
Crochet Triangle Christmas Trees are a charming way to bring handmade texture and classic holiday color to a mantel, shelf, or tabletop. This pattern creates three dimensional trees, each with a different decoration style: circle motifs, snowflakes, or swirls. The Buff and Soft White palette gives them a soft winter look, while beads, buttons, scallops, and bows add festive detail. Crocheters who enjoy small construction projects and seasonal home décor may also like this beginner-friendly crochet bear ornament as a coordinating holiday project.
Why You’ll Love This Crochet Project
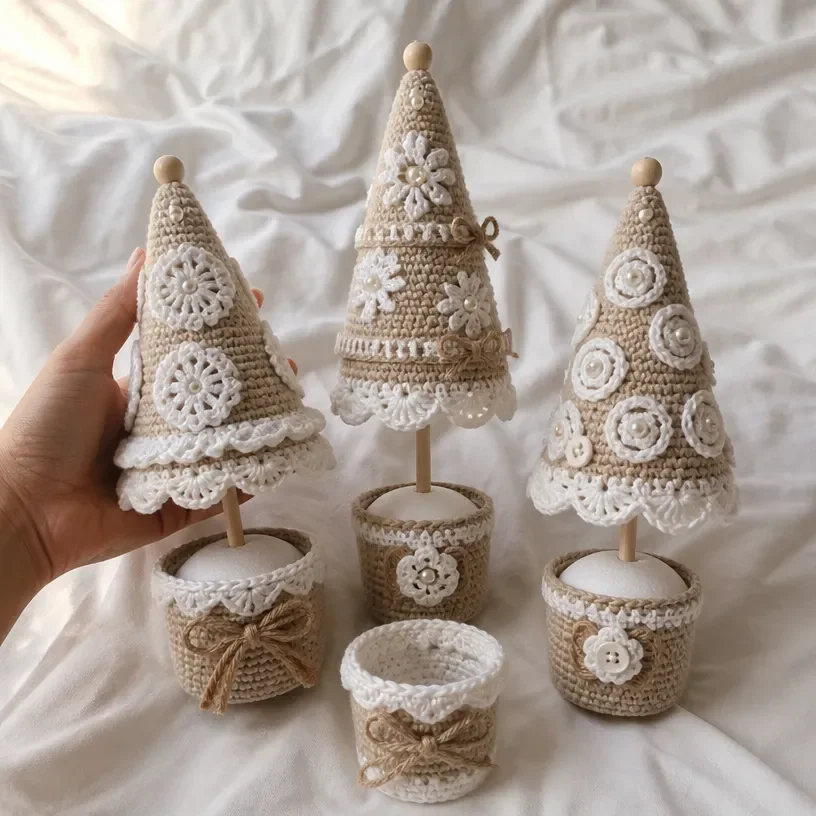
- Three coordinated designs: The trees share the same crocheted triangle and bucket construction, but each receives its own decorative treatment.
- Useful shaping practice: The triangle is formed with regular single crochet decreases, making the decreasing sequence easy to follow and count.
- A stable display piece: Each tree is lightly stuffed and mounted on a dowel inserted into a Styrofoam ball inside a small bucket.
- Handmade seasonal décor: Display the finished trees together as a holiday grouping or separately around your home.
- Creative finishing details: Beads, buttons, trims, snowflakes, swirls, and bows let you add texture without changing the core structure.
Crochet Mimi Tip: Make and decorate all three triangles before beginning the assembly. This keeps the sewing and adhesive work organized and helps you compare the placement of matching embellishments. You may also find Blooming Bouquet Crochet Blanket Pattern useful.
How This Crochet Project Comes Together
The complete set consists of three trees. Each tree uses two crocheted triangles worked in Color A, one crocheted skirt in Color B, and a bucket-and-dowel base. The triangles are sewn together, lightly stuffed with polyester fiberfill, and closed around the dowel opening.
Tree 1 is finished with circle motifs, scallop trims, pearl beads, and a bow. Tree 2 uses large and medium snowflakes, band trims, a flower, and bows. Tree 3 features large, medium, and small swirls, a curved trim, beads, and buttons.
The construction order is:
- Crochet two triangles for each tree.
- Crochet the skirt and the decorations for the selected tree.
- Sew the embellishments to the triangles.
- Sew the triangles together and lightly stuff the tree.
- Add the lower trim and leave the specified opening for the dowel.
- Glue the dowel into the tree and prepare the bucket.
- Insert the Styrofoam ball, attach the skirt, and ensure the tree stands straight.
The pattern uses US crochet terminology. Common abbreviations include ch for chain, sc for single crochet, dc for double crochet, sl st for slip stitch, sc2tog for single crochet two stitches together, and beg 3-dc Cl for beginning three-double-crochet cluster.
Materials You’ll Need
- RED HEART® Super Saver® 1 skein each color:
- A: 334 Buff
- B: 316 Soft White
- Susan Bates® Crochet Hook: 4 mm [US G-6]
- Yarn needle
- 24 ¼-inch (6 mm) pearl beads; quantity not specified, used for decoration
- Three ⅝-inch (15 mm) wood beads
- 12 ¼-½-inch (6-12 mm) white buttons; quantity not specified, used for decoration
- Three 15/16-inch (23 mm) diameter × 12-inch (30.5 cm) long dowels
- Three 3-inch (7.5 cm) tin buckets; samples by Oriental Trading Company
- Three 3-inch (7.5 cm) Styrofoam® balls
- Sewing needle and white thread
- Polyester fiberfill
- Craft glue
Color A forms the tree triangles, selected bows, bucket trims, and some bucket decorations. Color B is used for the skirts, most trims, motifs, snowflakes, flowers, and swirls. The dowels and Styrofoam balls provide the structure that allows the crocheted trees to stand in their buckets.
Step-by-Step Crochet Instructions
Special Technique
Join with sc: Use the join with sc instruction as defined in the approved pattern.
Tree Base Make 3
Triangle Make 2 for Each Tree
With A, ch 32.
Row 1 (right side): Sc in 2nd ch from hook and in each ch across, turn 31 sc.
Row 2: Ch 1, sc in each st, turn.
Row 3: Ch 1, sc2tog, sc in each st across to last 2 sts, sc2tog, turn 29 sc.
Rows 4 and 5: Repeat Row 2.
Row 6: Repeat Row 3 27 sc.
Rows 7–36: Repeat Rows 4–6 ten times 7 sc.
Rows 37–40: Repeat Rows 2 and 3 twice 3 sc.
Row 41: Ch 1, sc2tog, sc in last st, turn 2 sc.
Row 42: Ch 1, sc2tog 1 sc. Fasten off.
Skirt
With B, ch 7; join with slip st in first ch to form a ring.
Round 1 (right side): Ch 3, which counts as the first dc here and throughout; 15 dc in ring; join with slip st in top of beginning ch 16 dc.
Round 2: Ch 3, dc in next st, *ch 3, dc in next 2 dc; repeat from * around, ch 3; join with slip st in top of beginning ch 16 dc and 8 ch-3 spaces.
Round 3: Slip st in next st, 4 sc in each ch-3 space; join with slip st in first sc 32 sc. Fasten off.
Tree 1 Decorations
Circle Motif Make 2
With B, ch 7; join with slip st in first ch to form a ring.
Round 1 (right side): Ch 1, 12 sc in ring; join with slip st in first sc 12 sc.
Round 2: Ch 3, dc in next sc, *ch 3, dc in next 2 sc; repeat from * around, ch 3; join with slip st in top of beginning ch 12 dc and 6 ch-3 spaces.
Round 3: Slip st in next st, (slip st, beg 3-dc Cl, ch 4, 3-dc Cl) in first ch-3 space, [ch 4, 3-dc Cl] twice in each ch-3 space, ch 4; join with slip st in top of beginning Cl 12 Cls and 12 ch-4 spaces.
Round 4: Work [(2 sc, ch 3, 2 sc)] in each ch-4 space; join with slip st in first sc. Fasten off.
Scallop Trim #1
With B, ch 72.
Row 1 (right side): Sc in 2nd ch from hook, *skip next 2 ch, 5 dc in next ch; repeat from * across to last ch, sc in last ch. Fasten off.
Scallop Trim #2
With B, ch 63. Work the same as Scallop Trim #1.
Bucket Trim
With B, work an even number of ch as needed to fit around the top edge of the bucket.
Row 1: Dc in 2nd ch from hook and in each ch across, turn odd number of dc.
Row 2: Ch 3, skip next dc, sc in next st, *ch 3, skip next dc, sc in next dc; repeat from * across. Fasten off.
Bow
With 2 strands of A held together, work as many ch as needed to wrap around the bucket and tie a bow. Fasten off.
Tree 1 Assembly
Weave in ends.
- Sew a circle motif on each triangle.
- At the top of each triangle, sew 3 pearl beads in a vertical row.
- With right sides held together, sew triangle sides together. Turn the tree right side out and stuff lightly; do not overstuff.
- With sewing needle and thread, sew the short edges of Scallop Trim #1 together, then sew the trim to the bottom edge of the tree. Sew the short edges of Scallop Trim #2 together, place the trim on the tree, and sew to the nearest round.
- With sewing needle and thread, sew the bottom edges together, leaving a ½-inch (1.5 cm) opening in the center for the dowel.
- Apply glue to ⅔ of the dowel and insert it into the tree, leaving the remainder of the dowel for the bucket. Allow the glue to dry thoroughly throughout all assembly and finishing steps before handling.
- Apply glue to the outside of the bucket near the top edge and glue the bucket trim in place around it. Allow it to dry, then tie the bow around the trim. You may want to apply glue to an inconspicuous area of the knot to prevent it from unraveling and to the loops to prevent drooping.
Finishing Tree 1
Insert a Styrofoam ball into the bucket.
Apply glue around the ball where it meets the inside of the bucket and allow it to dry.
With a pin, mark the center of the ball.
Lightly mark 1½ inches (4 cm) from the bottom edge of the dowel and insert the dowel into the ball up to this mark.
Carefully remove the dowel and fill the hole with glue.
With the right side facing the tree, slide the skirt onto the dowel, then reinsert the dowel into the hole.
Ensure that the tree is standing straight, slide the skirt down to the ball, and allow the glue to dry thoroughly.
Tree 2 Decorations
Large Snowflake Make 2
With B, ch 6; join with slip st in first ch to form a ring.
Round 1 (right side): Ch 4, which counts as dc, ch 1; dc in ring, *ch 1, dc in ring; repeat from * 11 times, ch 1; join with slip st in 3rd ch of beginning ch-4 14 dc and 14 ch-1 spaces.
Round 2: Ch 1, sc in first ch-1 space, *ch 5, sc in next 2 ch-1 spaces, repeat from * 5 times, ch 5, sc in last ch-1 space; join with slip st in first sc 7 ch-5 spaces. Fasten off.
Medium Snowflake Make 2
With B, ch 6; join with slip st in first ch to form a ring.
Round 1 (right side): Ch 1, 12 sc in ring; join with slip st in first sc 12 sc.
Round 2: Ch 1, (sc, ch 5, sc) in same st as join, *sc in next sc, (sc, ch 5, sc) in next sc; repeat from * 4 times, sc in last sc; join with slip st in first sc 6 ch-5 spaces. Fasten off.
Lower Band Trim
With B, ch 7.
Row 1 (right side): Dc in 3rd ch from hook, *ch 1, skip next ch, dc in next ch; repeat from * once, turn 3 dc and 2 ch-1 spaces.
Row 2: Ch 1, sc in first dc, *ch 1, skip next dc, sc in next dc; repeat from * once, turn 3 sc and 2 ch-1 spaces.
Row 3: Ch 3, dc in first sc, *ch 1, skip next sc, dc in next sc; repeat from * once, turn 3 dc and 2 ch-1 spaces.
Repeat Rows 2 and 3 until the trim fits around the lower rounds of the tree. Fasten off.
Upper Band Trim
Work the same as the Lower Band Trim, repeating Rows 2 and 3 until the trim fits around the upper section of the tree.
Bow Make 2
With 2 strands of A held together, work as many ch as needed to weave in and out of each band and tie a bow. Fasten off.
Bucket Trim
With A, work as many ch as needed to fit around the outside of the bucket near the top edge plus 2 ch.
Row 1 (right side): Dc in 3rd ch from hook and in each ch across. Fasten off.
Flower
With B, ch 6; join with slip st in first ch to form a ring.
Round 1 (right side): Ch 1, 12 sc in ring; join with slip st in first sc 12 sc.
Round 2: Ch 1, sc in same st as join, *ch 5, sc in next 2 sc; repeat from * 4 times, ch 5, sc in last sc; join with slip st in first sc 6 ch-5 spaces. Fasten off.
Tree 2 Assembly
Weave in ends.
- Sew 1 medium and 1 large snowflake on each triangle. Do not sew through the outer ch-spaces of the large snowflake.
- Sew a pearl bead in the center of each snowflake. Sewing through the triangle, sew a bead on the 3rd ch of each ch-5 of the large snowflake, pulling outward slightly to create a point.
- Repeat Step 3 of Tree 1 Assembly.
- Sew the short ends of each band together to form a ring. Weave the appropriate bow through the upper and lower bands. Place the upper band on the tree.
- Repeat Steps 5 and 6 of Tree 1 Assembly.
- Apply glue around the outside of the bucket near the top edge and glue the bucket trim in place.
- Apply glue to the outside of the bucket near the top edge and glue the bucket trim in place.
- Sew a pearl bead in the center of the flower and glue the flower on the front of the trim.
Finishing Tree 2
See the instructions for Finishing Tree 1.
Tree 3 Decorations
Large Swirl Make 4
With B, ch 6; join with slip st in first ch to form a ring.
Round 1 (right side): Ch 5, which counts as dc, ch 2; dc in ring, *ch 2, dc in ring; repeat from * 5 times; join with slip st in 3rd ch of beginning ch 8 dc and 8 ch-2 spaces.
Round 2: Slip st in next ch, (sc, ch 3, sc) in each ch-2 space around, petal made; join with slip st in first sc 8 ch-3 spaces. Fasten off.
Medium Swirl Make 2
Work the same as Round 1 of Large Swirl. Fasten off.
Small Swirl Make 5
With B, ch 6; join with slip st in first ch to form a ring.
Round 1: *Ch 3, sc in ring; repeat from * 7 times; join with slip st in base of beginning ch 8 ch-3 spaces. Fasten off.
Curved Trim
With B, ch 3.
Row 1 (right side): Work 2 sc in 2nd ch from hook, *ch 3, 2 sc in 2nd ch from hook; repeat from * as needed to fit around the lower edge of the tree. Fasten off.
Bucket Trim
With A, ch 4.
Row 1 (right side): Sc in 2nd ch from hook, sc in next 2 ch, turn 3 sc.
Row 2: Ch 1, working in back loops only, sc in each st, turn.
Working an odd number of rows, repeat Row 2 until the trim fits around the top of the bucket. Fasten off.
Sew the short edges together.
Edging Round
With the right side of either edge facing, join B with sc at the seam, working in the ends of rows, ch 1, skip first row, sc in next row, *ch 1, skip next row, sc in next row; repeat from * around to last row, ch 1, skip last row; join with slip st in first sc. Fasten off.
Repeat on the opposite edge.
Tree 3 Assembly
Weave in ends.
- Sew 2 large swirls, 1 medium swirl, and 2 small swirls on each triangle. Sew beads and buttons as shown or where desired.
- Repeat Step 3 of Tree 1 Assembly.
- Sew the short ends of the curved band together to form a ring. Position the band at the lower edge of the tree and, with sewing needle and thread, sew it in place.
- Repeat Step 5 of Tree 1 Assembly.
- Repeat Step 6 of Tree 1 Assembly.
- Apply glue around the outside of the bucket near the top edge and glue the bucket trim in place.
- Sew a button to the center of the remaining small swirl. Glue the swirl to the front of the bucket trim.
Finishing Tree 3
See the instructions for Finishing Tree 1.
Ways to Display Your Finished Crochet
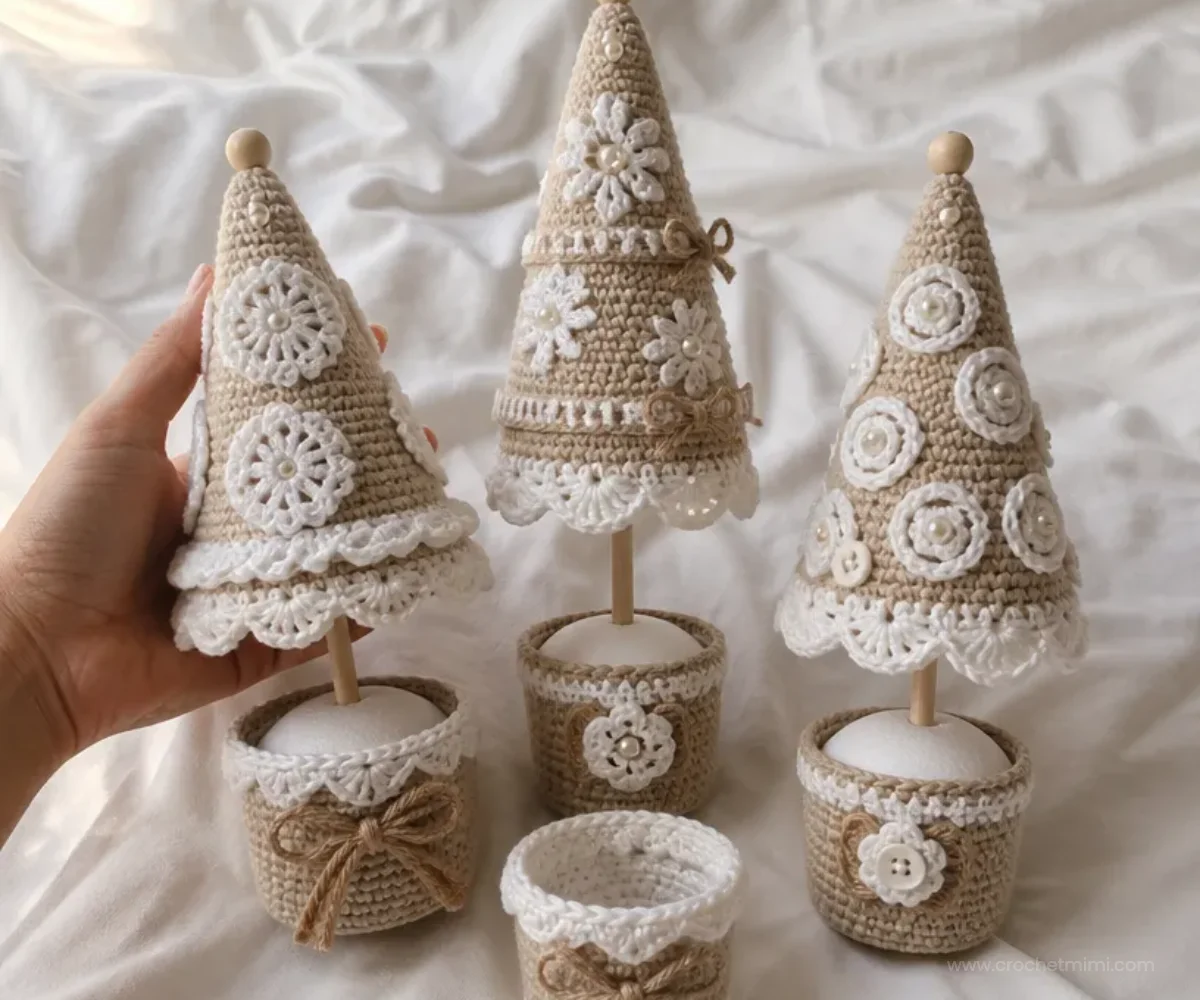
- Arrange all three trees together on a mantel, entry table, or holiday shelf.
- Place the trees at different heights using a tray, books, or small risers beneath the buckets.
- Use one tree as a festive centerpiece and place the other two on nearby side tables.
- Give a completed tree as a handmade seasonal gift, especially when paired with other crocheted holiday décor.
- Coordinate the display with natural greenery, white ornaments, wood accents, or metallic decorations.
- Combine the trees with other soft seasonal pieces, such as a crochet wreath-style arrangement when creating a broader handmade display.
Caring for Your Crochet Project
These trees contain beads, buttons, glued components, dowels, Styrofoam balls, and tin buckets, so they should be treated as decorative objects rather than washable crochet pieces.
- Dust the crocheted surfaces gently with a soft brush or use a low-suction vacuum attachment held slightly away from the fabric.
- Spot-clean carefully with a barely damp cloth, avoiding the beads, buttons, glued trims, and bucket.
- Do not soak, machine wash, or tumble dry the assembled trees.
- Keep the trees away from excessive heat, open flames, and strong direct sunlight.
- Store each tree upright or wrap it loosely in acid-free tissue so the trims and embellishments are not crushed.
- Check the glued dowel and bucket trims before displaying the trees each season, and allow any repaired glue to dry thoroughly before handling.
Tips for Better Results
- Count the triangle rows carefully. The triangle decreases at specific intervals, so mark Rows 3, 6, and each later repeat if you find it difficult to track the shaping.
- Keep the decrease edges consistent. Work both sc2tog decreases as written so the triangle narrows evenly toward the top.
- Avoid overstuffing. The pattern specifically calls for light stuffing. Too much fiberfill can distort the sewn sides and make the tree difficult to mount straight.
- Sew decorations before joining the triangles. This provides a flat surface and makes it easier to position motifs, snowflakes, and swirls evenly.
- Work the bucket trims to fit. The trims include length instructions based on the actual bucket, so check the fit around the bucket before fastening off or sewing the ends together.
- Respect the back-loop-only instruction. Tree 3’s Bucket Trim uses back-loop-only single crochet in Row 2; working through both loops changes the ribbed texture.
- Let glue dry between stages. The dowel, bucket trims, Styrofoam ball, skirt, and decorative pieces all depend on secure adhesive bonds.
- Use careful bead placement. For Tree 2, pull the beads on the large snowflake points outward slightly to create the intended dimensional shape.
For additional textured crochet inspiration, a beginner-friendly mandala doily pattern can provide useful practice with joined rounds, chain spaces, and decorative motifs.
Creative Ways to Customize Your Project
The approved instructions establish the construction, but the following are optional styling ideas:
- Keep the Buff and Soft White combination for a neutral winter display, or use another color pairing while understanding that a different yarn may affect the fabric, shaping, and amount required.
- Replace the placement of buttons or beads on Tree 3 to create a more scattered or symmetrical design.
- Coordinate the three tree designs by using the same bead or button color throughout.
- Use a seasonal palette such as deep green and cream for a traditional look, or pale blue and white for a frosty display.
- Arrange the buckets with matching ribbon or other compatible décor, making sure any added trim does not interfere with the dowel or the tree’s balance.
- Place the finished trees near other handmade botanical décor, such as crocheted red roses or a floral-themed blanket, for a mixed seasonal-and-floral display.
Changing the hook size or yarn weight is optional, but it can alter the triangle’s proportions, the fit of the trims, and the amount of stuffing or adhesive support needed. If you make such a change, check each fitted component against the bucket and assembled tree rather than relying on the original proportions.
Frequently Asked Questions
Is this project suitable for a beginner?
It is suitable for a crocheter who is comfortable with single crochet, double crochet, chains, slip stitches, joined rounds, decreases, sewing, and basic assembly. The triangle itself is straightforward, while the embellishments and structural finishing require patience.
How many trees does the pattern make?
The pattern makes three trees. Each tree uses two triangles, for a total of six triangles across the complete project.
What hook and yarn are specified?
Use RED HEART® Super Saver® in Color A, 334 Buff, and Color B, 316 Soft White, with a Susan Bates® Crochet Hook measuring 4 mm [US G-6].
Can the decorations be rearranged?
Tree 3 specifically allows beads and buttons to be sewn “as shown or where desired.” For the other trees, follow the stated decoration and assembly placement so the trims and motifs fit the intended design.
Why is the tree lightly stuffed?
Light stuffing supports the tree shape without over-expanding the sewn triangle sides. Overstuffing may distort the silhouette and make the bottom opening or dowel insertion more difficult.
How does each tree stand?
A dowel is glued into the tree and inserted into a Styrofoam ball inside a tin bucket. The skirt is then slid onto the dowel and positioned over the ball.
Can another yarn be used?
A substitute may be used, but it can change the fabric, size, texture, stitch definition, and yarn requirements. Check the triangle shape and fitted trims as you work.
How should the finished trees be cleaned?
Dust them gently and use careful spot cleaning only. Because the assembled trees include glued components, beads, buttons, dowels, Styrofoam balls, and buckets, do not soak or machine wash them.
Conclusion
This crochet triangle Christmas trees pattern combines simple single crochet shaping with decorative motifs and a sturdy tabletop construction. The three designs work beautifully as a coordinated holiday set, while the beads, buttons, trims, and colors leave room for personal styling. For another seasonal crochet option, explore the Red Heart triangle Christmas tree pattern or a crochet Christmas tree garland project.