
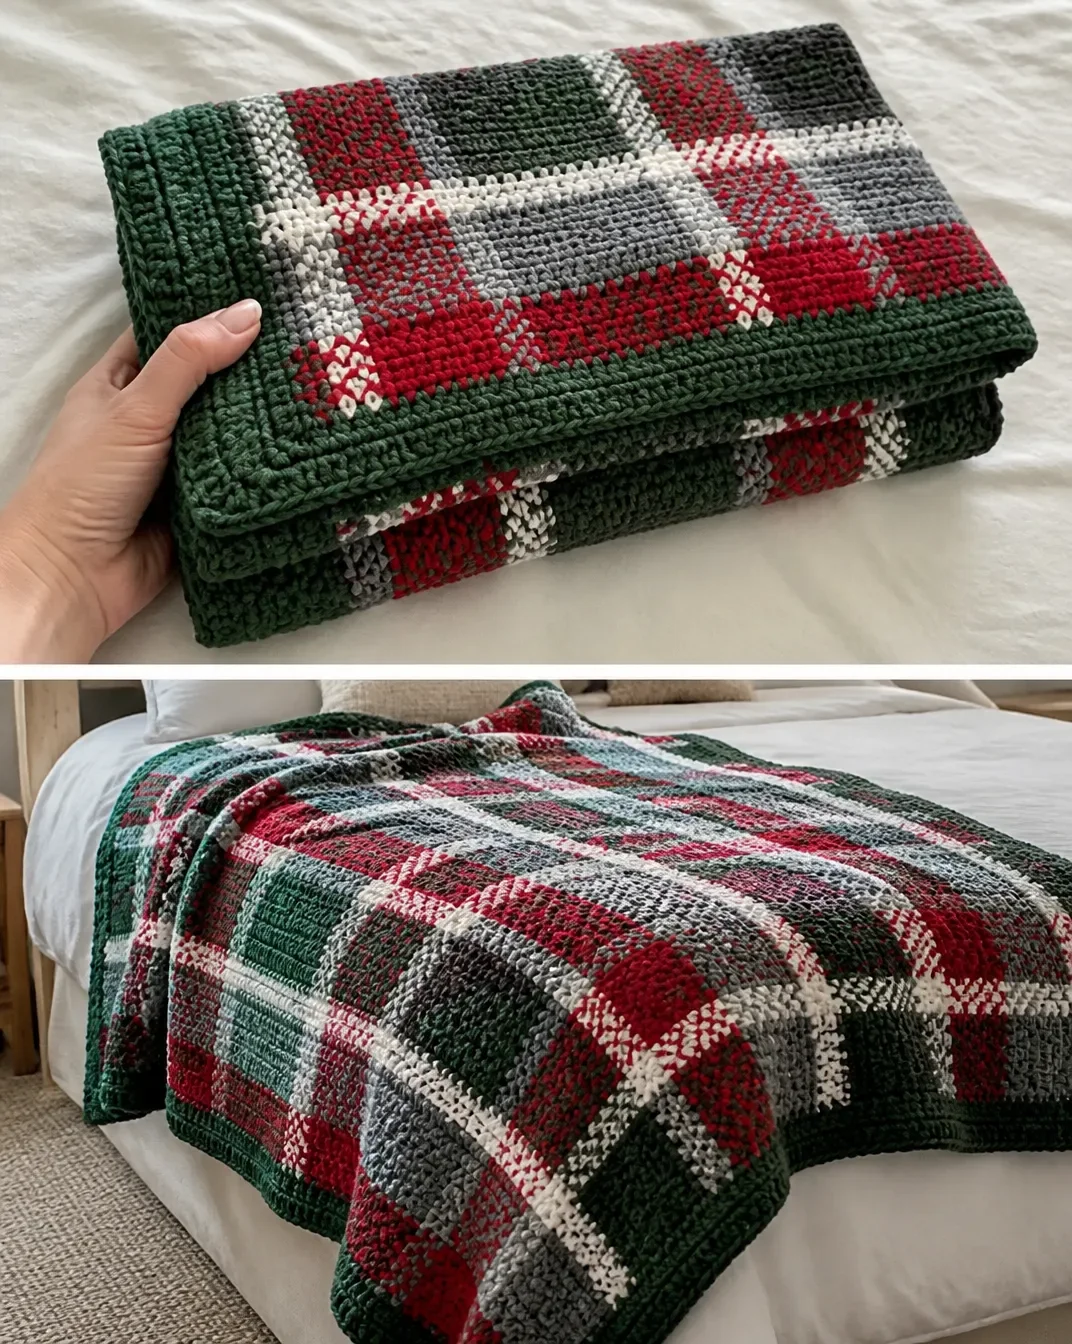
A cozy plaid throw is a practical way to bring classic Christmas color into a living room, reading nook, or guest bedroom. This Crochet Christmas Plaid Throw Pattern uses blocks of gray, white, Cardinal, and Ivy worked in half double crochet, followed by a textured ribbed border. The 40 x 60-inch design is suitable for crocheters who enjoy organized color changes and repeating rows. It also pairs beautifully with other handmade holiday pieces, such as a crochet bear Christmas ornament displayed nearby.
Why You’ll Love This Crochet Project
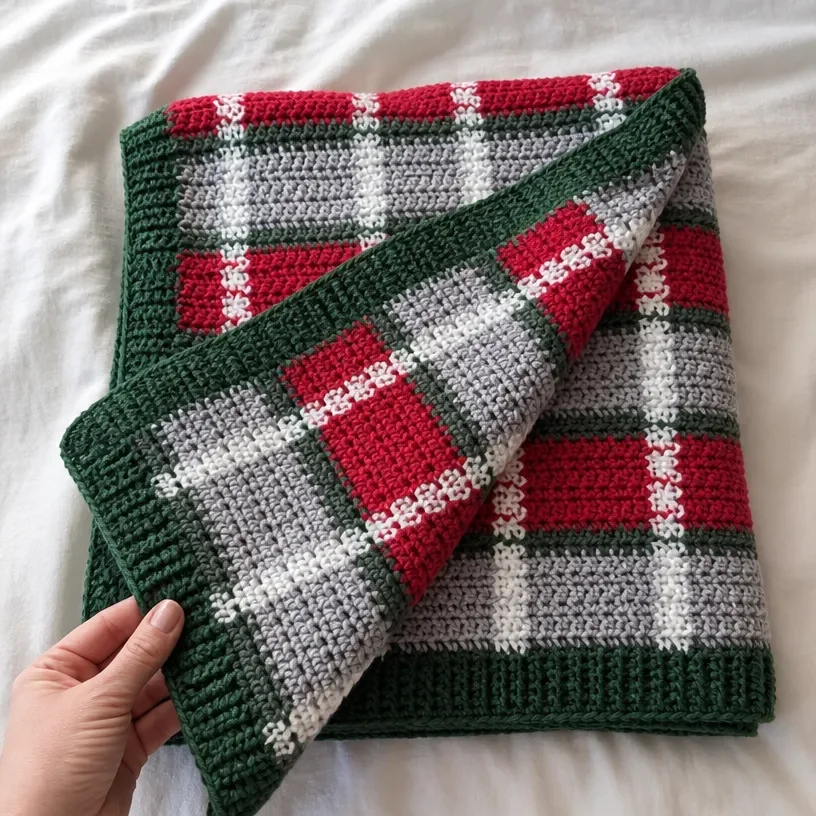
- Classic seasonal colorwork: Gray and white create a neutral foundation, while Cardinal and Ivy add traditional Christmas accents.
- Useful finished size: The 40 x 60 throw is large enough for lap comfort, couch decorating, or layering across the foot of a bed.
- Repeating structure: The plaid sequence is organized into short row groups, making it easier to follow the color arrangement.
- Textured border: Alternating front-post and back-post double crochet creates a ribbed edge that frames the blanket neatly.
- Gift-worthy handmade design: A finished throw can become a thoughtful holiday gift for a family member, friend, or new homeowner.
Crochet Mimi Tip: Keep each color section organized as you work. Labeling yarn tails or placing each skein in a separate project bag can make the repeated color changes much easier to manage. You may also find Blooming Bouquet Crochet Blanket Pattern useful.
Before You Start Crocheting
This pattern creates one rectangular throw measuring 40 x 60 inches. The blanket is worked from a foundation chain in Pale Gray Mix, followed by repeating blocks of half double crochet colorwork. The first color group uses Pale Gray Mix and White. The next uses Cardinal and Med Gray Mix, and a later repeat substitutes Ivy for Cardinal.
After the main body reaches the desired length, the blanket is finished on rows 1–4 instructions. A six-round Ivy border is then added around all four sides. The border begins with half double crochet, continues with double crochet, and uses alternating front-post and back-post double crochet for its ribbed texture.
Useful abbreviations include:
- CH: Chain
- HDC: Half double crochet
- DC: Double crochet
- SC: Single crochet
- SL ST: Slip stitch
- FPDC: Front-post double crochet
- BPDC: Back-post double crochet
Because this is a color-focused project, consistent tension and careful row tracking are especially helpful. For another seasonal handmade decoration using a coordinated palette, you may also enjoy this crochet flower wreath project as a separate display idea.
Materials You’ll Need
- Patons Canadiana, 100% acrylic, 100 g/3.5 oz, 187 meters/205 yards:
- 5 skeins Ivy
- 3 skeins White
- 3 skeins Cardinal
- 3 skeins Pale Gray Mix
- 3 skeins Med Gray Mix
- Crochet hook: Size H, 5mm
- Tapestry needle
- Scissors
The five colorways are used to create the plaid effect and the finishing border. The tapestry needle is needed for weaving in the many color-change tails, so keep it nearby throughout the project rather than waiting until the final row.
Complete Crochet Instructions
Foundation / Starting Chain
For size 40 x 60 throw:
- Chain 145 in Pale Gray Mix.
Main Body: Rows 1–4
Begin in the second chain from the hook on row 1. Refer to the graph in the lower right-hand to begin.
For rows 1–4, use this stitch sequence:
- 4 Pale Gray Mix, 4 White,
- *8 Pale Gray Mix, 4 White, 4 Pale Gray Mix, 4 White; repeat from * across to last 16 sts,
- then 8 Pale Gray Mix, 4 White, 4 Pale Gray Mix,
- CH 1 and turn.
At the end of row 4, change colors as follows:
Pull through with Cardinal on the last step of the last HDC of row 4, cut White and Pale Gray Mix, leave tails to weave in later.
When changing colors, complete the final pull-through with the new color exactly where instructed. Leave the tails long enough to secure and weave in later.
Main Body: Rows 5–13
Work the following stitch sequence:
4 Cardinal, 4 Med Gray Mix, *8 Cardinal, 4 Med Gray Mix, 4 Cardinal, 4 Med Gray Mix; repeat from * across to last 16 sts, then 8 Cardinal, 4 Med Gray Mix, 4 Cardinal.
- CH 1 and turn.
At the end of row 13, change colors as follows:
Pull through with Pale Gray Mix on the last step of the last HDC of row 13, cut Cardinal and Med Gray Mix, leave tails to weave in later.
Main Body: Rows 14–17
- Repeat rows 1–4.
Use the same Pale Gray Mix and White color sequence from rows 1–4, including the color change at the end of row 4.
Main Body: Rows 18–26
- Repeat rows 5–13, substituting Ivy for Cardinal.
The Med Gray Mix sections remain as written, while Ivy replaces Cardinal throughout this nine-row group. At the end of this group, follow the specified color-change instruction for the next section.
Length Adjustment and Ending
- Repeat graph until you have the length desired, end the blanket on rows 1–4 instructions.
- Tie off and weave in all the ends.
Ending on rows 1–4 keeps the color sequence consistent before the Ivy border is added. Before beginning the border, make sure the main body is secure and that all loose tails have been woven in.
Ribbed Border: Round 1
Work with Ivy.
With Ivy, pull up a loop in upper left hand corner.
- CH 1.
- HDC into same st as join.
- Work 3 HDC every other row on sides of blanket, 3 HDC in each corner, HDC into each stitch across top and bottom.
- Work remaining 2 HDC into same space as join to finish the starting corner.
- Join with a SL ST to the first HDC, CH 1 and turn.
When working along the sides, space the 3 HDC every other row as directed. The corner groups help the border turn smoothly around the rectangle.
Ribbed Border: Round 2
- DC into each HDC, [DC, CH 2, DC] into the second HDC of each corner.
- Join with a SL ST to the first DC of the round.
- CH 1 and turn.
The chain-2 spaces establish the corner points used by the following rounds.
Ribbed Border: Round 3
- Alternate FPDC and BPDC around each DC.
- [DC, CH 2, DC] around each CH 2 space of each corner.
- Join with a SL ST to the first FPDC of the round.
- CH 1 and turn.
Keep the post stitches alternating around the round to create the ribbed texture.
Ribbed Border: Rounds 4 and 5
- Repeat round 3.
Continue working the corner increase group around each CH 2 space while maintaining the alternating FPDC and BPDC pattern around each DC.
Ribbed Border: Round 6
- SC into each DC, SC around CH 2 space of each corner.
- Join with a SL ST to the first SC of the round, tie off and weave in all the ends.
Assembly and Finishing
After completing the main blanket:
- Tie off and weave in all the ends.
After completing round 6 of the border:
- Tie off and weave in all the ends.
A neat finish depends on securing every color-change tail carefully. Weave each end through nearby stitches, trim only after it is secure, and gently smooth the border so the corners lie flat.
Ways to Display Your Finished Crochet
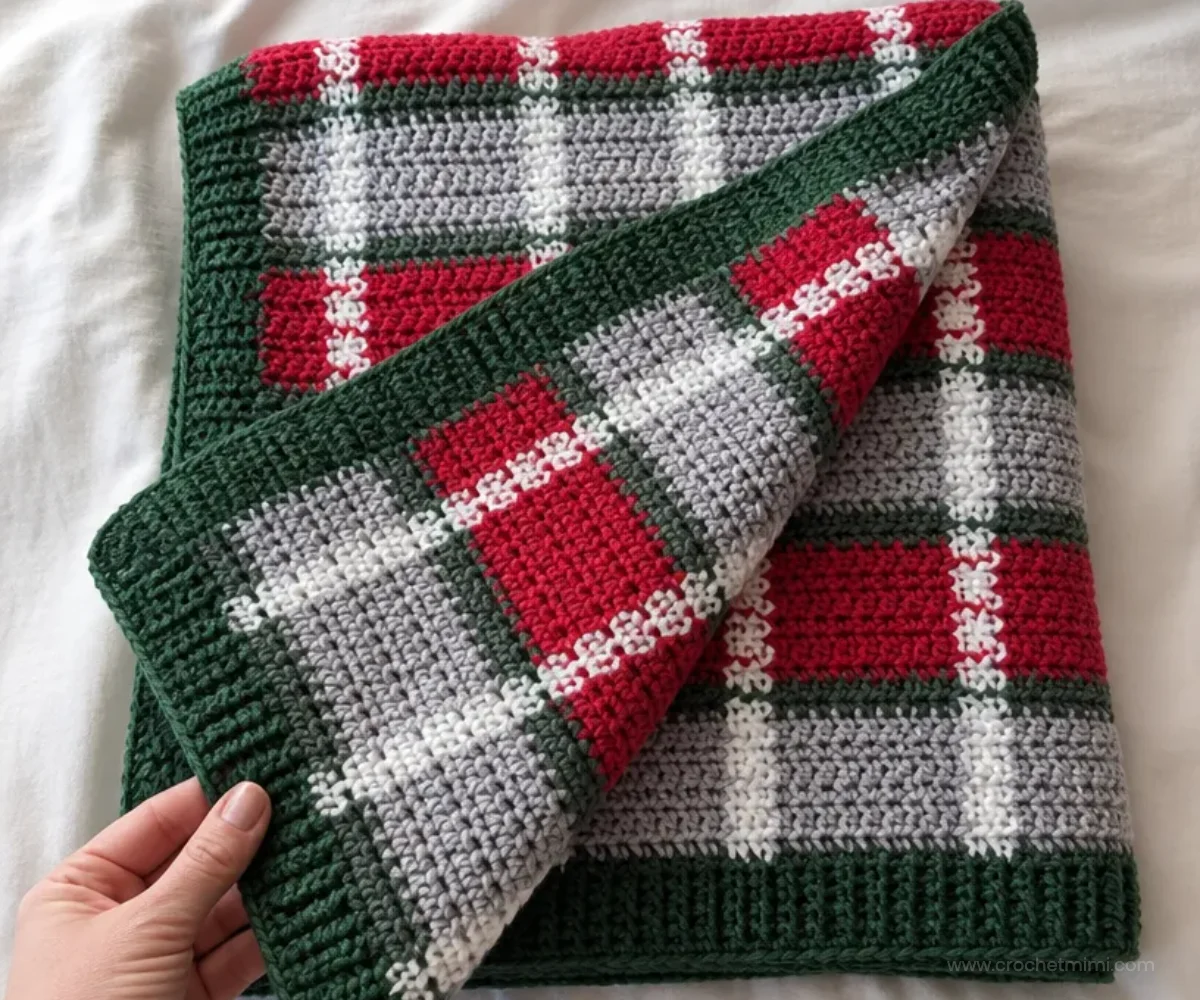
- Drape it over a sofa arm: Let the plaid pattern show while keeping the throw easy to reach on cold evenings.
- Fold it across the foot of a bed: The rectangular shape works well as a seasonal bed accent.
- Use it in a reading nook: Pair it with a neutral chair and a small basket for a comfortable holiday corner.
- Give it as a Christmas gift: Fold the throw with a simple ribbon or place it in a reusable fabric basket.
- Create a coordinated handmade display: Place the blanket near other crochet decorations, such as red floral pieces or festive ornaments. A beginner-friendly crochet red rose pattern can inspire a separate accent arrangement in a vase or basket.
- Layer it with neutral textiles: Gray, cream, and natural wood tones will emphasize the Cardinal and Ivy without making the room feel overly busy.
Caring for and Storing Your Crochet
Patons Canadiana is acrylic, and the finished throw should be cared for according to the yarn manufacturer’s instructions. Avoid excessive heat, which can affect acrylic fibers and flatten the raised border texture.
For routine care:
- Shake the throw gently outdoors or use a soft brush to remove loose dust.
- Spot-clean small marks carefully rather than rubbing aggressively.
- Allow any damp area to dry completely before folding.
- Store the blanket clean and fully dry in a breathable container.
- Avoid placing heavy objects on the ribbed border for long periods.
- Fold the throw loosely so the post-stitch edging does not become permanently compressed.
If the blanket needs more extensive cleaning, consult the care information supplied with the yarn before washing or drying it.
Helpful Crochet Tips
- Track each row group. Mark rows 1–4, 5–13, 14–17, and 18–26 on paper so you always know which color sequence comes next.
- Count the color blocks. The repeated sections contain groups of 4 and 8 stitches. Checking these blocks regularly can help catch mistakes before several rows are completed.
- Change colors on the final pull-through. Follow the pattern’s color-change wording at the end of row 4 and row 13 so the next color begins cleanly.
- Leave usable tails. Do not cut color-change ends too short; the tapestry needle needs enough yarn to weave them securely.
- Keep the foundation chain relaxed. A tight chain can pull the lower edge inward and make the blanket less rectangular.
- Watch the side border spacing. On round 1, work 3 HDC every other row along the sides as directed. Uneven spacing can cause the edge to ripple or pull.
- Mark the corner CH 2 spaces. A stitch marker can make the corner locations easier to identify during rounds 3–6.
- Maintain the FPDC/BPDC rhythm. The ribbing depends on alternating front-post and back-post stitches around each DC.
- Finish ends before blocking or styling. Securing the tails first keeps the colorwork stable and prevents loose ends from catching on furniture or clothing.
- Check the corners after each border round. The [DC, CH 2, DC] groups should remain centered around the corners so the throw stays flat.
Creative Ways to Customize Your Project
The approved pattern uses a traditional Christmas palette, but the repeating structure also makes optional color changes straightforward.
- Try a softer winter palette: Replace the bright seasonal accents with pale blue, cream, and silver-gray while keeping the same row structure.
- Use a modern holiday palette: Black, white, deep green, and cranberry can create a sharper contemporary look.
- Make a neutral version: Work the plaid in several gray and white shades, then use Ivy only for the ribbed border.
- Coordinate with floral decor: A small arrangement inspired by a mandala crochet doily design can add a decorative layer beneath a folded throw on a side table.
- Adjust the length: The pattern specifically allows you to repeat the graph until you have the length desired, but end the blanket on rows 1–4 instructions.
- Change yarn carefully: A different yarn or hook size may change the tension, finished dimensions, texture, and total yarn requirements. Make any substitution optional and expect to reassess the size before beginning.
Do not alter the approved row or border instructions unless you are intentionally creating a personal variation.
Frequently Asked Questions
Is this crochet Christmas plaid throw beginner-friendly?
The repeating color blocks and half double crochet construction can be approachable for a newer crocheter who is comfortable with basic stitches, turning chains, and color changes. The ribbed border adds front-post and back-post double crochet practice.
What size is the finished throw?
The pattern is written for a 40 x 60 throw.
What hook size does the pattern use?
Use a Size H, 5mm crochet hook.
How many skeins of Ivy are needed?
The materials list calls for 5 skeins of Ivy. The pattern also uses 3 skeins each of White, Cardinal, Pale Gray Mix, and Med Gray Mix.
Can I change the plaid colors?
Yes, color changes are an optional variation. Keep in mind that different colors or yarns can affect the appearance, texture, dimensions, and amount of yarn needed.
When should I add the border?
Complete the main body first, repeat the graph until you have the desired length, end on rows 1–4 instructions, tie off, and weave in all the ends. Then add the six-round Ivy border.
How do I keep the border corners neat?
Work the specified corner groups carefully: round 2 uses [DC, CH 2, DC] in the second HDC of each corner, and later rounds use [DC, CH 2, DC] around each CH 2 corner space.
Can I make the blanket longer?
Yes. The pattern says to repeat the graph until you have the length desired, but the blanket should end on rows 1–4 instructions before the border is started.
How should I store the finished throw?
Store it clean and dry in a breathable container, away from excessive heat and heavy compression. Fold it loosely to help preserve the textured border.
Conclusion
This Crochet Christmas Plaid Throw Pattern combines organized color changes with a practical 40 x 60-inch size and a textured Ivy border. It can be displayed on furniture, used for cozy evenings, or wrapped as a handmade holiday gift. For additional pattern inspiration, compare the Crochet Christmas Plaid Throw from Daisy Farm Crafts with the free Patons Christmas plaid throw pattern before choosing your preferred approach.