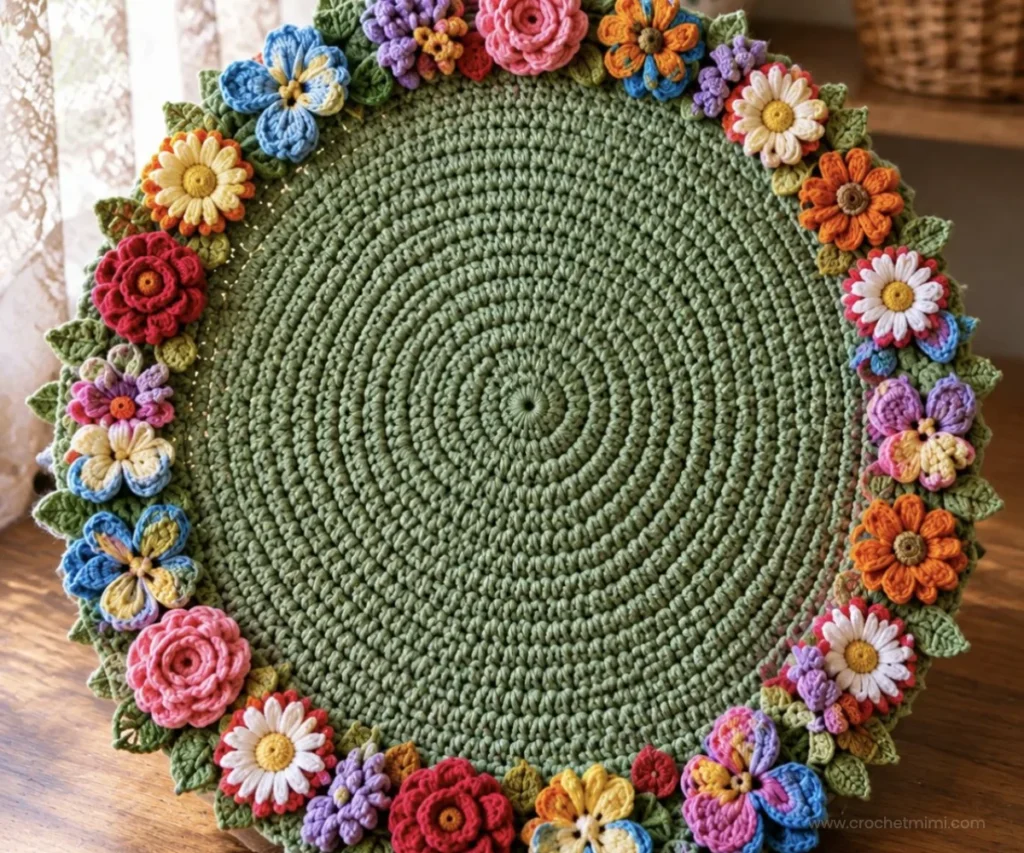
A round blanket surrounded by colorful crocheted flowers makes the Crochet Blooming Bouquet Blanket Pattern both a cozy home accent and a cheerful botanical display. The center grows with simple half double crochet increases, while roses, wisteria, pansies, carnations, daisies, and leaves create a dimensional floral border. It is a rewarding project for crocheters who enjoy repetitive circular work and detailed motifs, especially if you also like making coordinated pieces such as this crochet daisy bouquet tutorial. Use the finished blanket as a bed accent, lap blanket, nursery decoration, or handmade gift.
Why You’ll Love This Crochet Project
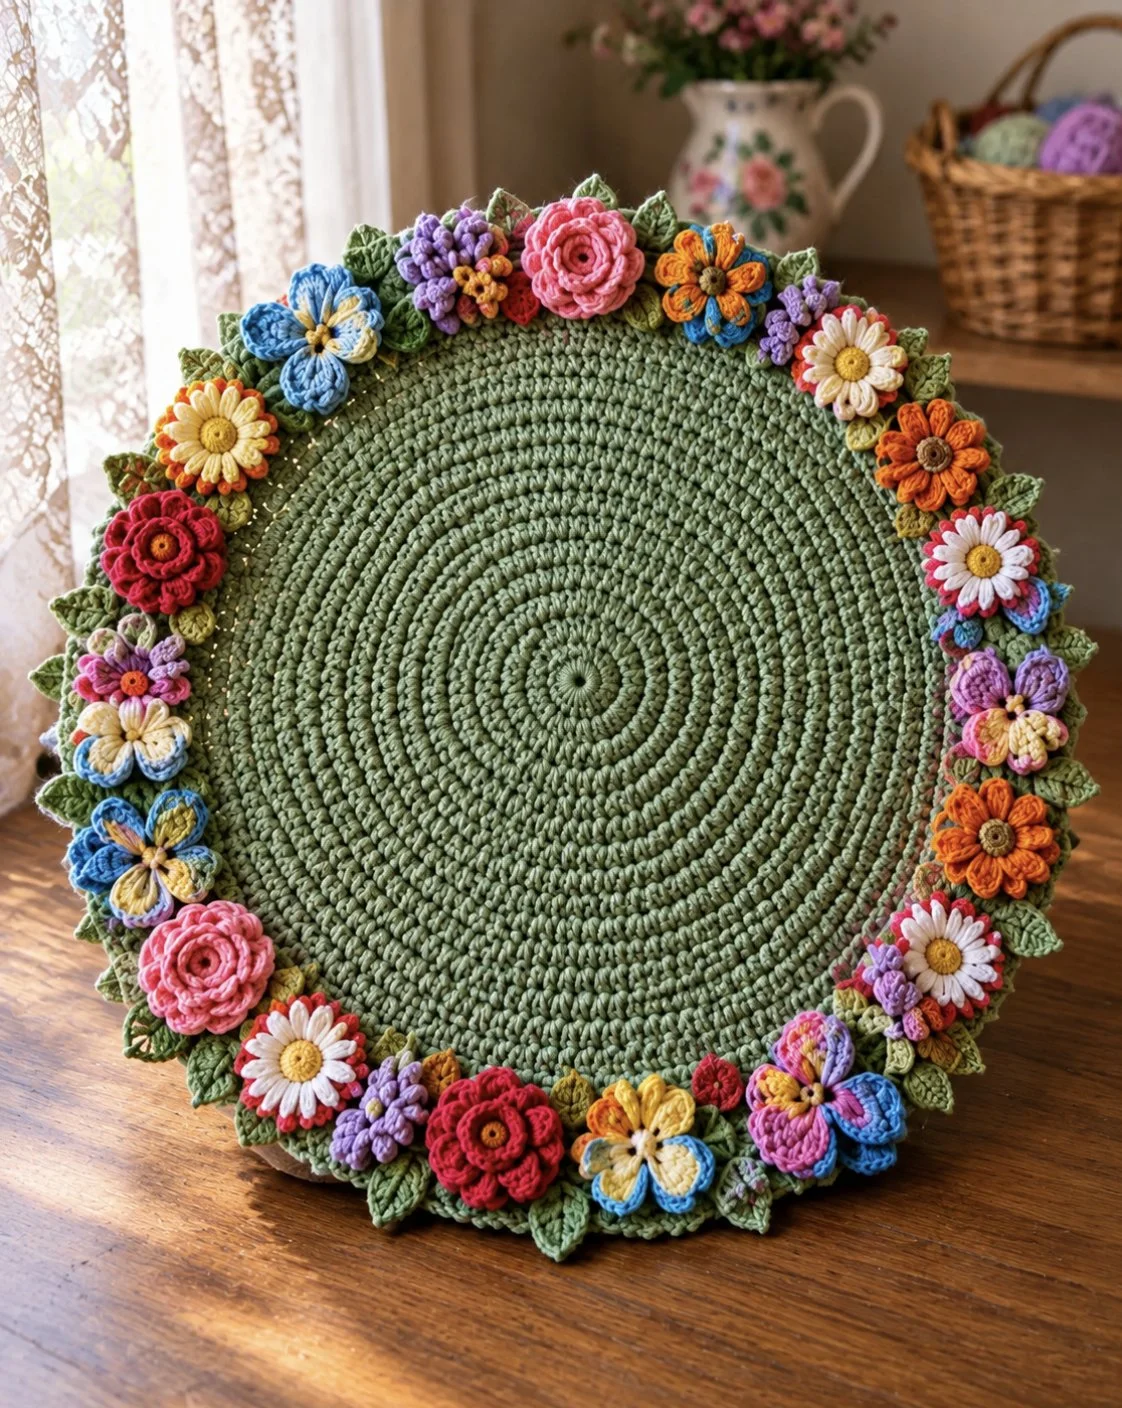
- A distinctive floral finish: The blanket combines several flower shapes and two types of leaves, giving the outer edge the look of a blooming garden.
- Excellent stitch practice: The blanket center reinforces half double crochet increases, while the motifs introduce double crochet, treble crochet, picots, chain spaces, and working behind previous rounds.
- A meaningful handmade gift: The 48-inch circular blanket is suitable for gifting, displaying over a chair, or using as a decorative lap blanket.
- Colorful but coordinated: The supplied palette includes warm reds, coral, yellow, orange, pinks, purples, blues, and greens.
- Flexible project pacing: You can complete the blanket center and motifs separately, then assemble everything after all components are finished.
Crochet Mimi Tip: Keep each flower type in its own labeled bag or container. This makes the final assembly much easier and prevents small motifs from being misplaced.
How This Crochet Project Comes Together
The project begins with a circular blanket worked in Frosty Green MC. The center is made in continuous rounds: every round increases by 10 half double crochets, allowing the fabric to expand evenly. The blanket continues until the 420-stitch round is complete and measures approximately 48 inches (122 cm) in diameter.
The floral border includes:
- 14 roses total
- 9 wisteria motifs
- 13 pansies total
- 3 carnations
- 10 daisies total
- 18 large leaves
- 18 small leaves
The motifs are sewn to the right side of the blanket and spaced evenly around the outer edge. The pattern uses U.S. crochet terminology.
Useful abbreviations include:
- ch: chain
- sc: single crochet
- hdc: half double crochet
- dc: double crochet
- tr: treble crochet
- sl st: slip stitch
- RS: right side
- PM: place marker
- tog: together
Before beginning, sort the colors according to their letter labels. If you enjoy building a coordinated floral collection, the color placement can also complement a beginner-friendly crochet pansy bouquet.
Materials You’ll Need
Yarn
Use Red Heart® Super Saver™ (7 oz/198 g; 364 yds/333 m):
- Main Color (MC) Frosty Green (661): 2 balls or 674 yds/616 m
- Contrast A Cherry Red: 1 ball or 93 yds/85 m
- Contrast B Saffron: 1 ball or 39 yds/36 m
- Contrast C Soft White: 1 ball or 49 yds/45 m
- Contrast D Pumpkin: 1 ball or 59 yds/54 m
- Contrast E Lavender: 1 ball or 82 yds/75 m
- Contrast F Pale Yellow: 1 ball or 68 yds/63 m
- Contrast G Coral: 1 ball or 49 yds/45 m
- Contrast H Baby Pink: 1 ball or 93 yds/85 m
- Contrast I Pale Plum: 1 ball or 68 yds/63 m
- Contrast J Light Blue: 1 ball or 40 yds/37 m
- Contrast K Light Periwinkle: 1 ball or 47 yds/43 m
- Contrast L Light Sage: 1 ball or 39 yds/36 m
Also included in the supplied materials:
- Red Heart® Super Saver® Super Craft Kit™ – 1 kit
Kit includes 12 balls (1.7 oz/50 g each; 21 oz/600 g total, 93 yds/85 m each; 1116 yds/1020 m total) - Red Heart® Super Saver® Super Craft Kit Pastels™ – 1 kit
Kit includes 12 balls (1.7 oz/50 g each; 21 oz/600 g total, 93 yds/85 m each; 1116 yds/1020 m total)
Tools
- Size U.S. I/9 (5.5 mm) Susan Bates® stitch markers
- Susan Bates® yarn needle
- Susan Bates® Silvalume® crochet hook, or size needed to obtain gauge
Step-by-Step Crochet Instructions
Blanket
With MC, ch 3.
- 1st rnd: (RS). 10 hdc in 3rd ch from hook. Do not join. PM for beg of rnd. 10 hdc.
- 2nd rnd: 2 hdc in each st around. Move marker. 20 hdc.
- 3rd rnd: *1 hdc in next hdc. 2 hdc in next hdc. Rep from * around. 30 hdc.
- 4th rnd: *1 hdc in next hdc. 2 hdc in next hdc. 1 hdc in next hdc. Rep from * around. 40 hdc.
- 5th rnd: *2 hdc in next hdc. 1 hdc in each of next 3 hdc. Rep from * around. 50 hdc.
- 6th rnd: *1 hdc in each of next 2 hdc. 2 hdc in next hdc. 1 hdc in each of next 2 hdc. Rep from * around. 60 hdc.
- 7th rnd: *1 hdc in each of next 5 hdc. 2 hdc in next hdc. Rep from * around. 70 hdc.
- 8th rnd: *1 hdc in each of next 3 hdc. 2 hdc in next hdc. 1 hdc in each of next 3 hdc. Rep from * around. 80 hdc.
- 9th rnd: *2 hdc in next hdc. 1 hdc in each of next 7 hdc. Rep from * around. 90 hdc.
- 10th rnd: *1 hdc in each of next 4 hdc. 2 hdc in next hdc. 1 hdc in each of next 4 hdc. Rep from * around. 100 hdc.
- 11th rnd: *1 hdc in each of next 9 hdc. 2 hdc in next hdc. Rep from * around. 110 hdc.
- 12th rnd: *1 hdc in each of next 5 hdc. 2 hdc in next hdc. 1 hdc in each of next 5 hdc. Rep from * around. 120 hdc.
- 13th rnd: *2 hdc in next hdc. 1 hdc in each of next 11 hdc. Rep from * around. 130 hdc.
- 14th rnd: *1 hdc in each of next 6 hdc. 2 hdc in next hdc. 1 hdc in each of next 6 hdc. Rep from * around. 140 hdc.
- 15th rnd: *1 hdc in each of next 13 hdc. 2 hdc in next hdc. Rep from * around. 150 hdc.
- 16th rnd: *1 hdc in each of next 7 hdc. 2 hdc in next hdc. 1 hdc in each of next 7 hdc. Rep from * around. 160 hdc.
- 17th rnd: *2 hdc in next hdc. 1 hdc in each of next 15 hdc. Rep from * around. 170 hdc.
- 18th rnd: *1 hdc in each of next 8 hdc. 2 hdc in next hdc. 1 hdc in each of next 8 hdc. Rep from * around. 180 hdc.
Continue in the same manner, increasing 10 hdc every rnd as established until the rnd “*1 hdc in each of next 20 hdc. 2 hdc in next hdc. 1 hdc in each of next 20 hdc. Rep from * around. 420 hdc” has been worked.
Blanket measures approx 48″ [122 cm] diameter.
Final row: 1 sc in each of next 2 hdc. Sl st in next hdc. Fasten off.
Rose
Rose (make 7 each with A and H).
Ch 27.
- 1st row: (RS). 1 dc in 4th ch from hook. 1 dc in each ch to last ch. 1 hdc in last ch. Turn. 25 sts.
- 2nd row: Ch 3 (counts as dc). *3 dc in each of next 3 dc. Sl st in next dc. Rep from * to end of row. Fasten off.
Coil strip and sew through layers to secure to form Rose.
Wisteria
Wisteria (make 5 with E and 4 with I).
Ch 4. Join with sl st in first ch to form a ring.
- 1st rnd: Ch 1. 7 sc into ring. Join with sl st to first sc.
- 2nd rnd: Ch 1. 1 sc in first sc. Ch 10. 3 sc in 2nd ch from hook. 3 sc in each of next 8 ch. *1 sc in next sc. Ch 10. 3 sc in 2nd ch from hook. 3 sc in each of next 8 ch. Rep from * 5 times more. Join with sl st to first sc. Fasten off.
Pansy
Make 6 with F as Color 1 and J as Color 2.
Make 7 with B as Color 1 and K as Color 2.
With Color 1, ch 4. Join with sl st to form a ring.
- 1st rnd: Ch 1. (2 sc in ring. Ch 2) twice. (2 sc in ring. Ch 5) 3 times. Join with sl st to first sc. Break Color 1.
- 2nd rnd: Join Color 2 with sl st to first ch-2 sp. Ch 2. (2 hdc. Ch 3. Sl st in first ch Picot made. 2 hdc) all in same ch-2 sp. Skip next sc. Sl st in next sc. (2 hdc. Picot. 2 hdc) all in next ch-2 sp.
*Skip next sc. Sl st in next sc. (1 hdc. 9 dc. 1 hdc) all in next ch-5 sp. Rep from * twice more.
Skip next sc. Sl st in next sc. Join with sl st to first hdc. Fasten off.
Carnation
Carnation (make 3).
With G, ch 5, leaving a long tail to use for gathering center of flower closed. Join with sl st in first ch to form a ring.
- 1st rnd: Ch 1. (2 sc. 2 hdc. 2 dc. 3 tr) all in ring. Join with sl st in first sc.
- 2nd rnd: Ch 1. Working behind 1st rnd, sl st in ring between first 2 sc. Ch 3. Sl st in ring between next 2 hdc. Ch 3. Sl st in ring between next 2 dc. Ch 3. Sl st in ring between next 2 tr. Ch 3. Sl st in ring after last tr. Ch 3. Join with sl st to first sc. 5 ch-3 loops.
- 3rd rnd: *Ch 1. (5 dc. Sl st) in next ch-3 loop. Rep from * around. Join with sl st in first ch 1. Join D. Break G. 5 petals.
- 4th rnd: Ch 1. Working behind last rnd, 1 sc in same sp as last sl st. *Ch 5. Sl st in sp between next 2 petals. Rep from * 3 times more. Ch 5. Join with sl st in first sc. 5 ch-5 loops.
- 5th rnd: *Ch 1. (2 dc. 4 tr. 2 dc. Sl st) all in next ch-5 loop. Rep from * around. Join with sl st in first ch 1. 5 petals.
- 6th rnd: Ch 1. Working behind last rnd, 1 sc in same sp as last sl st. *Ch 7. Sl st in sp between next 2 petals. Rep from * 3 times more. Ch 7. Join with sl st in first sc. 5 ch-7 loops.
- 7th rnd: *Ch 1. (3 dc. 5 tr. 3 dc. Sl st) all in next ch-7 loop. Rep from * around. Join with sl st in first ch 1. 5 petals. Fasten off.
Using the long tail from the beginning and a yarn needle, gather the center together tightly to close the center of the flower.
Daisy
Make 5 with B as Color 1 and C as Color 2.
Make 5 with B as Color 1 and F as Color 2.
With Color 1, ch 2.
- 1st rnd: 5 sc in 2nd ch from hook. Join.
- 2nd rnd: Ch 1. 2 sc in each sc around. Join. 10 sc. Join Color 2. Break Color 1.
- 3rd rnd: With Color 2, ch 1. 1 sc in first sc. *Ch 7. 1 hdc in 3rd ch from hook. 1 hdc in next ch. 1 dc in each of next 3 ch. Skip next sc of last rnd. 1 sc in next sc. Rep from * around, ending with sl st in first sc. 5 petals.
The 5 petals from the 3rd rnd will alternate with the 5 petals from the 4th rnd.
- 4th rnd: Ch 1. Working behind last rnd, 1 sc in next skipped sc from last rnd. *Ch 7. 1 hdc in 3rd ch from hook. 1 hdc in next ch. 1 dc in each of next 3 ch. Skip next sc. 1 sc in next skipped sc from last rnd. Rep from * around, ending with sl st in first sc. 5 petals. Fasten off.
Large Leaf
Large Leaf (make 18).
With MC, ch 8.
- 1st rnd: 1 sc in 2nd ch from hook. 1 hdc in each of next 2 ch. 1 dc in each of next 2 ch. 1 hdc in next ch. 5 hdc in last ch. Working into opposite side of ch, 1 hdc in next ch, 1 dc in each of next 2 ch. 1 hdc in each of next 2 ch. 1 sc in last ch. Join with sl st to first sc. Fasten off.
Small Leaf
Small Leaf (make 18).
With L, ch 5.
- 1st rnd: 1 sc in 2nd ch from hook. 1 hdc in next ch. 1 dc in next ch. (2 hdc. Ch 2. Sl st in 2nd ch from hook. 2 hdc) all in last ch. Working into opposite side of ch, work 1 dc in next ch. 1 hdc in next ch. 1 sc in last ch. Join with sl st to first sc. Fasten off.
Assembly and Finishing
With MC and yarn needle, sew Flower and Leaf Motifs to RS of Blanket, evenly spaced around outer edge as shown in photo.
For additional floral inspiration before arranging the border, compare the layered look with these beginner-friendly crochet red roses and this crochet daffodil bouquet pattern. They can help you visualize how different petal profiles and color groupings work together, without changing the approved blanket instructions.
Ways to Display Your Finished Crochet

- Layer it over a chair: Let part of the circular edge and its flowers remain visible for an inviting reading nook accent.
- Use it as a bed decoration: Place it at the foot of a bed so the floral border becomes the focal point.
- Create a seasonal centerpiece: Arrange the blanket beneath a low basket, vase, or decorative bowl, keeping the motifs visible around the perimeter.
- Give it as a handmade gift: The bright floral colors make it suitable for birthdays, housewarmings, showers, or spring celebrations.
- Style a nursery or craft room: The soft round shape and garden-inspired colors work well as a decorative textile.
- Pair it with crochet flowers: Coordinate the blanket with a separate daisy or rose arrangement for a larger handmade floral display.
Caring for Your Crochet Project
The blanket contains sewn-on floral motifs, so handle the outer edge gently. Dust it with a soft brush or use a vacuum with a low-suction upholstery attachment and a protective screen between the nozzle and the crochet.
For small marks, spot-clean carefully with a slightly damp cloth rather than rubbing the petals. Avoid soaking the blanket, especially if the motifs have been sewn on with multiple yarn tails that could loosen or distort during handling.
When reshaping the blanket, lay it flat and gently smooth the circular edge. Do not pull individual petals or leaves into place with force. Store the finished blanket clean and completely dry, folded loosely in a breathable container away from excessive heat, moisture, and direct sunlight.
Follow the yarn manufacturer’s care instructions for the Red Heart® Super Saver™ yarn.
Tips for Better Results
- Use a marker consistently: The blanket is worked without joining, so the marker identifies the beginning of every round and helps prevent losing your place.
- Track the stitch count: Each established blanket round increases by 10 hdc. Checking the count periodically helps catch a missed increase early.
- Keep the center flat: If the blanket edge begins to ripple, review the increase placement and your tension before continuing.
- Leave tails for construction: The carnation specifically requires a long beginning tail for gathering, and the other motifs need secure ends for sewing.
- Shape motifs before assembly: Arrange each rose, daisy, pansy, and carnation so the petals spread naturally before stitching it to the blanket.
- Space motifs gradually: Lay the blanket flat and distribute the flowers and leaves around the edge before sewing. This makes the border look balanced.
- Secure stitches discreetly: Use the yarn needle to weave or sew through stable sections of each motif rather than catching only the tips of petals.
- Use the right side consistently: The assembly instruction calls for sewing the motifs to the RS, so identify the right side of the blanket before attaching anything.
Creative Ways to Customize Your Project
The following ideas are optional styling variations and do not change the approved pattern instructions:
- Choose a seasonal palette: Keep the same motif quantities but use warm reds, oranges, and yellows for autumn styling, or soft pastels for spring.
- Create a monochromatic border: Group the flowers in related shades while keeping Frosty Green as MC for contrast.
- Emphasize one flower type: Arrange roses as the most visible feature and use the smaller wisteria and leaves as supporting accents.
- Use a neutral display setting: A cream, white, or natural wood background can make the colorful border stand out.
- Coordinate with a bouquet: A separate floral arrangement, such as this easy crochet daisy bouquet, can echo one or two blanket colors.
- Test substitutions carefully: Changing yarn or hook size may affect gauge, the blanket’s finished diameter, motif size, texture, and yarn requirements. Make a gauge swatch or sample motif before replacing the specified yarn.
Frequently Asked Questions
Is this blanket suitable for a beginner?
It includes approachable stitches, but the complete project also requires continuous circular increases, several color changes, shaped petals, and careful assembly. A beginner comfortable with basic crochet may prefer completing the blanket center first, then working through the motifs one type at a time.
What yarn is recommended?
The supplied pattern uses Red Heart® Super Saver™ in the listed main and contrast colors, along with the specified Red Heart® Super Saver® Super Craft Kit™ and Super Craft Kit Pastels™. Substituting yarn can affect size, texture, and yardage.
What hook size should I use?
Use a Susan Bates® Silvalume® crochet hook or the size needed to obtain gauge. The supplied tools also specify size U.S. I/9 (5.5 mm) Susan Bates® stitch markers.
How many flowers are attached to the blanket?
The pattern makes 14 roses, 9 wisteria motifs, 13 pansies, 3 carnations, and 10 daisies. It also includes 18 large leaves and 18 small leaves.
Can I change the flower colors?
Yes, color changes are an optional customization. Keep track of the color assignments for Color 1, Color 2, MC, and each contrast so you can preserve the intended construction while creating a different palette.
How are the motifs attached?
After all flowers and leaves are completed, use MC and a yarn needle to sew the Flower and Leaf Motifs to the right side of the blanket, evenly spaced around the outer edge.
How do I keep the blanket round?
Maintain the established increase sequence and use the stitch marker at the beginning of each unjoined round. Count the stitches when needed; the pattern increases by 10 hdc per round and ends with 420 hdc.
How should I store the finished blanket?
Store it clean and dry in a breathable container, away from excessive heat and direct sunlight. Fold it loosely so the attached petals and leaves are not crushed.
Conclusion
The Crochet Blooming Bouquet Blanket Pattern combines a simple expanding circular base with an abundant garden-inspired border. Roses, wisteria, pansies, carnations, daisies, and leaves make the finished piece especially suitable for display or gifting. For another floral blanket idea, explore the Red Heart blooming bouquet blanket pattern or a rose crochet flower blanket for inspiration.