
A trio of shimmering crochet hearts makes a sweet addition to a Christmas tree, gift package, mantel, or seasonal centerpiece. This Crochet Christmas Love Hearts Ornaments Pattern uses Red Heart Holiday yarn, simple single crochet shaping, and a small amount of stuffing to create dimensional decorations in red, white, and a two-color combination. The project is approachable for crocheters who are comfortable reading stitch instructions, and it pairs beautifully with other handmade ornaments such as this crochet bear Christmas ornament.
Why You’ll Love This Crochet Project
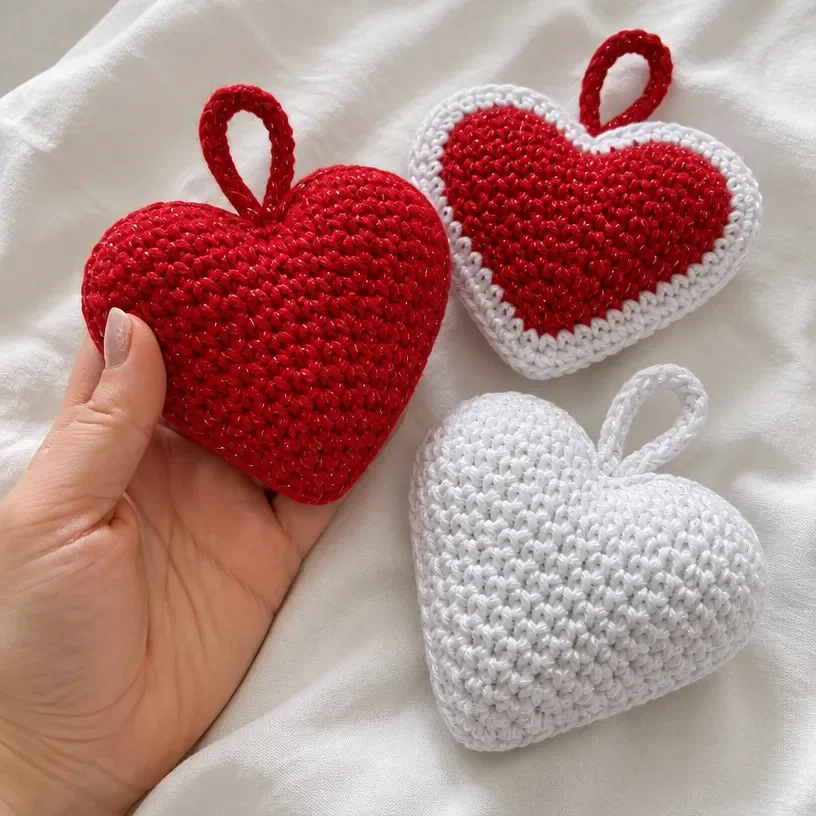
- It creates three coordinated ornaments. Heart 1 is made in Color A, Heart 2 in Color B, and Heart 3 combines both colors for a balanced set.
- The shaping is worked in single crochet. Increases form the rounded sides, while skipped stitches and the center chain space create the recognizable heart silhouette.
- The ornaments are dimensional. Two crocheted pieces are held together, lightly stuffed, and edged to make a softly padded decoration.
- The built-in hanging loop is practical. The chain-20 loop is formed during the joining round, so no separate cord or ribbon is required.
- The metallic yarn adds seasonal sparkle. Red Heart Holiday’s silver accents help the hearts catch the light on a tree or display.
Crochet Mimi Tip: Keep the three hearts together as a matching set, or use individual hearts as present toppers for handmade finishing touches.
Before You Start Crocheting
The project includes three stuffed heart ornaments. Each heart has a front and back panel worked through Round 4. Heart 1 uses Color A for both pieces, Heart 2 uses Color B for both pieces, and Heart 3 uses Color A for the front and Color B for the back.
The front and back are held wrong sides together. The final construction rounds are worked through both layers, with a chain-20 hanging loop added during Round 5. Stuffing is inserted before the opening is closed, and Round 6 is worked as slip stitches around the edge.
The pattern relies on single crochet, chain stitches, slip stitches, increases, skipped stitches, and working around both sides of a beginning chain. A split-ring stitch marker can help identify an important position while you work.
Helpful Abbreviations
- ch: chain
- sc: single crochet
- sl st: slip stitch
- st/sts: stitch/stitches
For another decorative crochet project that also rewards careful stitch counting, consider this beginner-friendly mandala doily pattern.
Materials You’ll Need
- RED HEART® Holiday yarn: 1 ball each
- 9040 Red/Silver (Color A)
- 140 White/Silver (Color B)
- Crochet hook: 5.5mm [US I-9]
- Split-ring stitch marker
- Small amount of stuffing
- Yarn needle
The split-ring stitch marker is useful for keeping track of a round or locating a working position. Use only a small amount of stuffing so the hearts remain softly padded without stretching the crocheted fabric.

Step-by-Step Crochet Instructions
Work the pattern in the order given below. The stitch counts at the end of Rounds 1–4 help confirm that the heart panels are developing correctly.
Heart 1
Front
With A, ch 15.
Round 1: 3 sc in 2nd ch from hook, sc in next 5 ch, skip next 2 ch, sc in next 5 ch, 3 sc in next ch; turn to work in unused loops of beginning ch, sc in next 5 ch, (sc, ch 2, sc) all in ch-2 space, sc in last 5 ch 28 sc
Round 2: [2 sc in next st] 3 times; sc in next 4 sts, skip next 2 sts, sc in next 4 sts, [2 sc in next st] 3 times; sc in next 6 sts, (sc, ch 2, sc) all in ch-2 space, sc in last 6 sts 34 sc
Round 3: [2 sc in next st, sc in next st] 3 times; sc in next 3 sts, skip next 2 sts, sc in next 4 sts, [2 sc in next st, sc in next st] 3 times; sc in next 6 sts, (sc, ch 2, sc) all in ch-2 space, sc in last 7 sts 40 sc
Round 4: sc in next st, [2 sc in next st, sc in next 2 sts] 3 times; sc in next st, skip next 2 sts, sc in next 3 sts, [2 sc in next st, sc in next 2 sts] 3 times; sc in next 7 sts, (sc, ch 2, sc) all in ch-2 space, sc in last 8 sts 48 sc
Fasten off.
Back and Joining
With A, repeat same as for Front; DO NOT fasten off at end of Round 4.
Hold Front and Back wrong sides together and work next round through both pieces.
Round 5: sc in next 14 sts, ch 20, slip st in 20th ch from the hook, sc in next 23 sts, 3 sc in ch-2 space, add stuffing, sc in last 9 sts.
Round 6: slip st in every sc around.
Fasten off, weave in ends.
Heart 2
With B, repeat as for Heart 1.
This means you will make the Front with Color B, then make the Back with Color B and complete the joining and stuffing rounds as written for Heart 1.
Heart 3
With A, repeat Heart 1 Front.
With B, repeat Heart 1 Back.
Hold the two pieces wrong sides together and complete the joining instructions from Heart 1, including the hanging loop, stuffing, and final slip-stitch round.
Finishing
For each heart:
After Round 6: Fasten off and weave in ends.
A neatly woven yarn tail helps keep the ornament edge tidy and prevents loose ends from showing when the heart is displayed. For more handmade seasonal inspiration, a crochet flower wreath can provide a contrasting spring-themed project using similarly decorative techniques.
Creative Ways to Use Your Project

- Hang the hearts on a Christmas tree. Arrange the red, white, and two-color versions at different heights for a coordinated display.
- Decorate wrapped gifts. Use one heart as a reusable present topper by threading the package ribbon through the hanging loop.
- Create a mantel arrangement. Hang the ornaments from greenery, a decorative branch, or a seasonal garland.
- Make a holiday centerpiece. Place the hearts in a shallow bowl or basket with other lightweight decorations.
- Give them as a small handmade set. Bundle all three hearts together with coordinating ribbon for a thoughtful seasonal gift.
- Use them as keepsake decorations. Add the year to a small paper tag tied near the loop if you want to remember when the set was made.
For a non-ornament project with a floral theme, these beginner-friendly crochet red roses could also be used to inspire handmade gift styling and decorative arrangements.
Caring for Your Crochet Project
Dust the ornaments gently with a soft cloth, lint roller, or the cool air of a hair dryer held at a distance. Avoid pulling on the hanging loops, especially when removing the hearts from a crowded tree.
For small marks, use careful spot cleaning rather than soaking the stuffed ornaments. Do not wring, twist, or expose them to excessive heat, as these actions may distort the heart shape or affect the stuffing. Allow any cleaned area to dry completely before storing.
Keep the ornaments in a dry storage container between seasons. Place tissue paper around them if needed to prevent snagging, and store them away from sharp hooks, heavy decorations, and direct heat.
Tips for Better Results
- Count the beginning chain carefully. The pattern starts with ch 15, and the first round is worked around both sides of that chain.
- Identify the unused loops clearly. After working across the beginning chain, turn to work in the unused loops as directed so the panel develops evenly.
- Watch the skipped stitches. The skipped stitches help form the indentation at the top of the heart; do not replace them with single crochet.
- Check each stitch count. The panel counts should be 28 sc after Round 1, 34 sc after Round 2, 40 sc after Round 3, and 48 sc after Round 4.
- Keep the panels aligned. Before Round 5, place the Front and Back wrong sides together and match the center chain spaces.
- Do not overstuff. Add a small amount of stuffing during Round 5, just before the final stitches close the heart.
- Form the loop accurately. Chain 20, then slip stitch in the 20th chain from the hook to create the hanging loop.
- Weave in ends securely. Because the ornament will be handled during decorating and storage, hide the yarn tails carefully inside the finished edge.
Color and Styling Variations
The approved pattern uses red, white, and a two-color combination, but the construction can be styled in several optional ways without changing the written instructions.
- Use the red-and-silver heart as the focal ornament and place the white-and-silver hearts around it for contrast.
- Display the three hearts together on a small tabletop tree or wreath.
- Give each color arrangement a different purpose, such as gift toppers, tree decorations, and keepsakes.
- Coordinate the ornaments with silver ribbon, white lights, or red wrapping paper.
- Place the hearts in a shallow white bowl to emphasize the metallic details in the yarn.
If you substitute a different yarn, remember that the yarn’s thickness, fiber, and texture may change the finished size, stuffing needs, drape, and stitch definition. A different hook size may also alter the dimensions and fabric density, so treat substitutions as optional and expect the result to vary.
A floral-themed holiday display could be expanded with a crocheted bouquet project such as this blooming bouquet crochet design, while keeping the heart ornaments as small seasonal accents.
Frequently Asked Questions
Is this project suitable for beginners?
It can suit beginners who are comfortable with single crochet, chain stitches, slip stitches, increases, and counting stitches. Working around both sides of a beginning chain and joining two pieces require careful attention.
What yarn and hook does the pattern use?
The pattern uses RED HEART® Holiday yarn in 9040 Red/Silver and 140 White/Silver, with 1 ball each. The specified hook is 5.5mm [US I-9].
How many ornaments does the pattern make?
The instructions make three hearts: Heart 1 in Color A, Heart 2 in Color B, and Heart 3 with a Color A Front and Color B Back.
How is Heart 3 different?
Heart 3 uses Color A for the Front and Color B for the Back. The two pieces are then held wrong sides together and completed using the same joining process as Heart 1.
When is the stuffing added?
Stuffing is added during Round 5, after working 3 sc in the ch-2 space and before working the last 9 sc.
How is the hanging loop made?
During Round 5, chain 20 and slip stitch in the 20th chain from the hook. This creates the loop used to hang the finished heart.
Can the colors be changed?
Yes, color changes are an optional styling choice. However, changing yarn may affect the fabric, dimensions, texture, stuffing requirements, and amount of yarn needed.
How should the ornaments be stored?
Store them dry in a container that protects them from crushing and snagging. Keep them away from excessive heat and avoid placing heavy items on top of the stuffed hearts.
Conclusion
These crochet Christmas love hearts ornaments combine simple single crochet shaping with festive metallic color to create a coordinated set of handmade decorations. Display them on a tree, attach them to gifts, or share them as seasonal keepsakes. For more heart-themed inspiration, explore this Red Heart Christmas love hearts pattern and this collection of free crochet heart patterns.