
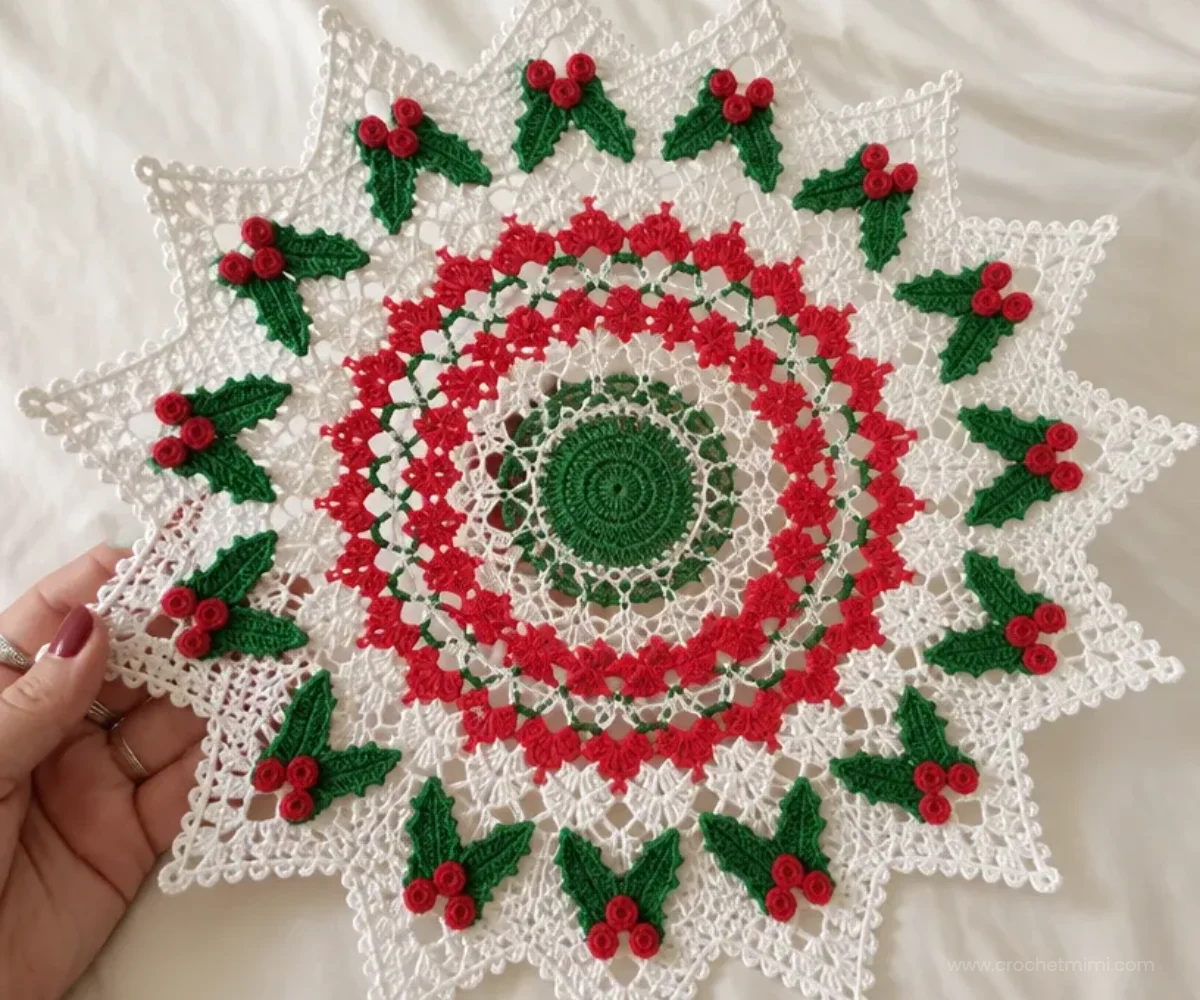
A classic holiday centerpiece, this Crochet Holly & Lace Doily Pattern combines an openwork lace circle with twelve pointed sections, paired green leaves, and red crocheted berries. The finished design is especially lovely beneath a candle, vase, or seasonal display, and it also makes a thoughtful handmade gift. Crocheters who enjoy detailed thread work will appreciate the changing rounds, cluster stitches, and decorative holly motif. For another circular project with a similarly delicate feel, compare this beginner-friendly mandala crochet doily.
Why You’ll Love This Crochet Project
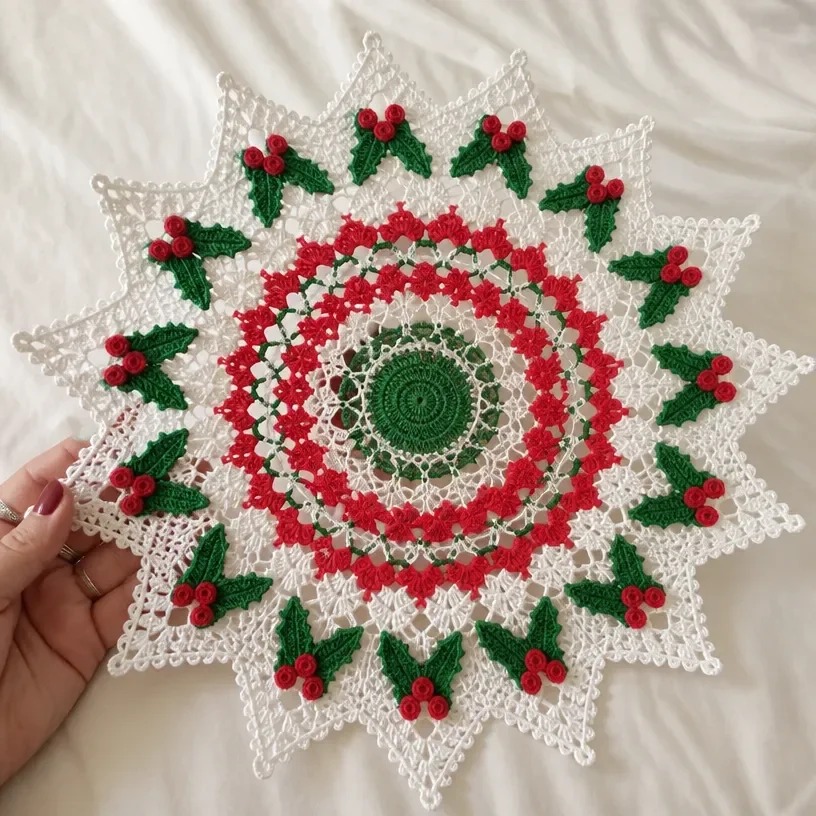
- A festive botanical design: Myrtle green leaves and victory red berries create a traditional holly appearance against the white lace edging.
- Detailed stitch practice: The pattern introduces shells, chain spaces, clusters, tall stitches, and structured lace shaping.
- A useful home accent: Display the completed doily on a dining table, sideboard, coffee table, or holiday serving area.
- A meaningful handmade gift: The finished piece can be given as a seasonal hostess gift or stored with holiday linens for yearly use.
- A satisfying multi-part project: The doily, leaves, and berries are made separately, giving you clear stages to complete and assemble.
Crochet Mimi Tip: Keep the three thread colors in separate project bags or containers so the white lace, green leaves, and red berries stay organized throughout the project. You may also find Crochet Halloween Necklace Pattern Tutorial useful.
What Makes This Pattern Special
The project has three main parts: one central lace doily, twelve sets of paired leaves, and twelve berries. The doily begins in Myrtle Green with a small ring and expands through rounds of single crochet, shells, chain spaces, clusters, and tall stitches. After Round 11, Color A creates the airy white outer section and twelve points. You may also find April Crochet Flowers Wreath Pattern Spring Decor useful.
Each point is worked separately over six rows. Once all twelve points are complete, the green leaf sets and red berries are made. The leaves are joined in pairs, berries are sewn to the leaves, and the finished leaf assemblies are attached between the doily points.
The construction uses US crochet terminology. Helpful abbreviations include:
- ch: chain
- sc: single crochet
- sl st: slip stitch
- dc: double crochet
- tr: treble crochet
- dtr: double treble crochet
- trtr: triple treble crochet
The pattern also uses clusters, in which several partially completed stitches are worked into a space or stitch and closed together as directed.
Materials You’ll Need
- AUNT LYDIA’S® Classic Crochet Thread, Size 10
- Color A: 1 ball White 001 or 453 Shaded Christmas A
- Color B: 1 ball 484 Myrtle Green B
- Color C: 1 ball 494 Victory Red C
- Steel crochet hook: 1.5 mm [US 7]
Color B forms the inner doily and leaves, Color A creates the lace points, and Color C makes the berries.
Complete Crochet Tutorial
Work carefully with the small steel hook and thread. The repeated chain spaces can look similar, so marking the right side and checking each round before joining will help.
Doily
Work in rounds. With B, ch 6; join with a slip st to form a ring.
Round 1
Ch 1, 12 sc in ring; join with a slip st to first sc – 12 sc.
Round 2
Ch 1, 2 sc in each sc around; join with slip st to first sc – 24 sc.
Round 3
Ch 1, 2 sc in joining slip st, sc in next 2 sc, [2 sc in next sc, sc in next 2 sc] 7 times; join with slip st to first sc – 32 sc.
Round 4
Ch 1, 2 sc in joining slip st, sc in next 3 sc, [2 sc in next sc, sc in next 3 sc] 7 times; join with slip st to first sc – 40 sc.
Round 5
Ch 3, tr in joining slip st, ch 3, (tr, dc) all in next sc, skip next sc, sc in next sc, skip next sc*, (dc, tr) all in next sc, ch 3, (tr, dc) all in next sc; repeat from * around, ending at **; join with slip st to top of ch-3 – 8 shells.
Round 6
Slip st in next tr, ch 1, *sc in next ch-3 space, ch 8; repeat from * around; join with slip st to first sc.
Round 7
Slip st in next 3 chs, ch 7, [dtr in next ch, ch 2] twice, dtr in next ch, ch 5, skip next 2 ch, skip next sc, skip next 2 ch*, [dtr in next ch, ch 2] 3 times; repeat from * around, ending at **; join with slip st to 5th ch of ch-7.
Round 8
Ch 1, sc in joining slip st, [2 sc in ch-2 space, sc in dtr] 3 times; 5 sc in ch-5 space*; sc in next dtr; repeat from * around, ending at **; join with slip st to first sc – 120 sc.
Rounds 9 and 10
Ch 1, sc in each sc around; join with slip st to first sc.
Round 11
Repeat Round 5 – 24 shells. Fasten off.
White Lace Rounds
Round 12
With right side facing, join A to first ch-3 space, ch 3; work 2-dc cluster in joining ch-3 space; ch 8, sc in next ch-3 space, ch 8*; 3-dc cluster in next ch-3 space; repeat from * around, ending at **; join with a slip st to top of 2-dc cluster – 12 clusters.
Round 13
Ch 2, 2-dc cluster in slip st; ch 3, (sc, ch 5, sc) all in next ch-8 space; ch 5, (sc, ch 5, sc) all in next ch-8 space; ch 3*, 3-dc cluster in top of next 3-dc cluster; repeat from * around, ending at **; join with a slip st to top of 2-dc cluster.
Round 14
Ch 2, 2-dc cluster in slip st; ch 5, skip ch-3 space, [sc in next ch-5 space, ch 5] 3 times*; 3-dc cluster in top on next 3-dc cluster; repeat from * around, ending at **; join with a slip st to top of 2-dc cluster.
Round 15
Ch 2, 2-dc cluster in slip st; ch 3, sc in next ch-5 space, [ch 5, sc in next ch-5 space] 3 times; ch 3*, 3-dc cluster in top of next 3-dc cluster; repeat from * around, ending at **; join with a slip st to top of 2-dc cluster.
Round 16
Repeat Round 14.
Round 17
Repeat Round 15, working ch 6 instead of ch 5.
Round 18
Repeat Round 14, working ch 6 instead of ch 5.
Round 19
Ch 2, 2-dc cluster in slip st; ch 4, sc in next ch-6 space, [ch 7, sc in next ch-6 space] 3 times; ch 4**, 3-dc cluster in top of next 3-dc cluster; repeat from * around, ending at **; join with a slip st to top of 2-dc cluster.
Round 20
Ch 2, 2-dc cluster in slip st; ch 7, skip ch-4 space, [sc in ch-7 space, ch 7] 3 times*; 3-dc cluster in top of next 3-dc cluster; repeat from * around, ending at **; join with a slip st to top of 2-dc cluster.
Round 21
Ch 2, 2-dc cluster in slip st; ch 4, sc in next ch-7 space, [ch 8, sc in next ch-7 space] 3 times; ch 4*, 3-dc cluster in top of next 3-dc cluster; repeat from * around, ending at **; join with a slip st to top of 2-dc cluster.
Round 22
Ch 2, 2-dc cluster in slip st; ch 7, skip ch-4 space, sc in ch-8 space; [(dtr, trtr, ch 3, trtr, dtr) all in next sc, sc in next ch-8 space] twice; ch 7*, 3-dc cluster in top of next 3-dc cluster; repeat from * around, ending at **; join with a slip st to top of 2-dc cluster.
Round 23
Ch 2, 2-dc cluster in slip st; ch 4, sc in ch-7 space, [ch 7, sc in next ch-3 space] twice; ch 7, sc in next ch-7 space, ch 4*; 3-dc cluster in top of next 3-dc cluster; repeat from * around, ending at **; join with a slip st to top of 2-dc cluster.
Round 24
Ch 2, 2-dc cluster in slip st; ch 6, skip ch-4 space, sc in ch-7 space, [ch 6, sc in next ch-7 space] twice; ch 6*, (2-dc cluster, ch 3, sl st, ch 3, 2-dc cluster) all in top of next 3-dc cluster; repeat from * around, ending at **; 3-dc cluster in same st first 2-dc cluster made; do not join; mark right side of work; turn – 24 clusters.
Points
With right side facing, skip next cluster on Round 24, join A to next cluster; turn. Work Rows 1–6 for point. Repeat until all 12 points are completed. Weave in ends. Block doily before sewing on leaves.
Row 1 Wrong Side
Ch 3, 2-dc cluster in top of next cluster; ch 3, sc in next ch-6 space, ch 4, sc in next ch-6 space, ch 6, sc in next ch-6 space, ch 4, sc in next ch-6 space, ch 3; 3-dc cluster in top of next cluster; turn.
Row 2
Ch 3, 2-dc cluster in top of next cluster; ch 4, skip next ch-3 space, [sc in next ch-4 space, ch 4] 3 times; skip next ch-3 space; 3-dc cluster in top of next cluster; turn.
Row 3
Ch 3, 2-dc cluster in top of next cluster; ch 3, sc in next ch-4 space, [ch 4, sc in next ch-4 space] 3 times; ch 3, 3-dc cluster in top of next cluster; turn.
Row 4
Ch 3, 2-dc cluster in top of next cluster; ch 3, skip next ch-3 space, [sc in next ch-4 space, ch 3] 3 times; skip next ch-3 space, 3-dc cluster in top of next cluster; turn.
Row 5
Ch 3, 2-dc cluster in top of next cluster; ch 3, skip next ch-3 space, [sc in next ch-3 space, ch 3] twice; skip next ch-3 space, 3-dc cluster in top of next cluster; turn.
Row 6
Ch 3, 2-dc cluster in top of next cluster; 3-dc cluster in top of next cluster. Fasten off.
Leaves
Make 12 sets.
First Leaf
With B, ch 12.
Row 1 Right Side: Sc in 2nd ch from hook – tip made; sc in next 9 ch, (sc, ch 3, sc) all in last ch; working along opposite side of chain, sc in next 8 ch; turn.
Row 2: Ch 3, sc in next 9 sc, (sc, ch 3, sc) all in ch-3 space, sc in next 8 sc; turn.
Rows 3–12: Working in back loops only, repeat Row 2. At end of Row 12, slip st in last sc. Fasten off.
Second Leaf
Rows 1–11: Work same as for First Leaf.
Row 12 Joining Row: With right sides of each leaf facing and working through both thicknesses, ch 3; slip st in next 9 sts and next ch-3 space; working on 2nd Leaf only, sc in back loop of next 8 sc; slip st in last sc worked. Fasten off.
The paired leaves create the greenery that will sit between the pointed sections. A floral necklace project can also help you practice working small botanical shapes, such as this beginner floral necklace pattern.
Berries
Make 12.
With C, ch 12; join with a slip st to form a ring.
Round 1
[Slip st into next ch, ch 3; work 5-tr cluster into same ch; ch 3, slip st in same ch, skip next ch] 6 times; turn; keeping right side facing, work 5-tr cluster in same ch as last cluster. Fasten off.
Finishing
Sew tip of last cluster to 6th ch of ring.
Sew berries to leaves.
Sew leaves between points of doily with the joining of the 2 leaves just touching the 2 clusters of Round 24.
Weave in ends.
Ways to Display Your Finished Crochet
- Holiday table centerpiece: Place the doily beneath a small bowl, vase, candle holder, or seasonal ornament.
- Sideboard decoration: Use it as a lace accent on a console or buffet alongside greenery and red decorations.
- Hostess gift: Fold it carefully and present it with other handmade or seasonal items.
- Winter display: Pair the holly motif with white ceramics, natural wood, or evergreen branches.
- Layered table setting: Position it beneath a centerpiece so the pointed lace edge remains visible.
- Seasonal textile collection: Store it with other handmade decorations and bring it out each year.
For another nature-inspired decoration, a crochet flower wreath can provide complementary seasonal styling without changing this doily’s construction.
Caring for Your Crochet Project
Treat the thread lace and sewn-on holly pieces gently. Dust the doily with a soft brush or use gentle air from a distance rather than pulling across the openwork.
If a small area needs attention, spot-clean carefully with a barely damp cloth and allow the piece to dry completely while lying flat. Avoid aggressive rubbing around the berries, leaves, clusters, and lace points.
After display, reshape the points gently by hand and store the doily flat or loosely folded with clean, acid-free tissue if available. Keep it dry, away from direct heat, and protected from objects that could snag the chain spaces.
Tips for Better Results
- Track the stitch counts. Rounds 1–4 finish at 12, 24, 32, and 40 single crochet, while Round 8 finishes at 120 sc. These counts are useful checkpoints.
- Mark the right side. Round 24 specifically instructs you to mark the right side before turning, which helps orient the twelve points correctly.
- Watch the chain spaces. Several rounds alternate between ch-5, ch-6, ch-7, and ch-8 spaces. Read the current round before beginning the repeat.
- Keep cluster tops visible. The outer lace rounds are anchored to 2-dc and 3-dc clusters, so avoid working into nearby chain spaces by mistake.
- Work leaf rows in the back loops only. This instruction begins with Rows 3–12 of the First Leaf and gives the leaves their ribbed texture.
- Block before attaching leaves. The pattern directs you to weave in ends and block the doily before sewing on the leaves. This makes the points easier to position.
- Sew components securely. Attach each berry to its leaves and place the joined leaf pair so the joining touches the two clusters of Round 24.
- Use a consistent tension. Loose chain tension can make the lace wavy, while tight tension can pull the points inward.
A red-and-green palette can also be explored in a separate crochet red roses project if you want coordinating handmade accents.
Color and Styling Variations
The approved pattern uses traditional white, green, and red. Optional color changes can give the same design a different seasonal mood, but keep the construction unchanged unless you intentionally want to experiment.
- Use a soft ivory for Color A and deep forest green for Color B for a vintage look.
- Replace the red berry color with burgundy or cranberry for a muted winter palette.
- Try white leaves and green berries for a frosted botanical effect.
- Pair the finished doily with a neutral vase and a small arrangement of handmade flowers.
- Use pastel versions of the three colors for a spring-inspired table setting.
Changing thread type, yarn size, or hook size may affect the lace scale, finished dimensions, drape, stitch definition, and yarn requirements. Make substitutions only with those changes in mind.
Frequently Asked Questions
Is this pattern suitable for a beginner?
It is best suited to a crocheter who is comfortable with thread, joined rounds, chain spaces, and basic increases. The pattern includes clusters and tall stitches, so beginners may want to practice those techniques separately first.
What yarn is recommended?
The specified yarn is AUNT LYDIA’S® Classic Crochet Thread, Size 10: Color A in White 001 or 453 Shaded Christmas A, Color B in 484 Myrtle Green B, and Color C in 494 Victory Red C.
What hook size should I use?
Use a 1.5 mm [US 7] steel crochet hook.
How many leaf sets and berries are made?
Make 12 sets of leaves and 12 berries. Each leaf set consists of two leaves, with the second leaf joined to the first during its final row.
Can I change the colors?
Yes, color changes are an optional styling choice. Keep the pattern’s color roles in mind: Color A is used for the lace points, Color B for the doily beginning and leaves, and Color C for the berries.
When should I block the doily?
Complete the doily points, weave in the ends, and block the doily before sewing on the leaves, as directed in the pattern.
How are the leaves attached?
Sew the leaves between the doily points, positioning the joining of the two leaves so it just touches the two clusters of Round 24.
Can I use a different yarn?
A different yarn may be possible, but changing yarn weight or fiber can alter the scale, drape, texture, and amount of yarn needed. The 1.5 mm steel hook is specified for the listed thread.
How should I store the finished doily?
Store it clean and completely dry, preferably flat or loosely folded in a protected space. Avoid crushing the berries or snagging the lace points and chain spaces.
Conclusion
The Crochet Holly & Lace Doily Pattern combines intricate thread lace with cheerful holly leaves and berries for a memorable seasonal decoration. Its twelve points and botanical details make it suitable for holiday tables, gifts, and winter displays. For additional reference, compare the Aunt Lydia’s Holly & Lace doily pattern and browse free crochet pattern resources for more ideas.