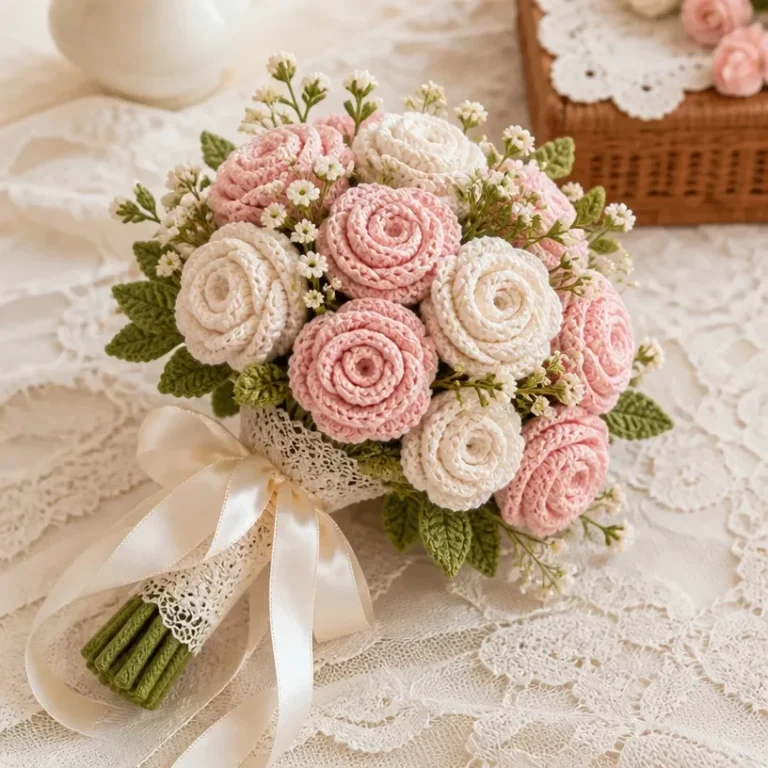
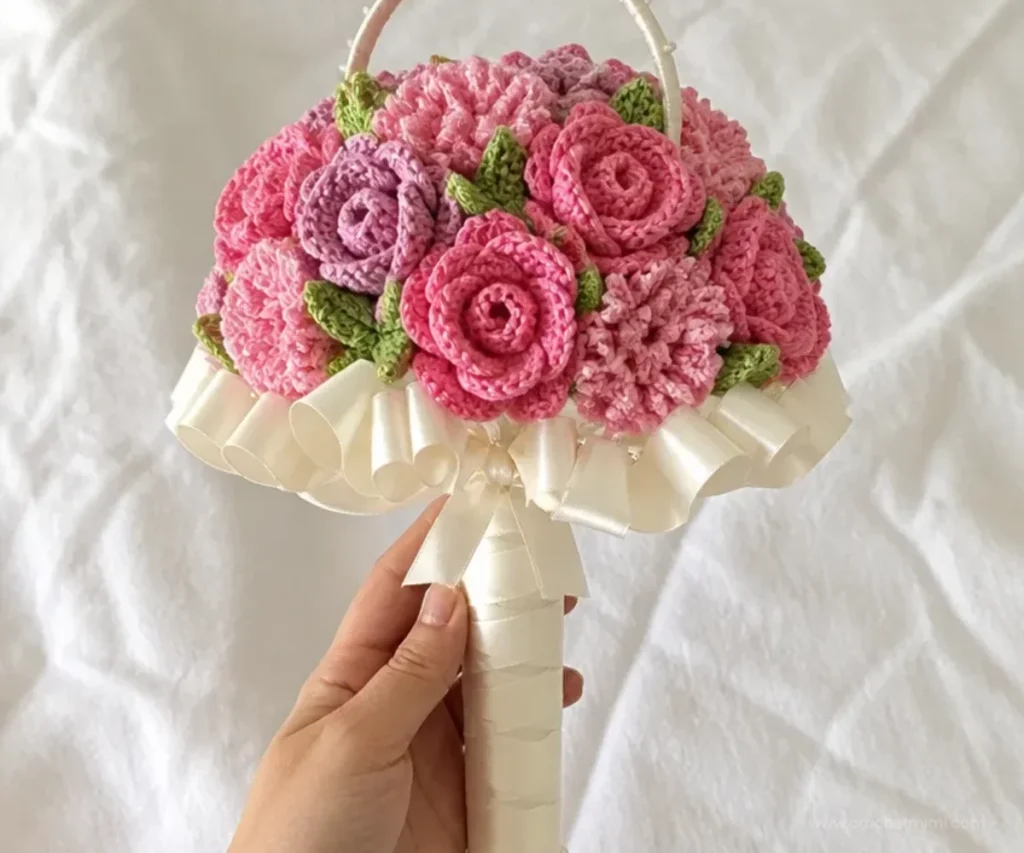
A crochet bridal nosegay is a charming way to carry handmade flowers on a wedding day, display a romantic floral arrangement, or create a keepsake gift. This design combines French rose and orchid pink roses and carnations with mint green leaves, a ribbon-wrapped cone, and a rounded floral top. The detailed construction makes it especially appealing to crocheters who enjoy small components and decorative assembly. For another floral project to make alongside it, try these beginner-friendly crochet red roses.
Why You’ll Love This Crochet Project

- It creates a complete floral arrangement. Instead of making one flower, you’ll assemble roses, carnations, leaves, ribbon, and a structured handle into a coordinated nosegay.
- It practices several useful techniques. The pattern includes crocheting into a ring, working petal rounds, forming a textured carnation row, and shaping a simple leaf.
- The color combination is wedding-ready. French rose, orchid pink, and mint green create a soft botanical palette that works well for bridal décor and spring displays.
- It offers flexible presentation options. The finished piece can be carried, displayed, or adapted as a handmade wedding keepsake.
- The carnations have an additional use. The pattern notes that a carnation may be worn by the groom and groomsmen as a boutonniere.
Crochet Mimi Tip: Keep completed flowers grouped by color as you work. This makes the final arrangement easier and helps you distribute the shades evenly across the rounded top.
How This Crochet Project Comes Together
The nosegay is built from three crocheted components:
- 15 roses in color A and 15 roses in color B
- 17 carnations in color A and 17 carnations in color B
- 12 leaves in color C
The flowers are crocheted with two strands of thread held together. Roses are worked in rounds, beginning with six small petals and adding six larger petals behind them. Carnations are made in rows and use repeated chain-and-slip-stitch sections to create their textured edge. Leaves are worked around both sides of a foundation chain.
For assembly, a 6-inch Styrofoam ball is cut in half. One half becomes the rounded top piece and is spray-painted light pink so it blends with the flowers. Floral wire is cut into 3-inch lengths and inserted into the flowers and leaves to form stems. The flowers are arranged around the curved sides, and the leaves are tucked between them.
The handle is formed with a 6-inch Styrofoam cone and antique-white satin ribbon. Ribbon loops decorate the flat side of the top piece, while the cone is wrapped in overlapping tiers. Pearl head pins attach the ribbon and handle.
Useful abbreviations include:
- ch: chain
- sc: single crochet
- hdc: half double crochet
- dc: double crochet
- slip st: slip stitch
Materials You’ll Need
- AUNT LYDIA’S® Classic Crochet Thread, Size 10
- 1 ball, color 493 French Rose A
- 1 ball, color 401 Orchid Pink B
- 1 ball, color 428 Mint Green C
- Susan Bates® Crochet Hook: 2.10mm [US 3]
- 6-inch (15 cm) diameter Styrofoam® ball
- 6-inch (15 cm) tall Styrofoam® cone
- Light pink spray paint, Styrofoam® safe
- Straight pins
- Pearl head straight pins
- 20 yards (18 m) of 1-inch (25 mm) wide double-faced satin ribbon in antique white
- Yarn needle
- Floral wire
The floral wire provides the stems that hold the crocheted components in the foam top. Straight pins reinforce the arrangement, while pearl head pins secure the ribbon and handle. Use spray paint specifically marked safe for Styrofoam®.
A beginner-friendly mandala crochet doily pattern can also provide useful practice with working rounds and maintaining neat joins before starting the roses.

Step-by-Step Crochet Instructions
Roses
Make 15 each with A and B.
With 2 strands of yarn held together, ch 5, slip st in first ch to make a ring.
Round 1
Ch 3 (counts as dc here and throughout), 11 dc in ring, slip st in top of beginning ch to join – 12 dc.
Round 2
*Ch 3, skip next dc, slip st in next dc; repeat from *, ch 3, skip last dc, slip st in first ch – 6 ch-3 spaces.
Round 3
*(Sc, hdc, 3 dc, hdc, sc) in next ch-3 space for Small Petal; repeat from * around, slip st in first st – 6 Small Petals.
Round 4
Working behind Small Petals, *ch 4, slip st in skipped dc on Round 1; repeat from * around, slip st in first ch – 6 ch-4 spaces.
Round 5
*(Sc, hdc, 5 dc, hdc, sc) in next ch-4 space for Large Petal; repeat from * around, slip st in first st.
Fasten off. Weave in ends.
Carnations
Make 17 each with A and B.
With 2 strands of thread held together, ch 18.
Row 1
2 dc in 4th ch from hook, 3 dc in each ch across – 45 dc.
Row 2
*Ch 3, turn, slip st in next dc; repeat from * to end. Fasten off. Weave in ends.
Leaves
Make 12 with C.
With 2 strands of C held together, ch 10.
Round 1
Sc in 2nd ch from hook, sc in next 7 ch, 2 sc in next ch, working along opposite edge of foundation ch, sc in next 8 ch, slip st in first sc.
Prepare the Top
- Cut the ball in half.
- Spray paint one half to cover completely and blend with flowers.
- Allow it to dry.
Add Floral Wire
- Cut floral wire into 3-inch (8 cm) lengths.
- Insert the wire into the center of the flowers and the edge of the leaves, forming stems.
Arrange the Flowers
- Insert the stems of the roses and carnations randomly around the curved sides of the top piece, covering it completely.
- Tuck the leaves in between the flowers.
- Reinforce with straight pins if needed.
Add Ribbon to the Top
- Pin one ribbon end at the center of the flat side of the top piece.
- Form a wheel of loops around the outside edge, allowing the loops to overlap and extend beyond the edge 2 inches (5 cm).
- Secure the loops with pins.
Wrap the Cone and Attach the Handle
- Using pearl head pins, pin one ribbon end to the narrow end of the cone.
- Wrap the ribbon around the cone, loosely overlapping the edges for a tiered effect, and pin each wrap to secure.
- Fold in extra ribbon and loops and pin to secure.
- Attach the handle to the top with pearl head pins inserted at an angle from the handle to the flat side of the top to prevent them from poking through the bouquet.
For the flowers, fasten off and weave in ends where applicable. The carnation may be used as a boutonniere for the groom and groomsmen.
Creative Ways to Use Your Project

- Carry it as a bridal nosegay. The ribbon-wrapped cone creates a defined handle for a wedding ceremony or portrait session.
- Display it as a wedding keepsake. Place the finished arrangement in a protected display area after the event.
- Use it as a romantic centerpiece. Set it on a small stand or decorative surface where the rounded floral top can be viewed from different angles.
- Make coordinated boutonnières. Use the carnation component as noted in the pattern for the groom and groomsmen.
- Create a matching floral collection. Pair the nosegay with a crochet flower arrangement or a floral blanket in complementary colors, such as this blooming bouquet crochet blanket pattern.
- Prepare a handmade gift. The finished piece is suitable for someone planning a wedding, anniversary celebration, or romantic home display.
Caring for Your Crochet Project
Because this nosegay contains thread flowers, Styrofoam, floral wire, ribbon, and pins, do not machine wash, soak, or submerge it. Water may damage the structural materials and distort the crocheted components.
Dust the arrangement gently with a soft, dry cloth or a delicate brush. Work around the petals, ribbon loops, pearl head pins, and leaves rather than pulling on them. If a flower shifts, reposition it carefully by holding the base near the wire instead of tugging on the petals.
Store the nosegay upright or in a roomy box where the flowers are not compressed. Keep it away from excessive heat, direct moisture, and areas where the ribbon can snag. A cool, dry storage space will help protect the thread, spray-painted foam, and satin trim.
Tips for Better Results
- Hold both strands consistently. Keep the two strands of thread aligned as you crochet so the stitches remain even and the petals have a uniform appearance.
- Count the rose stitches carefully. Round 1 must finish with 12 dc, Round 2 must create 6 ch-3 spaces, and the next rounds must produce 6 small and 6 large petals.
- Work Round 4 behind the small petals. This placement is important because it creates the foundation for the larger outer petals.
- Watch the carnation count. Row 1 finishes with 45 dc. Counting across the row helps prevent the textured edge from becoming uneven.
- Weave in ends before assembly. Loose tails are harder to manage after flowers are wired and placed into the foam.
- Cut wire carefully. Floral wire ends can be sharp, so handle the cut pieces cautiously and insert them securely into the flower centers or leaf edges.
- Arrange before reinforcing. Place all flowers and leaves first, then add straight pins where needed after the overall balance looks right.
- Angle the handle pins correctly. Insert pearl head pins from the handle toward the flat side of the top so they do not poke through the bouquet.
For a different accessory-focused crochet project, you can explore this chic crochet aviator hat pattern for more practice with shaping and finishing details.
Color and Styling Variations
The approved pattern uses French rose, orchid pink, and mint green, but the color placement can be customized without changing the construction.
- Use a single flower color. Make both rose and carnation groups in one shade for a monochromatic bridal arrangement.
- Reverse the emphasis. Use orchid pink for most flowers and French rose for accent blooms.
- Try a seasonal palette. Soft peach, cream, lavender, or pale blue can create different wedding moods if suitable crochet thread is selected.
- Coordinate the ribbon. Antique white gives a classic finish, while another ribbon color can match wedding colors.
- Add a complementary display. Pair the nosegay with a neutral stand, small pedestal, or protected keepsake box.
- Create a broader handmade theme. A small crochet bear ornament, such as this easy crochet bear ornament pattern, could complement a handmade gift collection for a different celebration.
These are optional styling changes. If you substitute a different thread or hook size, the flower dimensions, texture, yarn requirements, and overall proportions may change. Make a test component first and compare it with the intended arrangement.
Frequently Asked Questions
Is this crochet bridal nosegay pattern beginner-friendly?
It is suitable for crocheters comfortable with basic chains, slip stitches, single crochet, half double crochet, and double crochet. The assembly requires additional care because the flowers are wired and attached to Styrofoam.
What yarn and hook does the pattern use?
The pattern uses AUNT LYDIA’S® Classic Crochet Thread, Size 10, with one ball each of 493 French Rose A, 401 Orchid Pink B, and 428 Mint Green C. Use a Susan Bates® 2.10mm [US 3] crochet hook.
How many roses are required?
Make 15 roses with color A and 15 roses with color B, for a total of 30 roses.
How many carnations are required?
Make 17 carnations with color A and 17 carnations with color B, for a total of 34 carnations.
How many leaves are included?
Make 12 leaves with color C.
Can the colors be changed?
Yes. Changing colors is an optional styling choice. Keep the approved component counts and instructions the same, and remember that a different thread or hook may affect the finished proportions.
How is the rounded top constructed?
Cut the 6-inch Styrofoam ball in half and spray-paint one half completely with Styrofoam-safe light pink paint. After it dries, wire and insert the flowers around the curved sides, then tuck the leaves between them.
How is the handle attached?
Wrap the 6-inch Styrofoam cone with ribbon and use pearl head pins to attach it to the top. Insert the pins at an angle from the handle to the flat side of the top so they do not poke through the bouquet.
Can the finished nosegay be washed?
No. Because it contains Styrofoam, floral wire, ribbon, and pins, avoid machine washing, soaking, and submerging. Dust it gently and store it in a dry, protected place.
Conclusion
This crochet bridal nosegay combines delicate roses, textured carnations, mint leaves, satin ribbon, and a structured handle into a meaningful handmade arrangement. You can follow the original color plan or personalize the palette for a particular wedding or gift. For additional inspiration, compare it with this bridal nosegay crochet pattern and a crocheted bridal hair comb to build a coordinated handmade celebration set.