
A classic red, green, and white design makes this Crochet Christmas Stocking Pattern a festive project for holiday decorating and handmade gifting. The textured stocking body, shaped heel, contrasting toe, and decorative cuff create a traditional look with plenty of opportunity to practice construction techniques. It can be hung from a mantel, displayed on a staircase, or filled with small gifts. For another seasonal project to make alongside it, try this easy crochet bear ornament.
Why You’ll Love This Crochet Project
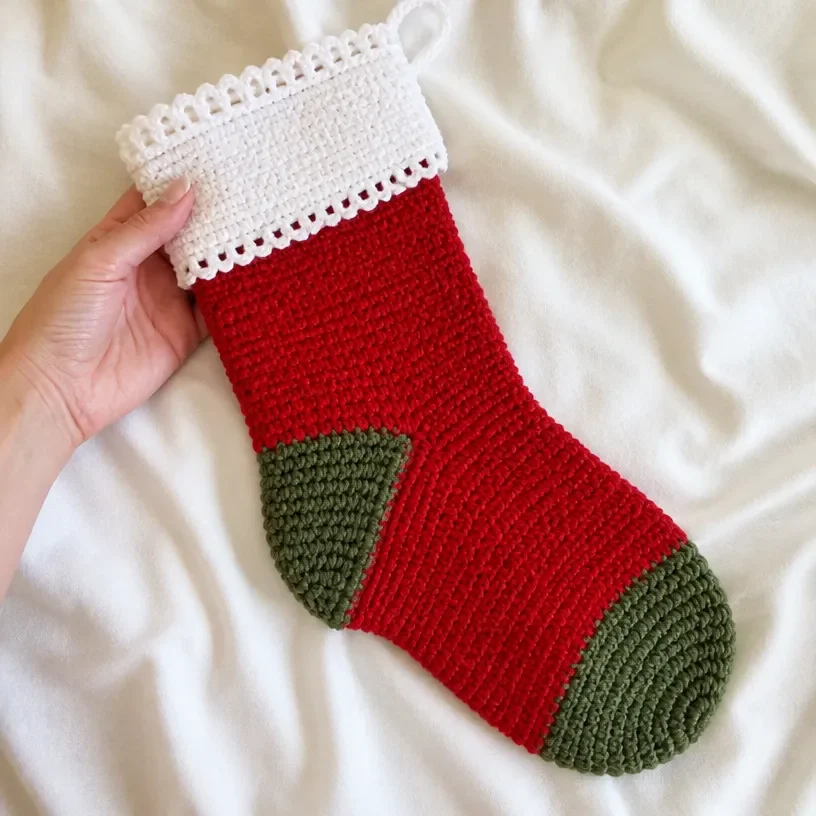
- It uses a classic holiday palette. Ranch Red, Dark Sage, and Soft White create a warm Christmas color scheme that suits traditional or rustic décor.
- It teaches useful shaping. The heel and toe introduce short rows and decreases without requiring complicated stitch patterns.
- It includes attractive texture. Alternating double-crochet and single-crochet rows gives the stocking body visual interest while remaining straightforward to work.
- It makes a thoughtful handmade gift. A finished stocking can be personalized with additional embroidery, a name tag, or a small decorative accent.
- It is useful beyond decoration. Hang it as part of a holiday display, or fill it with treats, notes, and small presents.
Crochet Mimi Tip: Keep the three colors in separate bags or bowls as you work so the color plan stays easy to follow and the yarn does not tangle. You may also find Beginner Friendly Mandala Crochet Doily Pattern useful.
Before You Start Crocheting
This pattern creates one crocheted stocking from a rectangular body worked first, followed by a shaped heel, foot, toe, cuff, edgings, and hanging loop. The main stocking uses the larger 5 mm hook, while the smaller 4 mm hook is used for the decorative cuff edgings. You may also find Blooming Bouquet Crochet Blanket Pattern useful.
The construction sequence is:
- Work the stocking body in Color A.
- Add and shape the heel in Color B.
- Work the foot in Color A.
- Shape both halves of the toe in Color B.
- Sew the toe, foot, back, and heel openings.
- Make the cuff in Color C.
- Add the lower edging, attach the cuff, and finish with the top edging and hanging loop.
The body is worked until it measures 10 inches from the beginning. The pattern uses US crochet terminology.
Abbreviations and Special Instructions
- A, B, C: Color A, Color B, Color C
- ch: Chain
- dc: Double crochet
- mm: Millimeters
- sc: Single crochet
- st(s): Stitch(es)
- tog: Together
- yo: Yarn over
- Sc2tog: [Draw up a loop in next st] twice, yo and draw through all 3 loops on hook.
- *, **, ***: Repeat whatever follows the symbol as indicated.
- []: Work the directions in brackets the number of times specified.
Materials You’ll Need
Yarn
- RED HEART® Super Saver®: 1 skein each
- 332 Ranch Red (A)
- 633 Dark Sage (B)
- 316 Soft White (C)
Crochet Hooks
- 4 mm [US G-6]
- 5 mm [US H-8]
Notions
- Yarn needle
The 5 mm hook is the larger hook used for the stocking body, heel, foot, toe, and cuff. The 4 mm hook is the smaller hook used for the lower and top edgings.
Complete Crochet Instructions
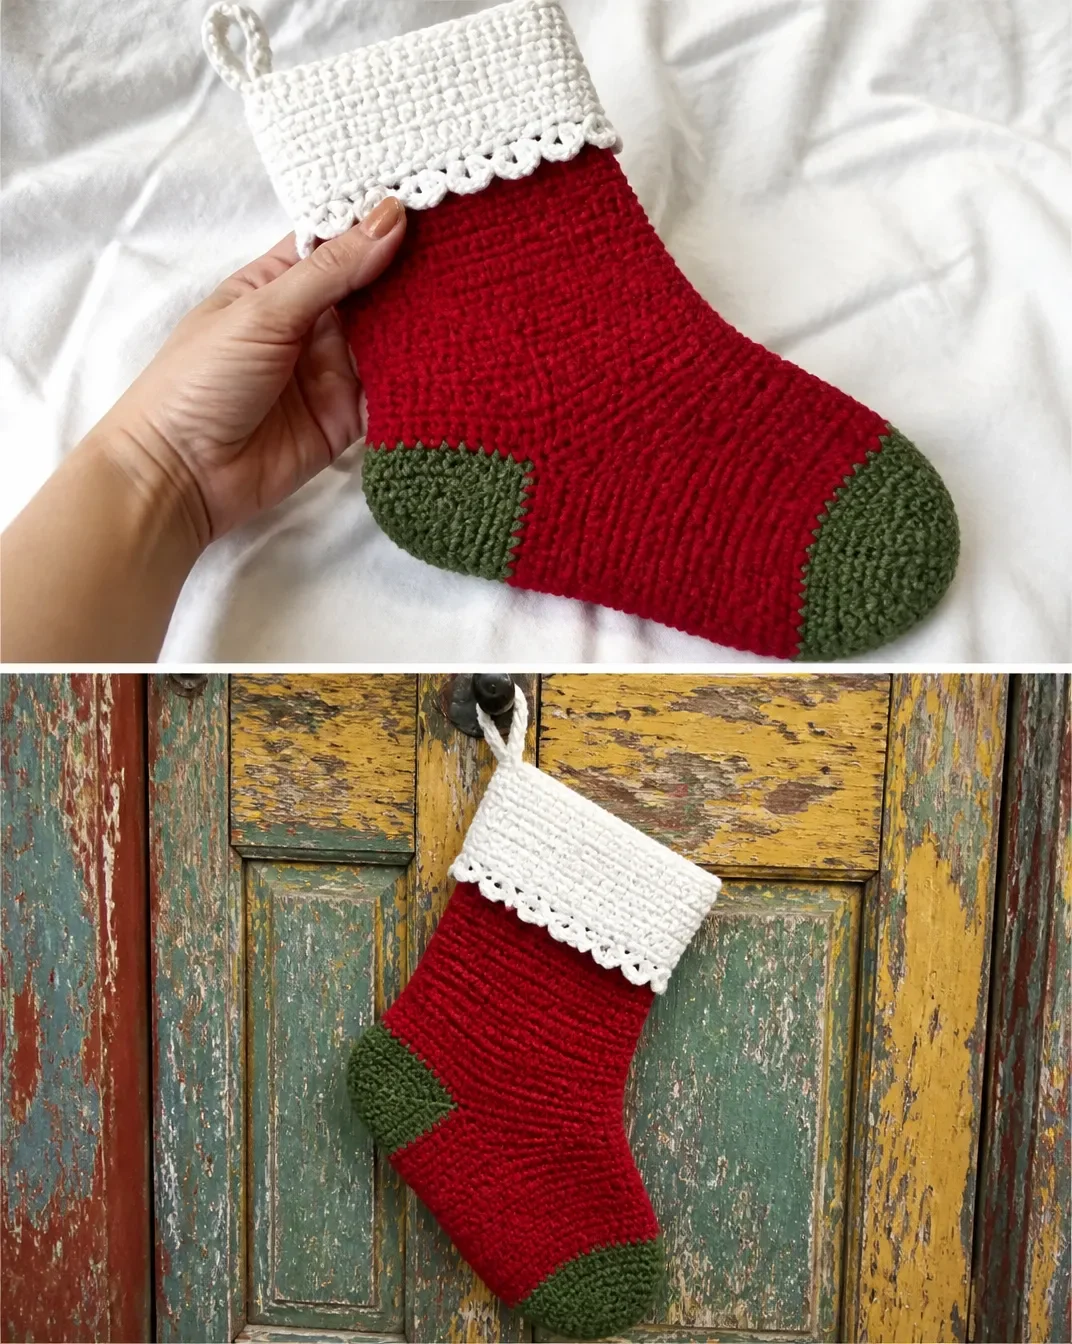
Follow the color plan and construction order below. When the pattern says to repeat Rows 2 and 3, continue using those two rows exactly as written. For the heel and toe, work the short rows and decreases within the stated boundaries.
Color Plan
- Color A: 332 Ranch Red
- Color B: 633 Dark Sage
- Color C: 316 Soft White
Stocking Body
With Larger Hook and A
With larger hook and A, ch 43.
Row 1 (Right Side):
Sc in 2nd ch from hook and in each ch across; turn.
Stitch count: 42 sc
Row 2:
Ch 3 (counts as dc), skip first sc, dc in next sc and in each sc across; turn.
Row 3:
Ch 1, sc in each dc across, sc in top of ch-3; turn.
Repeat Rows 2 and 3 for pattern until 10” from beginning, end by working Row 2. Fasten off.
Heel
With Right Side Facing and Larger Hook
With right side facing and larger hook, skip first 32 sts of last row, join B in next st; ch 1, sc in same st and in next 9 sts, bring other side of stocking around and sc in first 11 sts; turn – 21 sts.
Shape Heel
Work the short rows as follows, continuing until all 21 heel sts are worked.
Next Row: Ch 1, sc in first 14 sc; turn.
Next Row: Ch 1, sc in first 7 sc; turn.
Next Row: Ch 1, sc in first 7 sc, sc in next st of long row below; turn – 8 sc.
Next Row: Ch 1, sc in first 8 sc, sc in next st of long row below; turn – 9 sc.
Continue in this manner until all 21 heel sts are worked. Fasten off.
Foot
With Right Side Facing and Larger Hook
With right side facing and larger hook, skip first 10 sc of heel, join A in next sc; ch 1, sc in same sc and in next 10 sc of heel, skip next 2 sts of stocking, sc in next 17 sts of stocking, skip next 2 sts, sc in next 10 sts of heel; turn – 38 sc.
Repeat pattern Rows 2 and 3 five more times, then Row 2 once more. Fasten off.
Toe
First Half of Toe
With right side facing and larger hook, join B in first st of foot.
** Ch 1, sc2tog, sc in next 15 dc, sc2tog, turn – 17 sc.
Continue in sc only and decrease 1 st each end of every row until 3 sts remain. Fasten off.
**
Second Half of Toe
With right side facing, join B in next st of last long row.
Work same as first half of toe from ** to **.
Finishing and Seams
Sew toe, foot and back seams. Sew openings closed at corners of heel.
Cuff
With Larger Hook and C
With larger hook and C, ch 47.
Work 11 rows of sc over 46 sts. Fasten off.
Sew cuff seam.
Lower Cuff Edging
With Right Side Facing and Smaller Hook
*** With right side facing and smaller hook, join C at back seam; ch 1, sc in first 2 sc.
* Skip next sc, (dc, [ch 1, dc] twice) all in next sc, skip next sc, sc in next sc; repeat from * around; join with a slip st in first sc.
***
Fasten off.
Attach Cuff
With Right Side Facing and Smaller Hook
With right side facing and smaller hook, join C at upper edge of back seam of cuff; ch 1, sc in first sc.
Place cuff over right side of stocking and beginning at first st after back seam of stocking, work 21 sc through both layers at same time, sc in next sc of cuff only, sc in next 21 sc through both layers, sc in last sc of cuff only; join.
Fasten off.
Top Edging and Hanging Loop
Same as Lower Edging
Work same as Lower Edging from *** to **.
Ch 12 for hanging loop, slip st in first sc again.
Fasten off.
Weave in all ends.
Ways to Display Your Finished Crochet

- Create a mantel arrangement. Hang the stocking beside greenery, ribbon, or other handmade holiday décor.
- Use it as a gift container. Fill it with wrapped treats, gift cards, small toys, or handwritten notes.
- Make a coordinated stocking set. Repeat the pattern in different color combinations for each family member while keeping the same construction.
- Add it to a staircase display. A row of stockings creates a festive focal point along a banister.
- Pair it with handmade ornaments. A stocking display works especially well with other crocheted decorations and seasonal accents.
- Personalize the cuff. Once the stocking is complete, add a name tag or a small sewn-on embellishment without changing the approved construction.
For a spring-inspired handmade display after the holidays, you might also enjoy this crochet flowers wreath project.
Caring for Your Crochet Project
Keep the finished stocking clean with gentle dusting or careful spot cleaning. Avoid soaking the stocking unless the care instructions for your yarn specifically support that method, since the sewn seams and decorative edging may lose their shape when saturated.
For small marks, use a barely damp cloth and dab rather than rub. Allow the stocking to dry completely before storing it. Keep it away from excessive heat, which can affect the yarn’s shape and surface.
Store the stocking flat or loosely folded in a dry container. Avoid compressing the cuff or placing heavy items on top of the toe. If the stocking becomes slightly misshapen, gently arrange the body, heel, toe, and cuff back into position while it is dry.
Tips for Better Results
- Count the foundation chain carefully. The starting chain is 43, but Row 1 produces 42 sc. This count establishes the width of the stocking body.
- Watch the turning chains. In Row 2, ch 3 counts as a dc, and Row 3 includes a sc in the top of ch-3. Keeping this detail consistent helps maintain the row structure.
- Mark the heel area if needed. The heel begins after skipping the first 32 sts of the last body row. A removable stitch marker can help identify the joining point.
- Track the heel short rows. The heel begins with 21 sts, and the short rows gradually work back into the longer row below. Read each boundary carefully before turning.
- Confirm the foot count. The first foot setup creates 38 sc. Check the skipped stitches and the 17 stitches worked across the stocking before moving on.
- Use stitch markers for toe decreases. The first toe row has a sc2tog at each end and 17 sc afterward. Marking the beginning of each row makes the shaping easier to track.
- Sew seams neatly. Align the toe, foot, and back edges before stitching so the stocking keeps a smooth outline.
- Keep the cuff orientation clear. Place the cuff over the right side of the stocking before working the attachment row through both layers.
- Secure all ends thoroughly. Weave in the ends after the top edging and hanging loop are complete, taking care not to pull the fabric out of shape.
Color and Styling Variations
The approved pattern uses Ranch Red, Dark Sage, and Soft White, but the design can be personalized with other color combinations as an optional styling choice.
- Use a deep forest green in place of Dark Sage for a more traditional woodland palette.
- Try burgundy, cream, and muted green for a vintage-inspired look.
- Choose navy, white, and silver-toned yarn colors for a cooler winter display.
- Make several stockings with the same colors arranged differently, such as a green body with a red heel and toe.
- Add a simple initial or name tag after completing the stocking for individual identification.
- Coordinate the stocking with a handmade floral project such as these crochet red roses for a playful holiday-to-home-decor transition.
If substituting yarn, remember that a different yarn type or thickness can change the fabric texture, dimensions, stitch definition, and amount of yarn required. Changing hook size can also affect the finished proportions, so treat substitutions as optional experimentation rather than part of the approved instructions.
Frequently Asked Questions
Is this crochet stocking suitable for beginners?
It uses basic single crochet and double crochet, but the heel, toe shaping, and assembly require careful attention. A beginner who is comfortable counting stitches and following row-by-row instructions can work through it slowly.
Which hook size is used for the stocking body?
The larger 5 mm [US H-8] hook is used for the stocking body, heel, foot, toe, and cuff. The smaller 4 mm [US G-6] hook is used for the lower cuff edging, cuff attachment, and top edging.
How many skeins of yarn are needed?
The materials list calls for 1 skein each of RED HEART® Super Saver® in 332 Ranch Red, 633 Dark Sage, and 316 Soft White.
What colors are used for the heel and toe?
Both the heel and toe are worked in Color B, 633 Dark Sage. The stocking body and foot use Color A, 332 Ranch Red, while the cuff and edgings use Color C, 316 Soft White.
How is the heel shaped?
The heel begins with 21 sts. Short rows are worked by first using 14 sc, then 7 sc, and then gradually adding stitches worked into the next stitch of the long row below until all 21 heel sts are worked.
How is the toe constructed?
The toe is made in two halves. Each half begins with sc2tog at both ends, followed by decreases at each end of every row until 3 sts remain.
How is the cuff attached?
After sewing the cuff seam and completing the lower edging, place the cuff over the right side of the stocking. Work 21 sc through both layers, one sc in the cuff only, another 21 sc through both layers, and one final sc in the cuff only before joining.
Can the colors be changed?
Yes, colors can be changed as an optional customization. Keep the color sections clearly labeled so the heel, toe, cuff, and body remain easy to identify. Different yarn colors or yarn types may affect the appearance and dimensions.
How do I hang the finished stocking?
The top edging includes a hanging loop made with ch 12. Fasten it securely and use the loop to hang the stocking from a suitable hook or display fixture.
Conclusion
This Crochet Christmas Stocking Pattern combines classic holiday colors with practical shaping, textured rows, and a decorative cuff. Make one for a mantel display or create a coordinated set for gifting. For more seasonal inspiration, browse these free crochet Christmas stocking ideas and Christmas stocking patterns for heirloom projects.