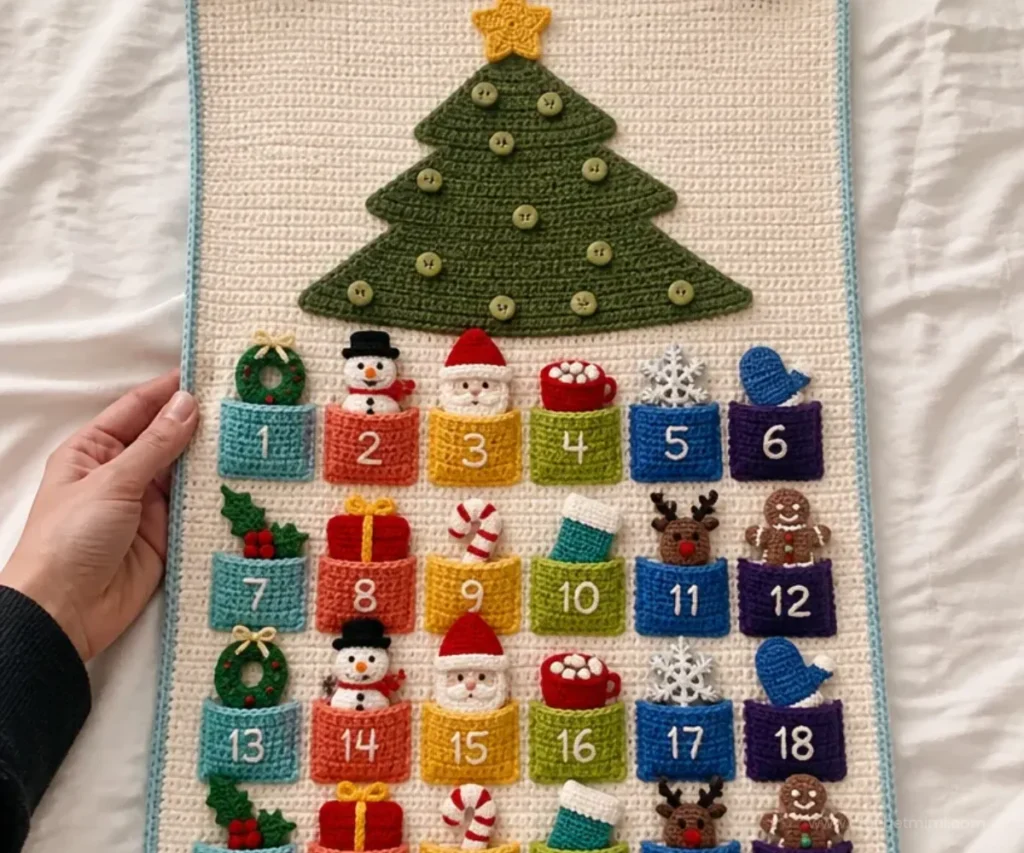
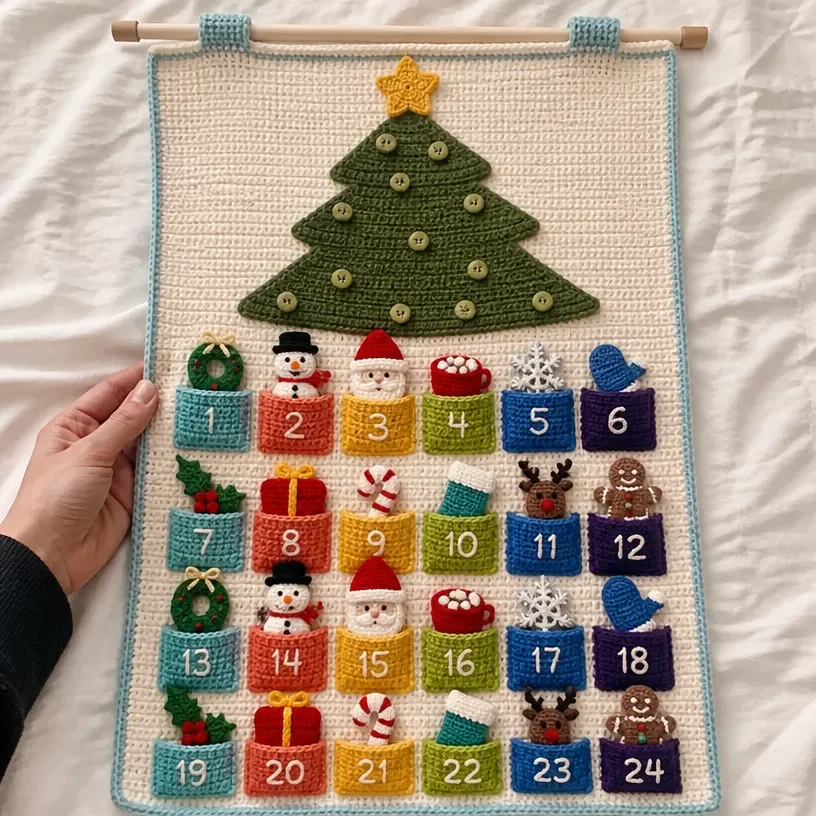
A handmade advent calendar brings daily anticipation to the holiday season, and this Countdown to Christmas Crochet Advent Calendar Pattern makes that tradition especially charming. The finished design combines a soft crocheted background, a tiered Christmas tree, numbered pockets, a star, and 24 removable ornaments, including snowmen, Santas, wreaths, gifts, stockings, and more. It is an ambitious project for crocheters who enjoy colorwork, small shaped pieces, embroidery, and careful assembly. For another festive handmade idea, consider these crochet Christmas ornament instructions as a companion project.
Why You’ll Love This Crochet Project
- It creates a reusable holiday tradition. The 24 pockets and removable ornaments can be enjoyed year after year.
- It offers plenty of variety. You will practice flat rows, joined rounds, increases, decreases, embroidery, stuffing, appliqué-style sewing, and color changes.
- It makes a striking seasonal display. The long background and tree design work well on a wall, door, or other vertical surface.
- It supports creative gifting. The calendar can be made for a child, family, classroom, or anyone who enjoys a handmade countdown.
- It builds useful crochet skills. Small ornaments provide manageable practice pieces while the background and tree develop consistency over longer sections.
Crochet Mimi Tip: Make and label the ornaments in groups as you go. Keeping each finished piece in a separate bag or container will make final assembly much easier. You may also find Bridal Nosegay Crochet Pattern Tutorial useful.
Before You Start Crocheting
This project is constructed in four broad stages: You may also find Chic Crochet Aviator Hat Pattern useful.
- Make the off-white background, blue edging, and two hanging tabs.
- Make the three dark sage tree sections and gold star.
- Make 24 pockets in six colors, embroider numbers 1–24, and sew the pockets to the background.
- Make all ornaments, add their loops, and hang them from the tree buttons.
The background measures 37″ [94 cm] in length from the beginning of the repeated rows. The tabs measure 2½” [6 cm], and the tree is sewn to the background 2½” [6 cm] from the top. Use a U.S. H/8 (5 mm) crochet hook or size needed to obtain gauge. You may also find Crochet Floral Hair Comb Pattern Tutorial useful.
The pattern uses these common US crochet abbreviations:
- ch: chain
- sc: single crochet
- hdc: half double crochet
- dc: double crochet
- sl st: slip stitch
- h2dc: half double crochet two together
- sc2tog: single crochet two together
- RS: right side
- WS: wrong side
- rem: remaining
Materials You’ll Need
- Contrast A Off White (39702): 3 balls
- Contrast B Robin’s Egg (39780): 1 ball
- Contrast C Dark Sage (39707): 1 ball
- Contrast D White (39701): 1 ball
- Contrast E Black (39727): 1 ball
- Contrast F Chocolate (39750): 1 ball
- Contrast G Burgundy (39762): 1 ball
- Contrast H Harvest Red (39763): 1 ball
- Contrast I Pumpkin (39765): 1 ball
- Contrast J Gold (39782): 1 ball
- Contrast K Chartreuse (39771): 1 ball
- Contrast L Cobalt Blue (39784): 1 ball
- Contrast M Bone (39703): 1 ball
- Contrast N Blackberry (COL0005): 1 ball
- U.S. H/8 (5 mm) crochet hook, or size needed to obtain gauge
- Stuffing
- 24 – 5/8″ [16 mm] buttons
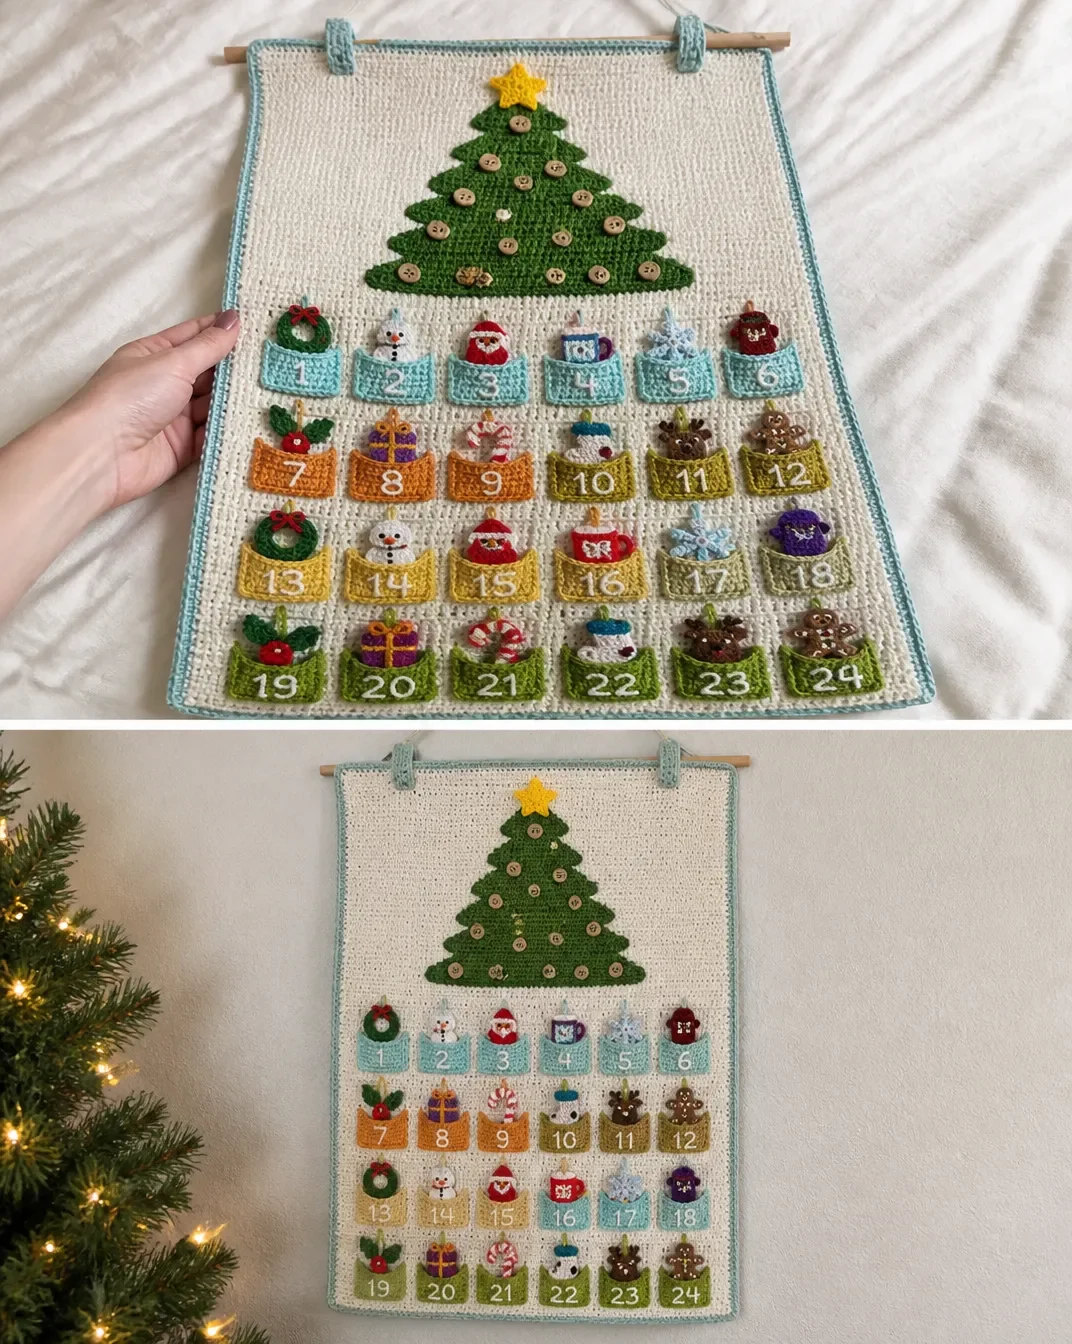
Complete Crochet Tutorial
Overall Construction
Make the components in this order:
- Make the background, edging, and tabs.
- Make Tree Sections One, Two, and Three, followed by the star.
- Make four pockets each in B, I, J, K, L, and N; embroider numbers 1–24 on the pockets.
- Make all ornaments and sew on their loops and finishing details as directed.
Background, Edging, and Tabs
Background
With A, ch 83.
- 1st row: 1 sc in 2nd ch from hook. 1 sc in each ch to end of ch. Turn. 82 sc
- 2nd row: Ch 1. 1 sc in first sc. 1 sc in each sc to end of row. Turn.
Repeat the 2nd row until work from beginning measures 37″ [94 cm]. Fasten off.
Edging
With RS facing, join B with sl st in any corner. Ch 1. Work 1 rnd sc evenly around Background, working 3 sc in each corner. Join with sl st to first sc. Fasten off.
Tabs Make 2
With B, ch 39.
- 1st row: 1 sc in 2nd ch from hook. 1 sc in each ch to end of ch. Turn. 38 sc
- 2nd row: Ch 1. 1 sc in first sc. 1 sc in each sc to end of row. Turn.
Repeat the 2nd row until work from beginning measures 2½” [6 cm]. Fasten off.
Fold Tabs in half. Beginning 1″ [2.5 cm] in from the corner on the top edge of the Background, sew Tabs evenly across as shown in the picture.
Tree and Star
Tree Section One
With C, ch 2.
- 1st row: 1 sc in 2nd ch from hook. Turn. 1 sc
- 2nd row: Ch 1. 2 sc in first sc. Turn. 2 sc
- 3rd row: Ch 1. 2 sc in each sc to end of row. Turn. 4 sc
- 4th row: Ch 1. 2 sc in first sc. 1 sc in each sc to last sc. 2 sc in last sc. Turn.
Repeat the 4th row until there are 34 sts in the row. Fasten off.
Tree Section Two
- 1st row: With RS facing, skip the first 7 sc in the last row. Join C with sl st to the next sc. Ch 1. 1 sc in the same st as the last sl st. 1 sc in each of the next 19 sc. Turn. Leave remaining sts unworked. 20 sc
- 2nd row: Ch 1. 2 sc in first sc. 1 sc in each st to last sc. 2 sc in last sc. Turn.
Repeat the 2nd row until there are 54 sts in the row. Fasten off.
Tree Section Three
- 1st row: With RS facing, skip the first 7 sc in the last row. Join C with sl st to the next sc. Ch 1. 1 sc in the same st as the last sl st. 1 sc in each of the next 39 sc. Turn. Leave remaining sts unworked. 40 sc
- 2nd row: Ch 1. 2 sc in first sc. 1 sc in each st to last sc. 2 sc in last sc. Turn.
Repeat the 2nd row until there are 74 sts in the row. Fasten off.
Sew Tree to Background 2½” [6 cm] from the top. Sew 24 buttons through all thicknesses of the Tree, spacing them evenly as shown in the photo.
Star Base
With J, ch 3.
- 1st rnd: 10 hdc in 3rd ch from hook. Join with sl st to first hdc.
- 2nd rnd: Ch 2. 2 hdc in first hdc. 2 hdc in each hdc around. Join with sl st to first hdc. 20 hdc
Fasten off.
Star Points
Each point is worked over 4 sts. Make 5 points total, joining with sl st to the next hdc of the last round.
- 1st row: Ch 2. Beginning in the same hdc as the last sl st, hdc2tog twice. Turn.
- 2nd row: Ch 2. 1 hdc in first hdc. 1 hdc in last hdc. Turn.
- 3rd row: Ch 2. Hdc2tog. Fasten off.
Repeat the Star Point instructions 4 more times. Sew Star to the top of Tree as shown in the picture.
Pockets
Make 4 each in B, I, J, K, L, and N.
Ch 9.
- 1st row: 1 sc in 2nd ch from hook. 1 sc in each ch to end of ch. Turn. 8 sc
- 2nd row: Ch 1. 1 sc in first sc. 1 sc in each sc to end of row. Turn.
Repeat the 2nd row until work from beginning measures 3″ [7.5 cm]. Fasten off.
With A, embroider numbers 1–24 on the Pockets according to the following layout:
1  2  3  4  5  6
7  8  9  10 11 12
13 14 15 16 17 18
19 20 21 22 23 24
Beginning 1¼” [3 cm] up from the bottom and 1″ [2.5 cm] from the side, sew 3 edges of the Pockets onto the Background in order according to the diagram, leaving 1″ [2.5 cm] between Pockets.
Ornaments
Wreath Make 2
Front and Back Make Alike
With C, ch 8. Join with sl st to first ch, making sure not to twist the chain.
- 1st rnd: Ch 2, which does not count as hdc. 2 hdc in first ch. 2 hdc in each ch around. Join with sl st to first hdc. 16 hdc
- 2nd rnd: Ch 1. 2 sc in first hdc. 2 sc in each hdc around. Join with sl st to first sc. 32 sc
Fasten off.
With WS facing each other, sew the center of the Wreath together. Join D with sl st to any sc through both thicknesses. Work the first round through both thicknesses, lightly stuffing as you go.
- 1st rnd: Ch 1. 1 sc in each of the first 2 sc. Ch 2. *1 sc in each of the next 2 sc. Ch 2. Repeat from * around. Join with sl st to first sc. Do not fasten off.
- Loop: Ch 6. Join with sl st to the first sl st in the last round. Fasten off.
With B, ch 30. Fasten off. Tie the chain into a bow and fasten it to the bottom of the Wreath.
Snowman Make 2
Head
With D, ch 2.
- 1st rnd: 8 sc in 2nd ch from hook. Join with sl st to first sc. 8 sc
- 2nd rnd: Ch 1. 1 sc in first sc. 1 sc in each sc around. Join with sl st to first sc.
Repeat the 2nd round twice more.
Body
- 1st rnd: Ch 1. 2 sc in first sc. 2 sc in each sc around. Join with sl st to first sc. 16 sc
- 2nd rnd: Ch 1. 1 sc in first sc. 1 sc in each sc around. Join with sl st to first sc.
Repeat the 2nd round 3 more times.
Next rnd: Ch 1. (Sc2tog) 8 times. 8 sc Fasten off, leaving a tail.
Lightly stuff Snowman. Using the tail, gather the bottom of Snowman and fasten securely.
With E, embroider buttons and eyes as shown in the picture. With I, embroider the carrot nose as shown in the picture.
Scarf: With K, ch 20. Fasten off. Tie Scarf around Snowman’s neck as shown in the picture.
Loop: With D, ch 8. Fasten off. Secure onto the top of Snowman’s Head.
Santa Make 2
Beard and Face
With D, ch 2.
- 1st rnd: 6 sc in 2nd ch from hook. Join with sl st to first sc. 6 sc
- 2nd rnd: Ch 1. 1 sc in first sc. 1 sc in each sc around. Join with sl st to first sc.
- 3rd rnd: Ch 1. 2 sc in first sc. 2 sc in each sc around. Join with sl st to first sc. 12 sc
- 4th rnd: Ch 1. 1 sc in first sc. 1 sc in each sc around. Join with sl st to first sc.
- 5th rnd: Ch 1. 1 sc in first sc. 2 sc in next sc. *1 sc in next sc. 2 sc in next sc. Repeat from * around. Join with sl st to first sc. 18 sc
- 6th rnd: Ch 1. 1 sc in first sc. 1 sc in each sc around. Join with sl st to first sc.
- 7th rnd: Ch 1. 1 sc in first sc. 1 sc in each of the next 5 sc. Join M. With M, 1 sc in each of the next 6 sc. Break M. With D, 1 sc in each of the last 6 sc. Join with sl st to first sc.
Repeat the 7th round twice more.
Hat
- 1st rnd: Ch 1. In front loops only, 1 sc in first sc. Ch 2. *1 sc in next sc. Ch 2. Repeat from * around. Join H with sl st to first sc.
- 2nd rnd: With H, ch 1. In remaining back loops only 2 rows below, 1 sc in first sc. 1 sc in each sc around. Join with sl st to first sc. 18 sc
- 3rd rnd: Ch 1. 1 sc in first sc. 1 sc in each sc around. Join with sl st to first sc.
- 4th rnd: Ch 1. 1 sc in first sc. Sc2tog. *1 sc in next sc. Sc2tog. Repeat from * around. Join with sl st to first sc. 12 sc
Lightly stuff Santa.
- 5th rnd: Ch 1. 1 sc in first sc. 1 sc in each sc around. Join with sl st to first sc.
- 6th rnd: Ch 1. (Sc2tog) 6 times. Join with sl st to first sc. 6 sc
- 7th rnd: Ch 1. 1 sc in first sc. 1 sc in each sc around. Join with sl st to first sc.
- 8th rnd: Ch 1. (Sc2tog) 3 times. Join with sl st to first sc.
Fasten off.
Loop: With D, ch 9. Fasten off. Sew loop to the top of Santa’s Hat.
Mustache: Cut a 3″ [7.5 cm] length of D. Tie a knot in the center of the strand. Trim to ¾” [2 cm], with the knot at the center. Sew into place as shown in the picture.
With one ply of E, embroider Eyes as shown in the picture.
Hot Cocoa Make 1 Each with G as Color 1 and I as Color 1
Front
With Color 1, ch 9.
- 1st row: 1 sc in 2nd ch from hook. 1 sc in each ch to end of ch. Turn. 8 sc
- 2nd row: Ch 1. 1 sc in first sc. 1 sc in each sc to end of row. Turn.
Repeat the 2nd row until work from beginning measures 2″ [5 cm].
Next row: Ch 1. 1 sc in first sc. Join F. With F, 1 sc in next sc. 1 hdc in next sc. 1 dc in each of the next 2 sc. 1 hdc in next sc. 1 sc in next sc. Break F. With Color 1, 1 sc in last sc. Turn.
Next row: 1 sl st in back loop only in each st to end of row. Fasten off.
With D, embroider 3 French knots for marshmallows.
Back
With Color 1, ch 9.
- 1st row: 1 sc in 2nd ch from hook. 1 sc in each ch to end of ch. Turn. 8 sc
- 2nd row: Ch 1. 1 sc in first sc. 1 sc in each sc to end of row. Turn.
Repeat the 2nd row until work from beginning measures 2″ [5 cm].
Next row: Ch 1. 1 sc in each of the first 2 sc. 1 hdc in next sc. 1 dc in each of the next 2 sc. 1 hdc in next sc. 1 sc in each of the last 2 sc. Turn.
Next row: 1 sl st in back loop only in each st to end of row. Fasten off.
Handle, Finishing, and Loop
With Color 1, ch 7.
- 1st row: 1 sc in 2nd ch from hook. 3 sc in next ch. 1 sc in each of the next 2 ch. 3 sc in next ch. 1 sc in last ch. Fasten off.
With sl st edges facing out and Handle sandwiched between Front and Back on the right of the Hot Cocoa, sew sides, top, and bottom together.
With Color 1, ch 9. Fasten off. Sew loop to the top right corner of Hot Cocoa.
Snowflake Make 2
With D, ch 2.
- 1st rnd: 6 sc in 2nd ch from hook. Join with sl st to first sc. 6 sc
- 2nd rnd: Ch 2, which does not count as hdc. 2 hdc in first sc. 2 hdc in each sc around. Join with sl st to first hdc. 12 hdc
- 3rd rnd: Ch 1. 1 sc in each of the first 2 hdc. Ch 3. *1 sc in each of the next 2 hdc. Ch 3. Repeat from * around. Join with sl st to first sc.
- 4th rnd: 1 sl st in each of the first 2 sc. (Sl st. Ch 2. Sl st) all in the next ch-3 space. *1 sl st in each of the next 2 sc. (Sl st. Ch 2. Sl st) all in the next ch-3 space. Repeat from * around. Join with sl st to first sl st.
Loop: Ch 8. Join with sl st to last sl st. Fasten off.
Mitten Make 1 Each with L as Color 1 and N as Color 1
With A, ch 14. Join with sl st to first ch, making sure not to twist.
- 1st rnd: Ch 2. 1 hdc in each ch around. Join with sl st to first hdc. 14 hdc
Join Color 1. Break A.
- 2nd rnd: With Color 1, ch 1. Working in back loops only, 1 sc in first hdc. 1 sc in each hdc around. Join with sl st to first sc.
Thumb Gusset
- 1st rnd: Ch 1. 1 sc in each of the first 2 sc. 2 sc in each of the next 2 sc. 1 sc in each remaining sc around. Join with sl st to first sc. 16 sc
- 2nd rnd: Ch 1. 1 sc in each of the first 2 sc. 2 sc in next sc. 1 sc in each of the next 2 sc. 2 sc in next sc. 1 sc in each remaining sc around. Join with sl st to first sc. 18 sc
Hand Shaping
- 1st rnd: Ch 1. 1 sc in each of the first 2 sc. Skip the next 4 sc. 1 sc in each remaining sc around. Join with sl st to first sc.
- 2nd rnd: Ch 1. 1 sc in first sc. 1 sc in each sc around. Join with sl st to first sc.
Repeat the 2nd round once more.
Next rnd: Ch 1. 1 sc in first sc. Sc2tog. *1 sc in next sc. Sc2tog. Repeat from * twice more. 1 sc in each of the next 2 sc. Join with sl st to first sc. 10 sc
Next rnd: Ch 1. (Sc2tog) 5 times. Join with sl st to first sc. 5 sc
Fasten off, leaving a tail. Draw tail through remaining sc and fasten securely.
Thumb
Join Color 1 with sl st in the first skipped st of the thumb gusset.
- 1st rnd: Ch 1. 1 sc in same st as sl st. 1 sc in each of the next 3 sc. Join with sl st to first sc. 4 sc
- 2nd rnd: Ch 1. 1 sc in first sc. 1 sc in each sc around. Join with sl st to first sc.
Fasten off, leaving a tail. Draw tail through remaining sc and fasten securely.
With A, ch 9. Fasten off. Sew loop to Mitten as shown in the picture.
Holly Make 1 with K as Color 1 and G as Color 2, and 1 with C as Color 1 and H as Color 2
Leaf Make 2
With Color 1, ch 8.
Working in top loops only, 1 sc in 2nd ch from hook. 1 hdc in next ch. (1 hdc. 1 dc. 1 hdc) all in next ch. 1 sc in next ch. (1 hdc. 1 dc. 1 hdc) all in next ch. 3 sc in last ch. Do not turn. Work in remaining loops of foundation ch, 1 hdc in next ch. (1 hdc. 1 dc. 1 hdc) all in next ch. 1 sc in next ch. (1 hdc. 1 dc. 1 hdc) all in next ch. 2 sc in first ch. Join with sl st to first sc. Fasten off.
Berry
With Color 2, ch 2.
1st rnd: 6 sc in 2nd ch from hook. Join with sl st to first sc. Fasten off.
Finishing
Sew 2 Leaves and Berry together as shown in the picture.
With Color 1, ch 9. Fasten off. Sew loop to the top of Holly.
Gift Make 1 with G as Color 1 and H as Color 2, and 1 with B as Color 1 and J as Color 2
Front and Back Make Alike
With Color 1, ch 9.
- 1st row: 1 sc in 2nd ch from hook. 1 sc in each ch to end of ch. Turn. 8 sc
- 2nd row: Ch 1. 1 sc in first sc. 1 sc in each sc to end of row. Turn.
Repeat the 2nd row until work from beginning measures 2¼” [5.5 cm]. Fasten off.
Ribbon
With Color 2, ch 9.
1st row: 1 sc in 2nd ch from hook. 1 sc in each ch to end of hook. Fasten off.
Sew Ribbon to Front as shown in the picture.
Bow
With Color 2, ch 7.
- 1st row: 1 hdc in 3rd ch from hook. 1 hdc in each ch to end of ch. Turn. 5 hdc
- 2nd row: Ch 2, which does not count as hdc. 1 hdc in first hdc. 1 hdc in each hdc to end of row. Fasten off.
With Color 2, wrap yarn around the middle of Bow to cinch in the middle. Sew onto Front as shown in the picture.
With Bow facing out, sew around the edges of Front and Back, lightly stuffing as you go.
With Color 1, ch 9. Fasten off. Sew loop onto the corner of Gift as shown in the picture.
Candy Cane Make 2
Coils
Make 1 each in A and H.
Ch 20. 2 hdc in 3rd ch from hook. 3 hdc in each ch to end of chain. Fasten off.
Twist Coils around each other to form Candy Cane. Bend slightly approximately 1″ [2.5 cm] from the top. Using H, tack loosely to form the curve.
With H, ch 9. Fasten off. Sew loop to the top of Candy Cane as shown in the picture.
Stocking Make 1 Each with B as Color 1 and K as Color 1
Main
With A, ch 14.
- 1st row: With RS facing, 1 hdc in 3rd ch from hook. 1 hdc in each ch to end of row. Join Color 1. Turn. 12 hdc
- 2nd row: With Color 1, ch 1. Working in front loops only, 1 sc in first hdc. 1 sc in each hdc to end of row. Turn.
Leg
1st row: Ch 1. 1 sc in first sc. 1 sc in each sc to end of row. Turn.
Repeat the 1st row until work from beginning measures approximately 2″ [5 cm], ending with RS facing. Fasten off.
Heel
With RS facing, skip the first 9 sc. Join A with sl st in next sc. Ch 1. 1 sc in same sc. 1 sc in each of the last 2 sc. Bring the other side of the leg around. 1 sc in each of the first 3 sc. Turn.
- Next row: Ch 1. 1 sc in each of the first 4 sc. Turn.
- Next row: Ch 1. 1 sc in each of the first 2 sc. Turn.
- Next row: Ch 1. 1 sc in each of the next 2 sc. 1 sc in next sc of long row below. Turn. 3 sts
- Next row: Ch 1. 1 sc in each of the next 3 sc. 1 sc in next sc of long row below. Turn. 4 sts
- Next row: Ch 1. 1 sc in each of the next 4 sc. 1 sc in next sc of long row below. Turn. 5 sts
- Next row: Ch 1. 1 sc in each of the next 5 sc. 1 sc in next sc of long row below. Turn. 6 sts
- Next row: Ch 1. 1 sc in each of the next 6 sc. 1 sc in next sc of long row below. Turn. 7 sts
- Next row: Ch 1. 1 sc in each of the next 7 sc. 1 sc in next sc of long row below. Turn. 8 sts
Fasten off.
Foot
With RS of work facing, skip the first 3 sc of Heel. Join Color 1 with sl st in next sc. Ch 1. 1 sc in same sc. 1 sc in each of the next 2 sc of Heel. Skip next sc of Leg. 1 sc in each of the next 4 sc. Skip next sc of Leg. 1 sc in each of the next 3 sc of Heel. Ch 1. Turn. 10 sts
- Next row: Ch 1. 1 sc in each sc to end of row. Turn.
- Next row: Ch 1. 1 sc in each sc to end of row. Join A. Turn.
Toe
Next 2 rows: With A, ch 1. 1 sc in each sc to end of row. Turn.
Next row: Ch 1. (Sc2tog) 5 times. Fasten off.
Sew Cuff and Leg back seams. Sew Foot and Toe seams. Sew corners of Heel closed.
With A, ch 9. Fasten off. Sew loop to the top corner of Stocking as shown in the picture.
Reindeer Make 2
Snout
With F, ch 2.
- 1st rnd: 8 sc in 2nd ch from hook. Join with sl st to first sc. 8 sc
- 2nd rnd: Ch 1. 1 sc in first sc. 1 sc in each sc around. Join with sl st to first sc.
Repeat the 2nd round 2 times more.
Head
- 1st rnd: Ch 1. 2 sc in first sc. 2 sc in each sc around. Join with sl st to first sc. 16 sc
- 2nd rnd: Ch 1. 1 sc in first sc. 1 sc in each sc around. Join with sl st to first sc.
Repeat the 2nd round 3 more times.
Next rnd: Ch 1. (Sc2tog) 8 times. 8 sc Fasten off, leaving a tail.
Lightly stuff Head. Using the tail, gather the top of Head and fasten securely.
Nose
With H, ch 2.
1st rnd: 6 sc in 2nd ch from hook. Join with sl st to first sc. Fasten off.
Ears Make 2
With F, ch 4.
1st row: Sl st into 2nd ch from hook. 1 sc in next ch. Sl st in last ch. Fasten off.
Antlers Make 2
With M, ch 5.
- 1st row: 1 sc in 2nd ch from hook. 1 sc in each ch to end of row. Turn. 4 sc
- 2nd row: Sl st in each of the first 3 sc. Ch 2. Sl st in same sc as last sl st. Sl st in last sc. Fasten off.
With E, embroider eyes as shown in the picture. Sew Antlers, Ears, and Nose onto Head and Snout as shown in the picture.
With F, ch 9. Fasten off. Sew loop to the top of Reindeer as shown in the picture.
Gingerbread Man Make 2
Head
With F, ch 3.
1st rnd: 10 hdc in 3rd ch from hook. Join with sl st to first hdc. Fasten off.
Arms
- 1st row: Ch 4. Join with sl st to any 2 hdc in Head. Ch 5. Turn.
- 2nd row: 1 sc in 2nd ch from hook. 1 sc in each of the next 3 ch. 1 sc in each of the next 2 sl st. 1 sc in each ch to end of ch. Turn. 10 sc
- 3rd row: Ch 1. 1 sc in first sc. 1 sc in each sc to end of row. Fasten off.
Torso
- 1st row: Skip the first 3 sc. Join with sl st in next sc. Ch 1. 1 sc in same st as sl st. 1 sc in each of the next 3 sc. Turn. 4 sc
- 2nd row: Ch 1. 1 sc in first sc. 1 sc in each of the next 3 sc. Turn.
Repeat the 2nd row once more. Do not fasten off.
Legs
- 1st row: Ch 1. 1 sc in first sc. 1 sc in next sc. Turn. 2 sc Leave remaining sts unworked.
- 2nd row: Ch 1. 1 sc in each of the next 2 sc. Turn.
Repeat the last row twice more. Fasten off. Repeat the last row twice more. Fasten off.
Join with sl st to first unworked st on Torso.
- 1st row: Ch 1. 1 sc in first sc. 1 sc in next sc. Turn. 2 sc
- Repeat the last row 3 more times. Fasten off.
With A, sl st into any edge st of Gingerbread Man. Sl st evenly around Gingerbread Man. Fasten off.
With F, ch 9. Fasten off. Sew loop to the top of Gingerbread Man as shown in the picture.
Overall Assembly and Finishing
- Sew Tree to Background 2½” [6 cm] from the top.
- Sew 24 buttons onto Tree through all thicknesses, evenly spaced as shown in the photo.
- Sew Star to the top of Tree as shown in the picture.
- Sew Pockets onto Background in order according to the diagram, beginning 1¼” [3 cm] up from the bottom, 1″ [2.5 cm] from the side, and leaving 1″ [2.5 cm] between Pockets.
- Sew Tabs across the top edge as stated.
- Snowman: secure loop onto the top of Snowman’s Head.
- Santa: sew loop to the top of Santa’s Hat.
- Hot Cocoa: sew loop to the top right corner.
- Holly: sew loop to the top.
- Candy Cane: sew loop to the top.
- Mitten: sew loop to the Mitten.
- Stocking: sew loop to the top corner.
- Reindeer: sew loop to the top.
- Gingerbread Man: sew loop to the top.
- Wreath: sew the center pieces together, work the wreath trim through both thicknesses while lightly stuffing, attach the ch-6 loop, and fasten the tied bow to the bottom.
- Complete each ornament’s local finishing instructions, including sewing Hot Cocoa sides, top, and bottom; sewing Gift ribbons and bows; sewing Stocking seams and heel corners; and securing all embroidery and appliqué details.
Ways to Display Your Finished Crochet
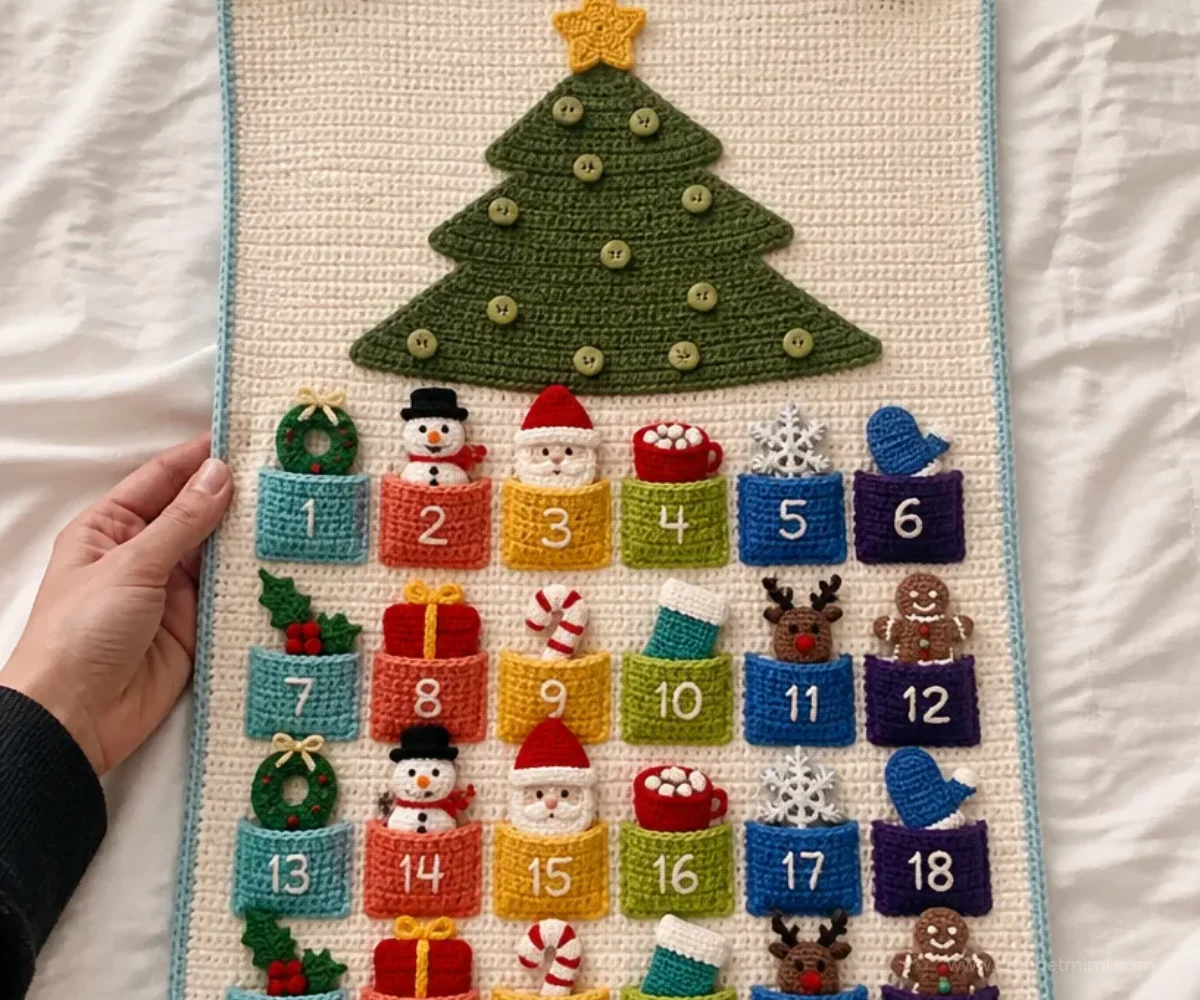
- Hang the calendar on a wall where the pockets and tree are easy to reach.
- Fill each pocket with its matching ornament and add a small note or activity card if desired.
- Use it as a family Christmas tradition by moving one ornament to the tree each day.
- Display it in a playroom, entryway, classroom, or holiday craft area.
- Store the ornaments separately and bring out a few as seasonal decorations on a mantel or shelf.
- Pair the calendar with other handmade holiday décor; small crochet appliqués can also coordinate with gift wrapping or greeting cards, such as these crochet flower appliqués.
Caring for Your Crochet Project
Keep the calendar and ornaments dry and protected from excessive heat. Because the project includes buttons, embroidery, stuffing, and many sewn components, gentle dusting is the safest routine maintenance method.
For small marks, spot-clean carefully with a slightly damp cloth and avoid saturating the fabric. Test any cleaning method on an inconspicuous area first. Do not wring, twist, or place the calendar in a dryer.
Store the calendar flat or loosely rolled in a breathable container once the season ends. Keep the ornaments from being crushed, and avoid placing heavy objects on the pockets or tree. Check the buttons and ornament loops before hanging the calendar each year.
Tips for Better Results
- Keep a color key nearby. The pattern uses 14 contrast colors, so label yarn balls or place small color samples beside the instructions.
- Count after every increase row. The tree sections must reach 34, 54, and 74 stitches respectively.
- Mark the beginning of joined rounds. This is especially helpful for the small ornaments, where a missed stitch changes the shape quickly.
- Watch the working loops carefully. The Santa hat uses front loops and back loops two rows below, while the Mitten and Stocking also specify back-loop or front-loop work.
- Use light stuffing. Overstuffing Snow