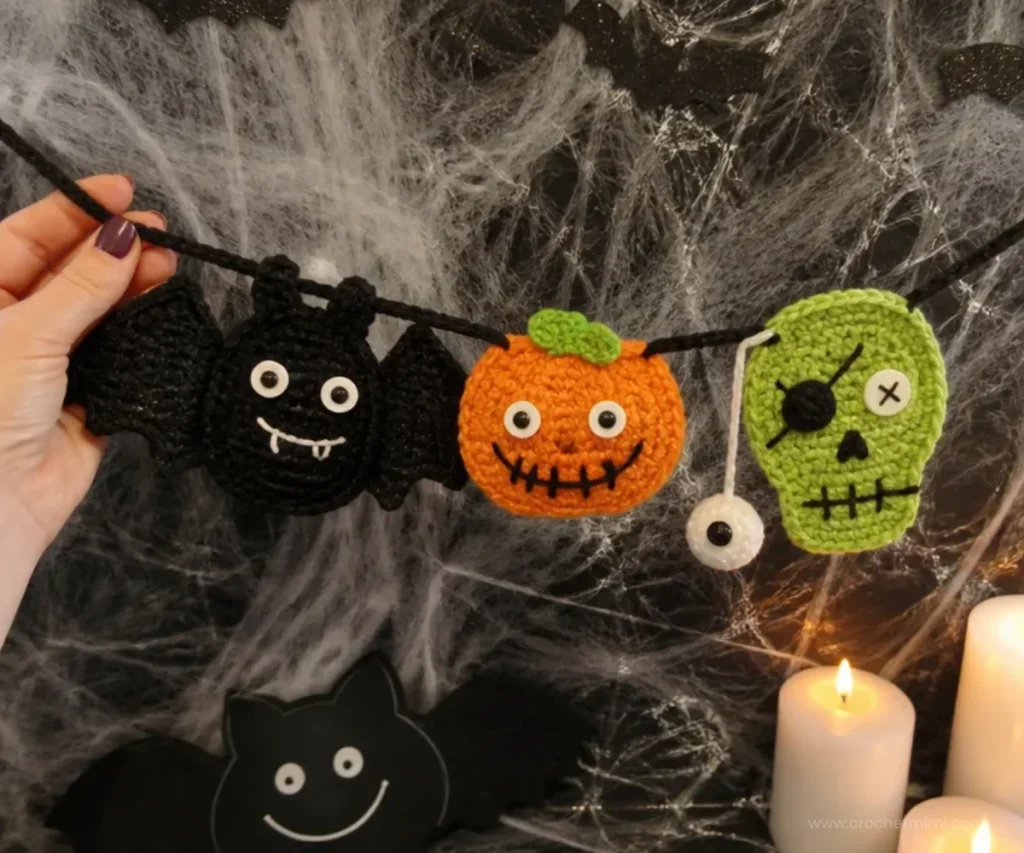
A crochet Halloween party banner is a cheerful way to decorate a mantel, doorway, party table, or seasonal display. This project combines bats, pumpkins, and skulls in bold Halloween colors, creating a reusable garland with plenty of character. The individual motifs are small enough to make as decorative accents, while the finished banner can be customized with as many pieces as you like. Crocheters who enjoy playful seasonal projects may also like these beginner-friendly crochet flowers for a contrasting handmade display.
Why You’ll Love This Crochet Project
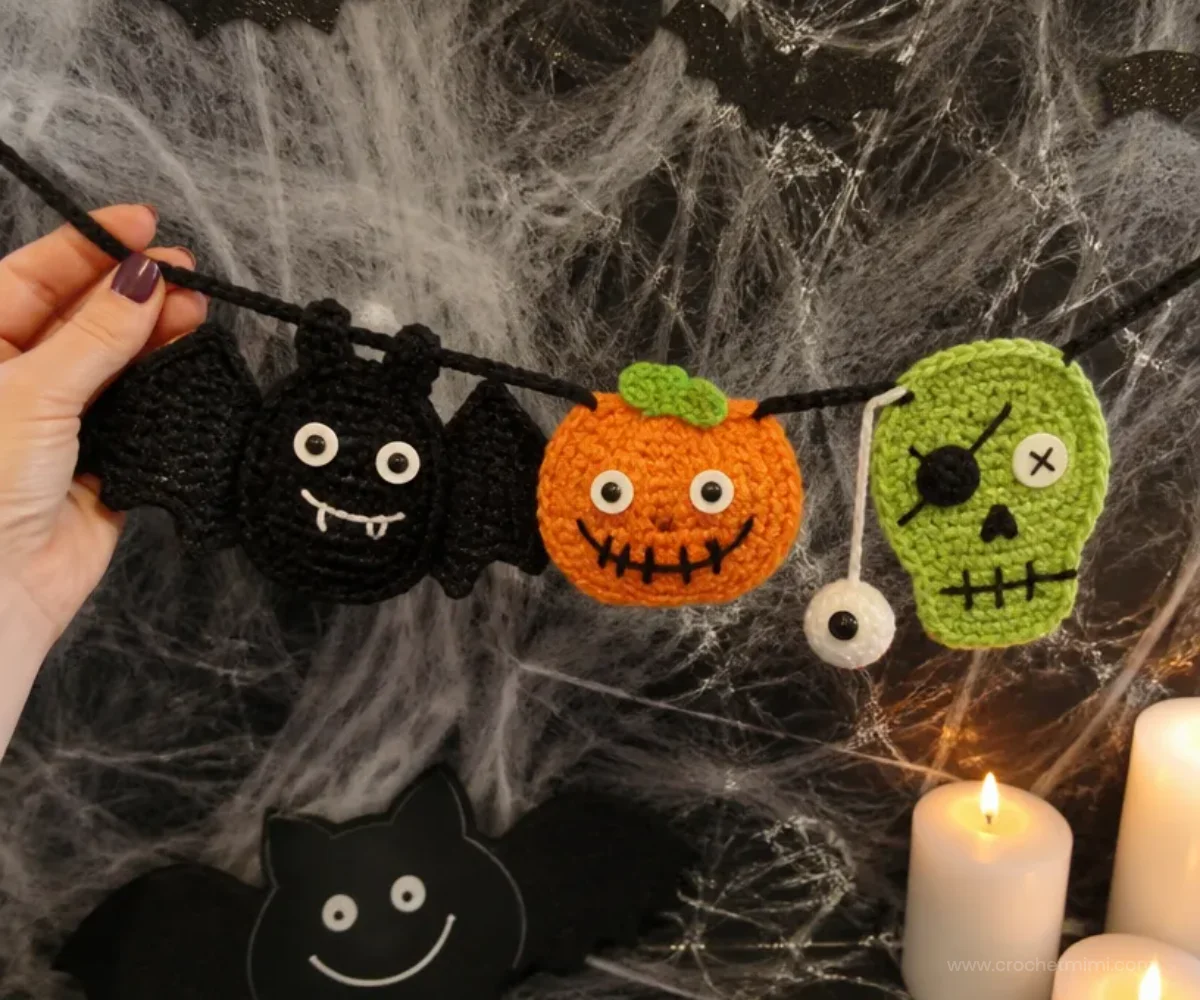
- It creates a complete seasonal decoration. Bats, pumpkins, and skulls give the banner a classic Halloween look without requiring a complicated background.
- You can practice several techniques. The pattern includes continuous rounds, increases, decreases, color changes, embroidery, and simple motif assembly.
- The motifs are customizable. The approved pattern makes three bats, two pumpkins, and two skulls, but it also invites you to make more pieces and arrange them in your preferred order.
- It works for many decorating styles. Use the banner for a Halloween party, a children’s room, a craft-room display, or a small seasonal corner.
- It makes a thoughtful handmade gift. A finished garland is lightweight, reusable, and easy to package or mail.
Crochet Mimi Tip: Keep the motifs flat while finishing them so the eyes, embroidered details, and banner cord stay evenly positioned.
Before You Start Crocheting
The project includes three bats, two pumpkins, and two skulls. Each motif is crocheted separately, finished with facial details, and then threaded together with a long tail of black yarn. The pattern uses US crochet terminology and a 4mm [US G-6] hook.
The finished motifs measure:
- Bat: 4½” [11 cm] high × 8½” [22 cm] wide
- Pumpkin: 4” [10 cm] high × 4½” [11 cm] wide
- Skull: 5” [13 cm] high × 4½” [11 cm] wide
The construction begins with circular bodies worked in continuous rounds. Wings, ears, leaves, mouths, and eyes are then shaped with additional stitches. The skull includes a stuffed eyeball attached so it hangs about an inch away from the skull.
Useful Abbreviation
- dec (decrease): Draw up a loop in the next 2 sts, yo and draw through all 3 loops on hook.
Materials You’ll Need
- RED HEART® Super Saver®: 1 skein 312 Black (A)
- RED HEART® Super Saver®: 1 skein 316 Soft White (B)
- RED HEART® Super Saver®: 1 skein 254 Pumpkin (C)
- RED HEART® Super Saver®: 1 skein 672 Spring Green (D)
- Susan Bates® Crochet Hook: 4mm [US G-6]
- Yarn needle
- Polyester fiberfill
- Stitch marker
- Sewing thread and needle
- Ten 5mm black buttons for eyes
- Two 9mm safety eyes (or buttons)
Black yarn forms the bats and banner threading, pumpkin yarn creates the pumpkins, and spring green yarn is used for the skulls and pumpkin leaves. The soft white yarn makes the eyes. Use the fiberfill only for the skull eyeballs, and place safety eyes securely if you choose them instead of buttons.
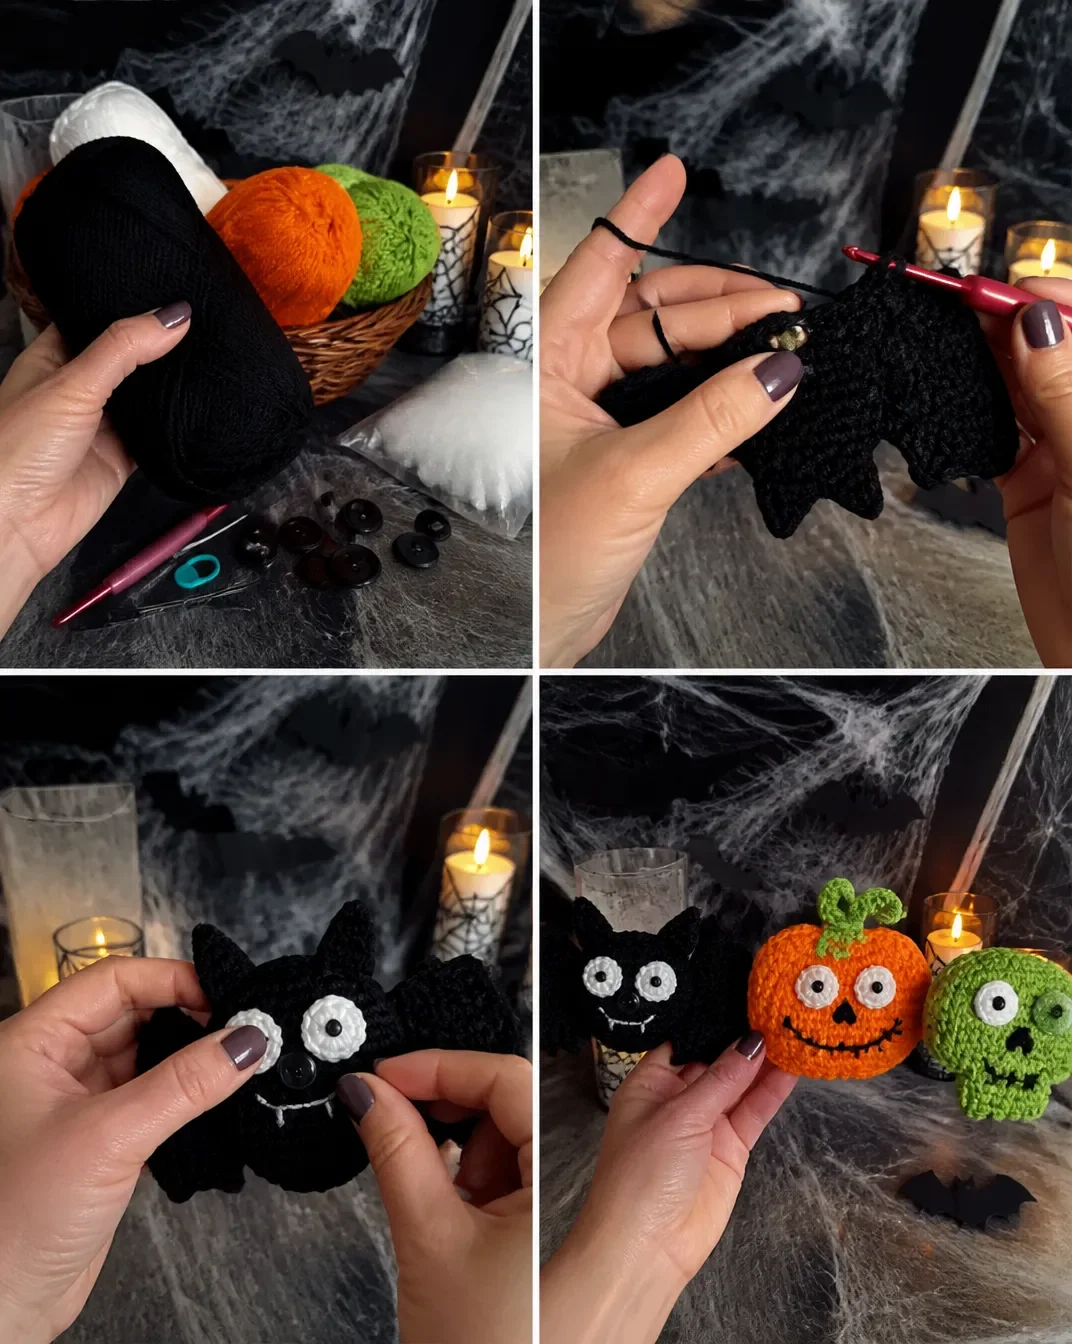
Complete Crochet Tutorial
Bat Make 3
Body
Round 1: With A, ch 4; 8 dc in 4th ch from hook; do NOT join but work in continuous rounds. Place marker in first st and move up each round.
Round 2: 2 Dc in each dc around – 16 dc.
Round 3: 2 Dc in each dc around – 32 dc.
Ears Round 4
Ears Round 4: Sc in next dc,
- ch 4, slip st in 2nd ch from hook, sc in next 2 ch **,
2 dc in next dc on Body, hdc in next dc, 2 dc in next dc;
repeat from * to ** once more,
sc in next dc, slip st in next dc.
Do not fasten off but continue with Wing.
Wing
Row 1: Ch 3, dc in same dc as slip st, dc in next 5 dc; turn – 6 dc.
Row 2: Ch 3 (counts as dc), dc in next 6 dc; turn – 7 sts.
Rows 3 and 4: Repeat Row 2.
Row 5: Ch 3, hdc in next dc, dc in next dc, 2 dc in next dc, slip st in next dc – 5 sts. Fasten off.
With wrong side facing, join A in 2nd st from Ear and repeat Rows 1–5 for next Wing.
Eyes Make 2
With B, ch 2; 5 sc in 2nd ch from hook; join with a slip st to first sc. Fasten off, leaving a long tail for sewing and embroidery.
Bat Finishing
With B, use the remaining yarn tail to sew eyes to Bat and embroider mouth and teeth as pictured with Straight sts.
Sew buttons to eyes as pictured.
Weave in ends.
Bat measurement: Bat measures 4½” [11 cm] high × 8½” [22 cm] wide.
Pumpkin Make 2
Rounds 1–3
With C, work the same as Bat:
Rounds 1–3: With C, work same as Bat 32 dc.
Round 4
Round 4: Sc in next 2 dc, 2 hdc in next dc, 2 dc in next 8 dc, hdc in next 3 dc, sc in next 4 dc, hdc in next 3 dc, 2 dc in next 8 dc, 2 hdc in next dc, sc in next 2 dc changing to D in last sc.
Leaf
With D, ch 7; slip st in 2nd ch from hook, hdc in next ch, dc in next 2 ch, hdc in next ch, slip st in last ch, slip st in next st on Pumpkin, ch 4, sc in 2nd ch from hook, sc in next ch, (sc, slip st) in last ch. Fasten off.
Eyes
The pumpkin eyes are worked as a pair.
First Eye: With B, ch 2; 5 sc in 2nd ch from hook; join with a slip st to first sc. Fasten off, leaving a long tail for sewing.
Second Eye Round 1: With B, ch 2; 5 sc in 2nd ch from hook; do not join.
Round 2: 2 Sc in each sc around; join with a slip st to first sc – 10 sc. Fasten off.
Pumpkin Finishing
Sew eyes to Pumpkin using the remaining yarn tail of B.
Sew buttons on to eyes.
With A embroider teeth as pictured.
Weave in ends.
Pumpkin measurement: Pumpkin measures 4” [10 cm] high × 4½” [11 cm] wide.
Skull Make 2
Body
Rounds 1–3: With D, work same as Bat 32 dc.
Round 4: [2 Dc in next dc, dc in next dc] 16 times – 48 dc.
Do not fasten off but continue with Mouth.
Mouth
Row 1: Ch 3, dc in same dc, dc in next 7 dc; turn – 8 dc.
Row 2: Ch 3 (counts as dc), dc in next 8 dc; turn – 9 sts.
Row 3: Ch 2 (counts as hdc), hdc in next 7 dc, ch 2, slip st in top of ch-3. Fasten off.
Eyeball
Round 1: With B, ch 2; 5 sc in 2nd ch from hook; do not join but work in continuous rounds.
Round 2: 2 Sc in each sc around – 10 sc.
Round 3: 2 Sc in each sc around – 20 sc.
Rounds 4–6: Sc in each sc around.
Round 7: [Dec] 10 times – 10 sc.
If using 9mm safety eye, place now in the center of Round 1. Add stuffing.
Round 8: [Dec] 5 times – 5 sc. Fasten off, leaving a long tail.
With yarn needle, weave tail through remaining sts and pull tight.
Skull Finishing
With the remaining tail from the Eyeball, attach it to the Skull so the Eyeball will hang about an inch away as pictured.
With A, embroider a mouth, nose, and other eye for Skull as pictured.
Weave in ends.
Skull measurement: Skull measures 5” [13 cm] high × 4½” [11 cm] wide.
Final Banner Assembly
With yarn needle, weave a long tail of A through the wings of the Bat, the tip of the Leaf of the Pumpkin, and through the Skull’s head as pictured.
Add the rest as pictured.
Make as many more Bats, Pumpkins, and Skulls as you want and add them in the order you like.
When arranging the pieces, leave enough yarn at both ends to hang the banner. Thread through sturdy sections of each motif rather than loose embroidered details.
Finished Project Inspiration
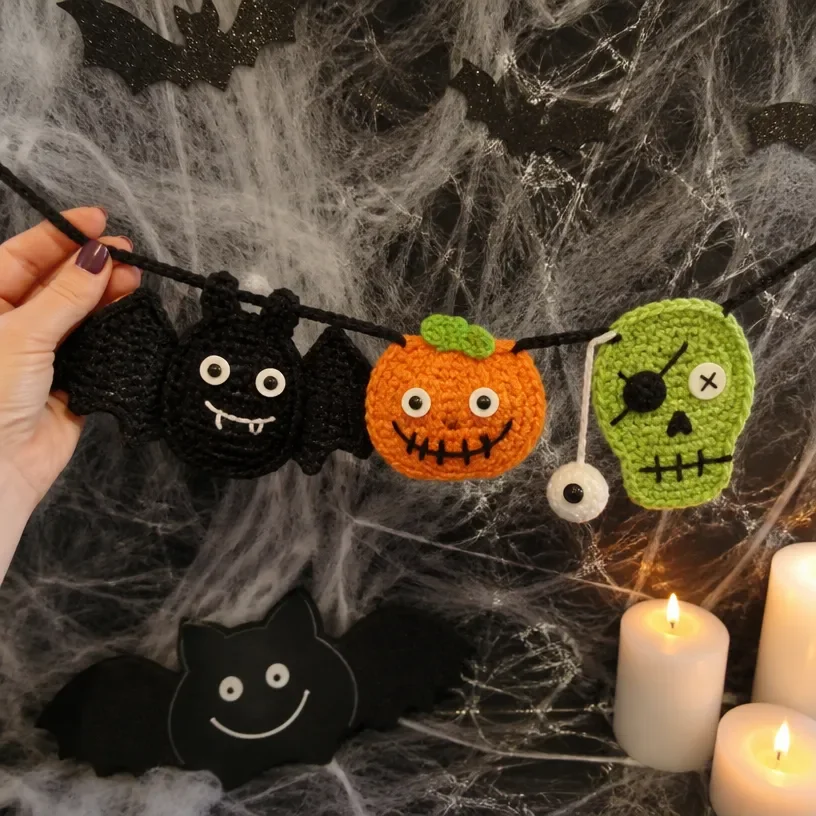
- Hang it across a mantel with small pumpkins or battery-operated lights nearby.
- Decorate a party table by placing the banner along the front edge or behind the serving area.
- Use it in an entryway to create a seasonal welcome without taking up floor space.
- Make a longer garland by crocheting additional bats, pumpkins, and skulls in a repeating sequence.
- Give it as a handmade Halloween gift to someone who enjoys reusable holiday décor.
- Pair it with other handmade decorations, such as floral accents; colorful ideas like these crochet bell flower designs can help inspire mixed seasonal displays.
Caring for Your Crochet Project
Dust the finished banner gently with a soft brush or use a vacuum cleaner on a low setting with a fabric-covered nozzle. Pay particular attention to the buttons, safety eyes, embroidered details, and the stuffed eyeballs.
For small marks, use careful spot cleaning rather than soaking the entire banner. Avoid excessive water around the buttons and safety eyes, and do not pull on the hanging eyeballs or banner cord.
Store the banner flat or loosely coiled in a dry container. Keep it away from direct heat, sharp objects, and anything that could snag the wings or leaf tips. Before storing, make sure the motifs are completely dry and that all yarn ends remain secure.
Tips for Better Results
- Use a stitch marker from Round 1. The bat, pumpkin, and skull bodies are worked in continuous rounds, so the marker helps identify the beginning of each round.
- Count the body stitches carefully. The first three rounds of the bat produce 8 dc, 16 dc, and 32 dc. The skull’s fourth round increases to 48 dc.
- Keep the color changes neat. The pumpkin changes from C to D in the last sc of Round 4, so complete that final stitch carefully.
- Leave long tails for sewing. The eye instructions specifically require long tails, which make attaching the eyes and securing details easier.
- Stuff the skull eyeball gradually. Add fiberfill after Round 7, before closing Round 8, so the piece remains rounded without overfilling.
- Check the orientation before threading. Lay every motif flat and decide which side should face outward before weaving the long A tail through the banner pieces.
- Secure facial details firmly. Buttons, safety eyes, and embroidered features should be attached securely, especially if the banner will be displayed where children or pets can reach it.
- Weave in ends as you finish each motif. This prevents loose tails from becoming tangled during final assembly.
Creative Ways to Customize Your Project
The approved pattern uses black, soft white, pumpkin, and spring green for a traditional Halloween palette. Optional changes can give the banner a different mood without altering the construction:
- Replace the pumpkin color with a deeper rust, gold, or pale orange for a vintage autumn look.
- Use purple or dark gray in place of black for a softer gothic palette.
- Make a longer banner with extra motifs, keeping the same threading method.
- Arrange the pieces symmetrically, or use a playful irregular sequence of bats, pumpkins, and skulls.
- Add more pumpkins for a harvest-themed display while keeping the skulls and bats as accents.
- Pair the banner with a handmade bouquet; a crochet daffodil bouquet can provide a bright contrast when Halloween décor is mixed with autumn crafts.
Changing yarn weight or hook size is optional, but it may affect the finished dimensions, stitch definition, yarn requirements, and the way the banner pieces hang. For the stated measurements, use the supplied yarn and 4mm hook.
Frequently Asked Questions
How many motifs does the approved pattern make?
The pattern makes three bats, two pumpkins, and two skulls. You can make additional motifs and add them in any order for a longer banner.
What hook size should I use?
Use a Susan Bates® Crochet Hook, 4mm [US G-6].
Which yarn colors are used?
The pattern uses RED HEART® Super Saver® in 312 Black (A), 316 Soft White (B), 254 Pumpkin (C), and 672 Spring Green (D), with one skein of each color listed.
Are the bats, pumpkins, and skulls made in the same way?
Their first three body rounds follow the same circular increase structure, but each motif has different shaping afterward. Bats form ears and wings, pumpkins form a leaf and facial details, and skulls include a mouth and a separate stuffed eyeball.
How is the banner assembled?
A long tail of A is woven through the wings of the bats, the tip of the pumpkin leaf, and the skull’s head. The remaining pieces are added in the order you choose.
Can I use buttons instead of safety eyes?
Yes. The materials list allows two 9mm safety eyes or buttons. The skull eyeball instruction places the 9mm safety eye in the center of Round 1 if you are using one.
How should I attach the pumpkin eyes?
Sew the eyes to the pumpkin using the remaining yarn tail of B, then sew buttons on to the eyes. Embroider the teeth with A and weave in the ends.
How do I keep the banner from tangling?
Lay the motifs flat before threading them, keep the long assembly tail loosely tensioned, and store the finished banner flat or loosely coiled rather than tightly knotted.
Conclusion
This crochet Halloween party banner brings together recognizable seasonal shapes, bold colors, and approachable shaping techniques. Make the stated bats, pumpkins, and skulls for a compact garland, or add more motifs for a fuller display. For another version of the seasonal idea, compare this Red Heart Halloween party banner pattern with the broader collection of free Halloween crochet patterns for more decorating inspiration.