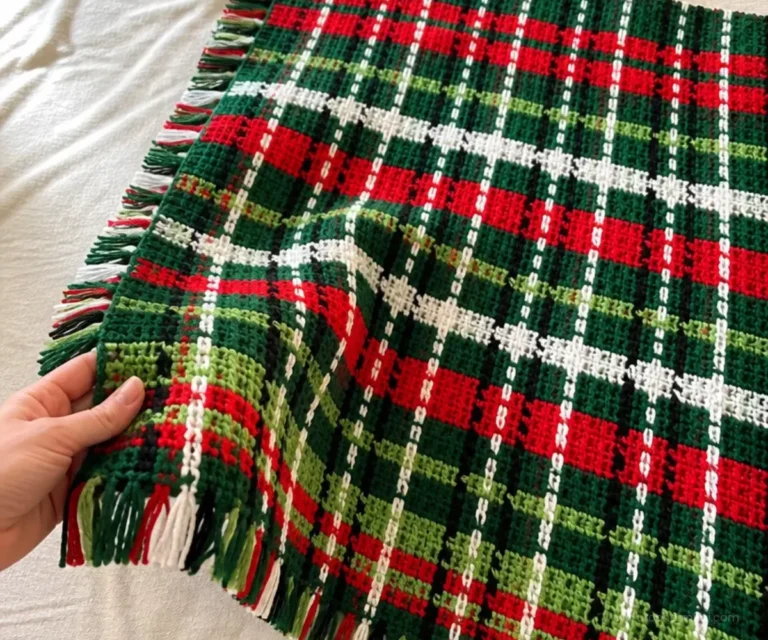
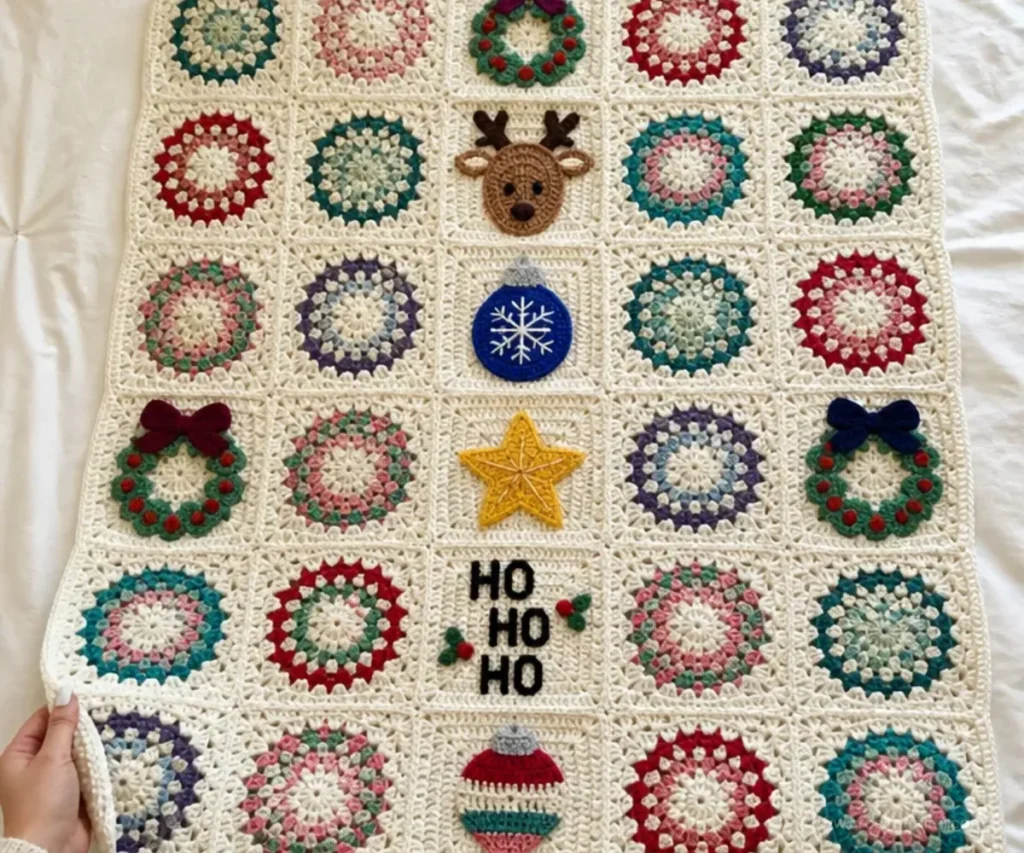
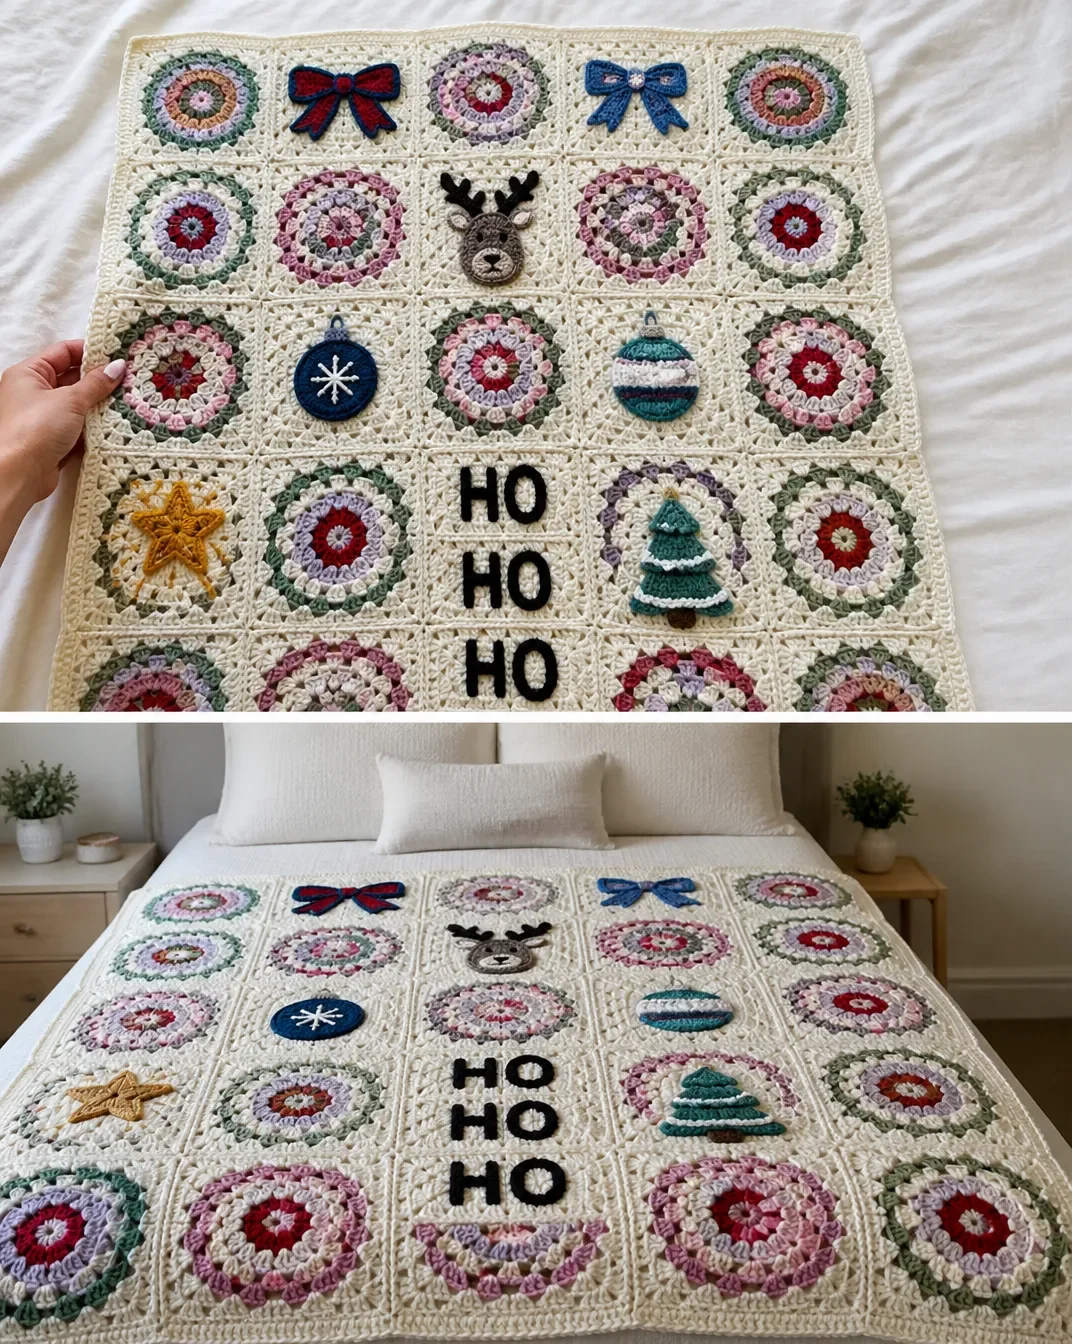
A playful mix of colorful motifs, velvet appliqués, and cheerful holiday characters makes this Crochet Kooky Christmas Blanket Pattern a memorable seasonal project. The finished blanket combines vintage white squares with bright stripes, bows, ornaments, a reindeer, “HO HO HO,” a star, and a Christmas tree. Crocheters who enjoy assembling detailed motifs will appreciate the variety, while the finished piece makes a cozy holiday throw or a thoughtful handmade gift. For another festive crochet idea, compare its decorative spirit with this crochet bear ornament project.
Why You’ll Love This Crochet Project
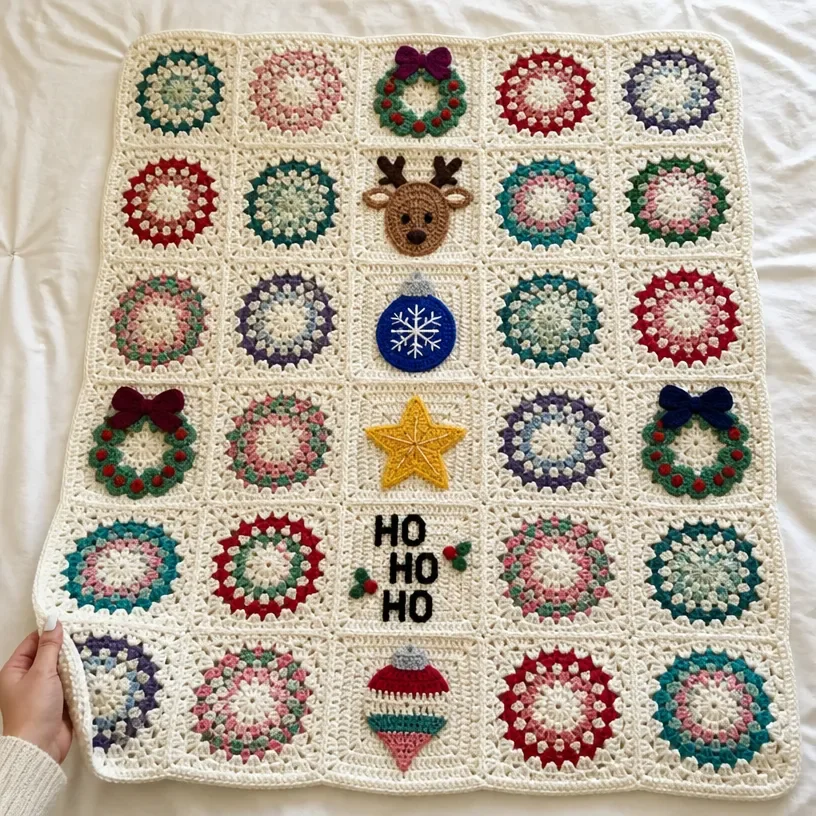
- It has a joyful holiday theme. The blanket includes recognizable Christmas details without relying on a single repetitive stitch pattern.
- It builds motif skills. You will practice working in rounds, shaping corners, changing colors, and joining separate pieces.
- The appliqués add personality. Velvet bows, lettering, ornaments, a reindeer, star, and tree create a dimensional decorative surface.
- It makes a useful seasonal gift. A completed blanket can be displayed during the holidays, folded over a chair, or given as a family keepsake.
- It offers color-planning practice. The striped motifs use three different color sequences, giving the finished blanket a lively, coordinated look.
Crochet Mimi Tip: Make one motif of each type first and use them as visual references while completing the remaining pieces. This makes color placement and assembly easier to track. You may also find Blooming Bouquet Crochet Blanket Pattern useful.
Pattern Overview
This blanket is built from three motif styles:
- Motif 1: make 4 alike.
- Motif 2: make 8 alike.
- Motif 3a: make 4.
- Motif 3b: make 7.
- Motif 3c: make 7.
The motifs are joined into 6 horizontal strips with 5 motifs in each strip, and the six strips are then joined together. Flat slip-stitch joining is worked through the back loops only, with the working yarn held on the wrong side to create a flat slip-stitch chain detail on the right side.
The completed surface is embellished with bows, tails, a tie, three sets of “HO HO HO” letters, reindeer details, round and pointed ornaments, a star, and a tree. Appliqués are sewn to the blanket with Contrast M, and shine lines are embroidered around the star with Contrast O.
The pattern uses a larger hook for the blanket motifs and a smaller hook for appliqués. Work to the gauge required by the supplied yarn and hook combination.
Useful Abbreviations
- ch: chain
- sc: single crochet
- hdc: half double crochet
- dc: double crochet
- tr: treble crochet
- sl st: slip stitch
- sc2tog: single crochet two together
- fsc: foundation single crochet
- RS: right side
- WS: wrong side
- rem: remaining
Materials You’ll Need
Bernat® Blanket™
Bernat® Blanket™ weighs 10.5 oz / 300 g and contains 220 yds / 201 m per ball.
- Main Color (MC) Vintage White (10006): 5 balls or 1025 yds / 937 m
- Contrast A Malachite (10802): 1 ball or 135 yds / 123 m
- Contrast B Clary Sage (11018): 1 ball or 121 yds / 110 m
- Contrast C Crimson (10786): 1 ball or 128 yds / 117 m
- Contrast D Pink Dust (10956): 1 ball or 103 yds / 94 m
Bernat® Velvet™ Minis™
- Bernat® Velvet™ Minis™: 1 kit
- Kit contents: 20 balls, each 1.2 oz / 35 g and 41 yds / 38 m
- Total kit amount: 25 oz / 700 g and 820 yds / 750 m
- Contrast E Burgundy Plum: 1 ball or 35 yds / 32 m
- Contrast F Twilight: 1 ball or 35 yds / 32 m
- Contrast G Blackbird: 1 ball or 28 yds / 26 m
- Contrast H Red: 1 ball or 14 yds / 13 m
- Contrast I Mushroom: 1 ball or 20 yds / 18 m
- Contrast J Chocolate: 1 ball or 4 yds / 3.5 m
- Contrast K Rich Blue: 1 ball or 18 yds / 16 m
- Contrast L Vapor Grey: 1 ball or 4 yds / 3.5 m
- Contrast M Snowy White: 1 ball or 4 yds / 3.5 m
- Contrast N Bleached Aqua: 1 ball or 9 yds / 8 m
- Contrast O Joyful Gold: 1 ball or 19 yds / 17 m
- Contrast P Velveteal: 1 ball or 20 yds / 18 m
Hooks and Notions
- Susan Bates® Silvalume® crochet hook, U.S. H/8 (5 mm)
- Susan Bates® Silvalume® crochet hook, U.S. L/11 (8 mm)
- Use the hook size needed to obtain gauge.
- Susan Bates® yarn needle
Complete Crochet Tutorial
Blanket: Motif 1
Make 4 alike. See diagram on page 3.
With MC and larger hook, ch 4. Join with sl st to first ch to form ring.
1st rnd: Ch 3. 11 dc in ring. Join. Fasten off MC. 12 dc.
2nd rnd: Join A with sl st to any dc. Ch 3. 1 dc in same sp as last sl st. 2 dc in each dc around. Join. 24 dc.
3rd rnd: Ch 3. 2 dc in next dc. *1 dc in next dc. 2 dc in next dc. Rep from * around. Join. Fasten off A. 36 dc.
4th rnd: Join MC with sl st to any dc. Ch 4 (counts as dc and ch-1).
2 dc in next dc. 1 hdc in each of next 2 dc. 1 sc in each of next 3 dc. 1 hdc in each of next 2 dc.*
2 dc in next dc. Ch 1. Rep from * twice more, then from * to ** once.**
1 dc in same sp as first st. Join with sl st to 3rd ch of ch-4.
44 sts and 4 ch-1 sps.
5th rnd: Sl st in next ch-1 sp. Ch 3. (1 dc. Ch 3. 2 dc) in same sp as last sl st.
1 dc in each st to next ch-1 sp.* (2 dc. Ch 3. 2 dc) all in next ch-1 sp.
Rep from * twice more, then from * to ** once. Join. 60 dc.**
Fasten off.
Blanket: Motif 2
Make 8 alike. See diagram on page 4.
With MC and larger hook, ch 4. Join with sl st to first ch to form ring.
1st rnd: Ch 4. 3 dc in ring. (Ch 1. 3 dc) twice in ring. Ch 1. 2 dc in ring. Join with sl st to 3rd ch of ch-4. 12 dc.
2nd and 3rd rnds: Sl st in next ch-1 sp. Ch 4. 2 dc in same sp as last sl st.
1 dc in each dc to next ch-1 sp.* (2 dc. Ch 1. 2 dc) all in next ch-1 sp.
Rep from * twice more, then from * to ** once.
1 dc in first ch-1 sp. Join with sl st to 3rd ch of ch-4.
44 dc at end of 3rd rnd.
4th rnd: Sl st in next ch-1 sp. Ch 6 (counts as dc and ch-3).
1 dc in same sp as last sl st.
1 dc in each dc to next ch-1 sp.* (1 dc. Ch 3. 1 dc) all in next ch-1 sp.
Rep from * twice more, then from * to ** once. Join with sl st to 3rd ch of ch-6.
52 dc and 4 ch-3 sps.
5th rnd: Sl st in next ch-3 sp. Ch 6. 1 dc in same sp as last sl st.
1 dc in each dc to next ch-3 sp.* (1 dc. Ch 3. 1 dc) all in next ch-3 sp.
Rep from * twice more, then from * to ** once.
Join with sl st to 3rd ch of ch-6.
60 dc and 4 ch-3 sps.
Blanket: Motif 3 Stripe Pattern
See diagram on page 5.
Stripe Pattern
- Motif 3a: Make 4: A B C D MC
- Motif 3b: Make 7: MC A MC B MC
- Motif 3c: Make 7: MC D MC C MC
With Color 1 and larger hook, ch 4. Join with sl st to first ch to form a ring.
1st rnd: With Color 1, ch 6 (counts as dc and ch-3). (3 dc. Ch 3) 3 times in ring. 2 dc in ring. Join. Fasten off Color 1. 4 groups of 3-dc clusters.
2nd rnd: Join Color 2 with sl st in any ch-3 sp. Ch 6.
3 dc in same sp as sl st. (3 dc. Ch 3. 3 dc) in next ch-3 sp. Rep from * twice more. 2 dc in first ch-3 sp. Join. Fasten off Color 2.
8 groups of 3-dc clusters.
3rd rnd: Join Color 3 with sl st in any ch-3 sp. Ch 6.
3 dc in same sp as sl st. 3 dc between next two 3-dc clusters.*
(3 dc. Ch 3. 3 dc) in next ch-3 sp. Rep from * twice more, then from * to ** once.
2 dc in first ch-3 sp. Join. Fasten off Color 3.
12 groups of 3-dc clusters.
4th rnd: Join Color 4 with sl st in any ch-3 sp. Ch 6.
3 dc in same sp as sl st. (3 dc between next two 3-dc clusters) twice.*
(3 dc. Ch 3. 3 dc) in next ch-3 sp. Rep from * twice more, then from * to ** once.
2 dc in first ch-3 sp. Join. Fasten off Color 4.
16 groups of 3-dc clusters.
5th rnd: Join Color 5 with sl st in any ch-3 sp. Ch 6. 3 dc in same sp as sl st.
(3 dc between next two 3-dc clusters) 3 times.* (3 dc. Ch 3. 3 dc) in next ch-3 sp.
Rep from * twice more, then from * to ** once. 2 dc in first ch-3 sp. Join. Fasten off.
20 groups of 3-dc clusters.
Blanket Assembly
Following the Assembly Diagram, join motifs into 6 horizontal strips, having 5 motifs in each strip, using Flat SL ST Join. Join 6 strips together.
Seaming With Flat Slip-Stitch Join
RS: With MC and larger hook, sl st motifs together, working through the back loops only and keeping the working yarn to the WS of the work to create a flat sl-st chain detail on the RS of the work. See diagram.
Appliqués: Bows
Make 2 in E and 2 in F.
With smaller hook, ch 16.
1st row: RS. 1 sc in 2nd ch from hook. 1 sc in each ch to end of chain. Turn. 15 sc.
2nd row: Ch 2. 1 hdc in each of first 5 sc. 1 sc in each of next 5 sc. 1 hdc in each of last 5 sc. Turn.
3rd and 4th rows: Ch 2. 1 hdc in each of first 5 hdc. 1 sc in each of next 5 sc. 1 hdc in each of next 5 hdc. Turn.
5th row: Ch 1. 1 sc in each st to end of row. Fasten off.
Appliqués: Tails
Make tails for each letter or note as given, following the pairings listed under Tie.
With smaller hook, ch 31.
1st row: RS. 1 sc in 2nd ch from hook. Sc2tog. 1 sc in each ch to last 3 ch. Sc2tog. 1 sc in last ch. Turn. 28 sts.
2nd row: Ch 1. 1 sc in first sc. Sc2tog. 1 sc in each sc to last 3 sts. Sc2tog. 1 sc in last sc. Turn. 26 sts.
3rd row: Ch 1. 1 sc in each st to end of row. Turn.
4th and 5th rows: Ch 1. 1 sc in first sc. 2 sc in next sc. 1 sc in each sc to last 2 sc. 2 sc in next sc. 1 sc in last sc. Turn. 30 sc at end of last row. Fasten off.
Appliqués: Tie
Make 1 tie; pairings below.
With smaller hook, ch 10.
1st row: 1 hdc in 2nd ch from hook. 1 hdc in each ch to end of chain. Fasten off, leaving a long tail. 9 hdc.
Appliqués: HO HO HO
Make 3 of each letter.
Letter H
Work side to side.
With smaller hook and G, ch 11.
1st row: RS. 1 sc in 2nd ch from hook. 1 sc in each ch to end of chain. Turn. 10 sc.
2nd row: Ch 1. 1 sc in each sc to end of row. Turn.
3rd row: Sl st in each of first 5 sc. Ch 1. 1 sc in same sp as last sl st. 1 sc in next sc. Turn. Leave rem sts unworked. 2 sc.
4th to 6th rows: Ch 1. 1 sc in each of first 2 sc. Turn.
7th row: Ch 5. 1 sc in 2nd ch from hook. 1 sc in each of next 3 ch. 1 sc in each of next 2 sc. Make 4 fsc. Turn. 10 sts.
8th row: Ch 1. 1 sc in each sc to end of row. Fasten off.
Letter O
Work in a round/ring.
With G, ch 18. Join with sl st to first ch to form ring.
1st rnd: Ch 1. 1 sc in same sp as sl st. 1 sc in next ch.
2 sc in next ch. 1 sc in next ch. Rep from * twice more.
1 sc in each of next 3 ch. Rep from * to once more. 1 sc in last ch. Join.**
24 sc.
2nd rnd: Ch 1. 1 sc in same sp as sl st. 1 sc in each of next 2 sc.
2 sc in next sc. 1 sc in each of next 2 sc. Rep from * once more. 2 sc in next sc.*
1 sc in each of next 5 sc. Rep from * to once.**
1 sc in each sc to end of rnd. Join. Fasten off.
Appliqués: Reindeer
See diagram on page 8.
Head
With smaller hook and H, ch 2.
1st rnd: 6 sc in 2nd ch from hook. Join.
2nd rnd: Ch 1. 1 sc in each sc around. Join. Fasten off H.
3rd rnd: Join I with sl st to any sc. Ch 1. 2 sc in same sp as sl st. 2 sc in each sc around. Join. 12 sc.
4th rnd: Ch 1. 1 sc in same sp as sl st. 2 sc in next sc. *1 sc in next sc. 2 sc in next sc. Rep from * to end of rnd. Join. 18 sc.
5th rnd: Ch 1. 1 sc in same sp as sl st. 1 sc in next sc. 2 sc in next sc.
*1 sc in each of next 2 sc. 2 sc in next sc. Rep from * to end of rnd. Join. 24 sc.
Continue working in rows for the head.
1st row: RS. Ch 1. 1 sc in each of first 8 sc. Turn. Leave rem sts unworked. 8 sc.
2nd row: Ch 1. 1 sc in first sc. Sc2tog. 1 sc in each sc to last 3 sc. Sc2tog. 1 sc in last sc. Turn. 6 sts.
3rd row: Ch 1. 1 sc in each st to end of row. Turn.
4th row: Ch 1. 1 sc in first sc. (Sc2tog) twice. 1 sc in last sc. Turn. 4 sts.
Do not fasten off. Continue for edging as follows.
1st rnd: RS. Ch 1. 1 sc in each of first 4 sts. Working around sts at end of rows,
1 sc in each of next 2 rows. Ch 5. 1 sc in 2nd ch from hook. 1 hdc in next ch. 1 dc in next ch. 1 sc in last ch ear made. 1 sc in each of next 2 rows.*
Working into unworked sts of 5th rnd, (1 sc in each of next 3 sc. 2 sc in next sc) 4 times. Working around sts at end of rows, rep from * to **. Join. Fasten off.
Antlers
Make 2.
With smaller hook and J, ch 12.
1st row: Sl st in 2nd ch from hook. 1 sc in next ch.
*Ch 4. Sl st in 2nd ch from hook. 1 sc in each of next 2 ch. 1 sc in each of next 4 ch of foundation ch. Rep from * once more. 1 sc in last ch. Fasten off, leaving a long tail.
With long tails and yarn needle, sew antlers to WS of head, positioned just above the ears and with points facing outwards, as shown.
With G, embroider eyes to the head over the 1st and 2nd rows, using Satin Stitch, as shown.
Appliqués: Round Ornament
With smaller hook and K, ch 2.
1st rnd: 6 sc in 2nd ch from hook. Join.
2nd rnd: Ch 1. 2 sc in same sp as sl st. 2 sc in each sc around. Join. 12 sc.
3rd rnd: Ch 1. 1 sc in same sp as sl st. 2 sc in next sc.
*1 sc in next sc. 2 sc in next sc. Rep from * to end of rnd. Join. 18 sc.
4th rnd: Ch 1. 1 sc in same sp as sl st. 1 sc in next sc. 2 sc in next sc.
*1 sc in each of next 2 sc. 2 sc in next sc. Rep from * to end of rnd. Join. 24 sc.
5th rnd: Ch 1. 1 sc in same sp as sl st. 1 sc in each of next 2 sc. 2 sc in next sc.
*1 sc in each of next 3 sc. 2 sc in next sc. Rep from * to end of rnd. Join. 30 sc.
6th rnd: Ch 1. 1 sc in same sp as sl st. 1 sc in each of next 3 sc. 2 sc in next sc.
*1 sc in each of next 4 sc. 2 sc in next sc. Rep from * to end of rnd. Join. 36 sc.
7th rnd: Ch 1. 1 sc in same sp as sl st. 1 sc in each of next 4 sc. 2 sc in next sc.
*1 sc in each of next 5 sc. 2 sc in next sc. Rep from * to end of rnd. Join. 42 sc. Fasten off.
Topper
With smaller hook, join L with sl st to back loop of any sc.
1st row: RS. Ch 1. Working in back loops only, 1 sc in same sp as sl st. 1 sc in each of next 4 sc. Turn. 5 sc.
2nd row: Ch 1. 1 sc in each sc to end of row. Turn.
3rd row: Ch 1. Sc2tog. 1 sc in next sc. Sc2tog. Turn. 3 sts. Fasten off.
Turn work so the topper is at the bottom. Join L with sl st to last remaining front loop of the 7th rnd of the ornament at the base of the topper.
Trim
1st row: *Ch 3. Sl st in next rem loop. Rep from * 3 times more. Fasten off.
With M, embroider a snowflake to the RS of the round ornament, using Straight Stitch as shown.
Appliqués: Pointed Ornament
To change color, work to the last 2 loops on the hook and draw the new color through the last 2 loops, then proceed in the new color.
With smaller hook and H, ch 5.
1st row: RS. Working into the bumps at the back of the chain, 1 sc in 2nd ch from hook. 1 sc in each ch to end of chain. Turn. 4 sc.
2nd row: Ch 1. 2 sc in first sc. 1 sc in each of next 2 sc. 2 sc in last sc. Turn. 6 sc.
3rd row: Ch 1. 1 sc in first sc. 2 sc in next sc. 1 sc in each of next 2 sc. 2 sc in next sc. 1 sc in last sc. Turn. 8 sc.
4th row: Ch 1. 1 sc in each sc to end of row. Join N. Break H. Turn.
5th and 6th rows: With N, ch 1. 2 sc in first sc. 1 sc in each sc to last sc. 2 sc in last sc. Turn. 12 sc at end of 6th row.
7th and 8th rows: Ch 1. 1 sc in each sc to end of row. Join H at end of 8th row. Break N. Turn.
9th to 12th rows: With H, ch 1. 1 sc in each sc to end of row. Join N at end of 12th row. Break H. Turn.
13th row: Ch 1. 1 sc in first sc. Sc2tog. 1 sc in each sc to last 3 sc. Sc2tog. 1 sc in last sc. Turn. 10 sts.
14th row: Ch 1. 1 sc in each st to end of row. Turn.
15th to 18th rows: Rep 13th and 14th rows twice more. 6 sts at end of 18th row. Join H at end of 18th row. Break N. Turn.
19th row: With H, ch 1. Sc2tog. 1 sc in each of next 2 sc. Sc2tog. Turn. 4 sts.
20th row: Ch 1. (Sc2tog) twice. Turn. 2 sts.
21st row: Ch 1. Sc2tog. Fasten off.
Topper
Join L with sl st to back loop of first foundation ch.
1st row: RS. Ch 1. Working in back loops only, 1 sc in same sp as sl st. 1 sc in each of next 3 ch. Turn. 4 sc.
2nd row: Ch 1. 1 sc in each sc to end of row. Turn.
3rd row: Ch 1. 1 sc in first sc. Sc2tog. 1 sc in last sc. Turn. 3 sts. Fasten off.
Trim
Turn work so the topper is at the bottom. Join L with sl st to last remaining front loop of the foundation chain at the base of the topper.
1st row: RS. *Ch 3. Sl st in next rem loop. Rep from * twice more. Fasten off.
Appliqués: Star
With smaller hook and O, ch 2.
1st rnd: 5 sc in 2nd ch from hook. Join.
2nd rnd: Ch 1. 2 sc in same sp as sl st. 2 sc in each sc around. Join. 10 sc.
3rd rnd: Ch 1. 1 sc in same sp as sl st. 2 sc in next sc.
*1 sc in next sc. 2 sc in next sc. Rep from * around. Join. 15 sc.
4th rnd: Ch 1. 1 sc in same sp as sl st. 1 sc in next sc. 2 sc in next sc.
*1 sc in each of next 2 sc. 2 sc in next sc. Rep from * around. Join. 20 sc.
5th rnd: *Ch 5. 1 sc in 2nd ch from hook. 1 hdc in next ch. 1 dc in next ch. 1 tr in last ch. Skip next 3 sc. Sl st in next sc star point made. Rep from * 4 times more, ending last rep with sl st into top of first sc of 4th rnd. Fasten off.
Appliqués: Tree
Work from top down. See diagram on page 11.
With smaller hook and P, ch 2.
1st row: RS. 3 sc in 2nd ch from hook. Turn. 3 sc.
2nd row: Ch 1. 2 sc in first sc. 1 sc in next sc. 2 sc in last sc. Turn. 5 sc.
3rd row: Ch 1. 1 sc in each sc to end of row. Turn.
4th row: Ch 1. 2 sc in first sc. 1 sc in each sc to last sc. 2 sc in last sc. Turn. 7 sc.
5th row: Ch 1. 1 sc in each sc to end of row. Turn.
6th row: Working in front loops only, sl st in each of first 2 sc. Ch 1. 1 sc in same sp as last sl st. 1 sc in each sc to last sc. Turn. Leave rem st unworked. 5 sc.
7th to 11th rows: Rep 4th and 5th rows twice more, then 4th row once. 11 sc at end of 11th row.
12th row: Working in front loops only, sl st in each of first 3 sc. Ch 1. 1 sc in same sp as last sl st. 1 sc in each sc to last 2 sc. Turn. Leave rem sts unworked. 7 sts.
13th to 16th rows: Rep 4th and 5th rows once more, then 4th row twice. 13 sc.
17th row: Ch 1. 1 sc in each sc to end of row. Fasten off.
Trunk
With RS facing, skip first 4 sc. Join J with sl st to back loop of next sc.
1st row: RS. Ch 1. Working in back loops only, 1 sc in same sp as last sl st. 1 sc in each of next 4 sc. Turn. Leave rem sts unworked. 5 sc.
2nd and 3rd rows: Ch 1. 1 sc in each sc to end of row. Turn. Fasten off.
Snow Appliqué Edging
With RS facing, join M with sl st to first remaining loop of 5th row.
1st row: Ch 1. 1 sc in same sp as sl st. 1 sc in each rem loop to end of row. Fasten off. 7 sc.
With RS facing, join M with sl st to first remaining loop of 11th row. Rep from * to * as given for 1st row. 11 sc.
With RS facing, join M with sl st to front loop of first st in 17th row. Working in front loops only, rep from * to * as given for 1st row. 13 sc.
Appliqué Finishing
With M, sew appliqués to the blanket as shown in the Placement Diagram.
With O and using Straight Stitch, embroider shine lines around the star appliqué as shown. Use Straight Stitch / Spoke Stitch.
Styling Your Handmade Crochet
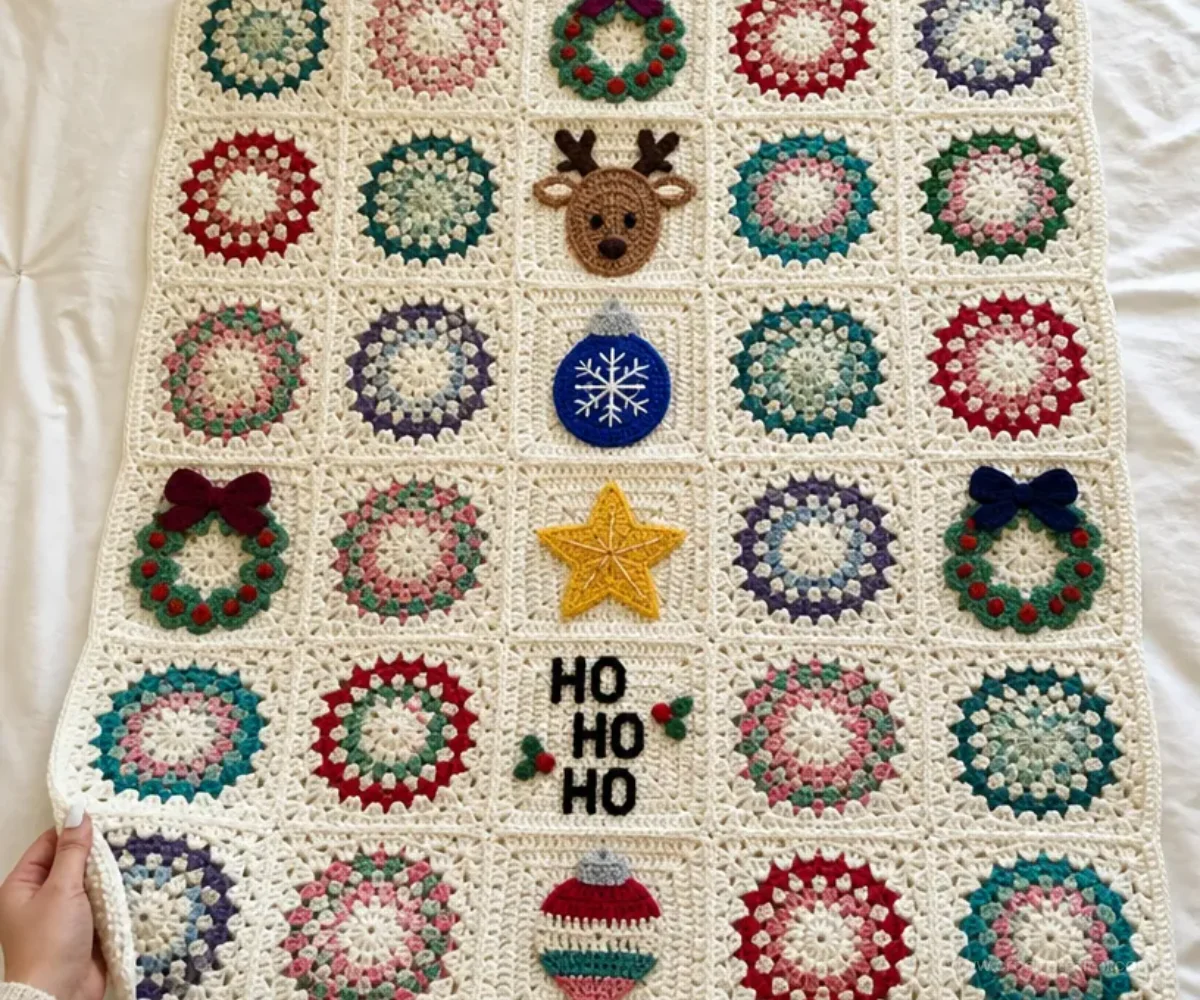
- Drape the blanket over the back of a sofa or accent chair during the holiday season.
- Fold it at the foot of a guest bed for a colorful Christmas layer.
- Use it as a festive family-room throw alongside stockings, ornaments, and other handmade décor.
- Give it as a seasonal wedding, housewarming, or family gift when the recipient enjoys handmade textiles.
- Display the appliqué side prominently so the lettering, reindeer, ornaments, and tree become the focal point.
- Pair its playful motif style with other handmade decorations, such as an appliqué-style crochet wreath adapted for a coordinated seasonal display.
Caring for Your Crochet Project
The blanket combines bulky yarn, velvet mini yarn, stitched appliqués, embroidered details, and flat seams, so handle it carefully.
- Follow the yarn manufacturer’s care instructions for the specific yarns used.
- Dust the blanket gently rather than pulling at appliqué edges or embroidered details.
- For small marks, use careful spot cleaning and avoid aggressive rubbing.
- Keep the blanket away from excessive heat, which may affect the yarn texture and the raised velvet details.
- Store it clean and completely dry in a cool, dry place.
- Fold loosely instead of compressing the appliqués for long periods.
- Avoid snagging the lettering, antlers, bows, and ornament trims on sharp furniture edges.
Tips for Better Results
- Track every motif type separately. Label completed motifs as Motif 1, Motif 2, 3a, 3b, or 3c so the assembly layout remains accurate.
- Count after every round. Motif 1 ends with 60 dc, Motif 2 ends with 60 dc and 4 ch-3 spaces, and Motif 3 ends with 20 groups of 3-dc clusters.
- Use the correct hook for each section. The larger hook is used for blanket motifs, while the smaller hook is used for appliqués.
- Watch loop placement. The tree uses front-loop work for shaping and snow, while the trunk and ornament toppers use back loops in specified sections.
- Secure color changes neatly. Fasten off the indicated colors and weave in ends before assembly whenever possible.
- Keep the appliqués flat while sewing. Pin or lightly position each piece before stitching so the blanket does not pucker.
- Check right side and wrong side. This is especially important for flat slip-stitch joining, antler placement, and embroidered details.
- Use the placement diagram. The appliqué arrangement is part of the finished design, so refer to it before permanently sewing pieces down.
For a contrasting project that also rewards careful stitch counting and neat shaping, this beginner-friendly mandala crochet pattern offers useful practice with rounds and organized colorwork.
Color and Styling Variations
The approved pattern uses Vintage White, green, crimson, pink, velvet jewel tones, and bright accent colors. Optional changes can personalize the blanket without changing the construction:
- Replace the dominant Vintage White with another light neutral for a softer or cooler background.
- Use traditional red and green throughout the striped motifs for a classic holiday palette.
- Try icy blues, snowy white, and silver-toned accents for a winter theme.
- Coordinate the velvet appliqué colors with existing tree ornaments or wrapped gifts.
- Make the bows in matching colors instead of contrasting E and F shades.
- Arrange the finished blanket with handmade floral décor, such as crocheted red roses, when creating a playful holiday-and-botanical display.
Changing yarn weight, fiber, or hook size may affect gauge, motif dimensions, texture, drape, and yarn requirements. Treat substitutions as optional and check the resulting motif size before making every component.
Frequently Asked Questions
Is this pattern suitable for a beginner?
It is most approachable for a crocheter who already understands basic stitches, joining rounds, color changes, and simple decreases. The large number of appliqués and the assembly layout require careful organization.
What yarn does the pattern recommend?
The blanket motifs use Bernat® Blanket™ in Vintage White and Contrasts A through D. The appliqués use Bernat® Velvet™ Minis™ in Contrasts E through P, with the specified quantities listed in the materials section.
Which hook sizes are used?
Use the U.S. H/8 5 mm and U.S. L/11 8 mm Susan Bates® Silvalume® crochet hooks, or the sizes needed to obtain gauge. The pattern specifies the larger hook for blanket motifs and the smaller hook for appliqués.
How many blanket motifs are made?
Make 4 Motif 1 pieces, 8 Motif 2 pieces, 4 Motif 3a pieces, 7 Motif 3b pieces, and 7 Motif 3c pieces. These are joined into six strips with five motifs in each strip.
Can the colors be changed?
Yes, color changes are an optional customization. Keep the color sequence organized for each Motif 3 variation, and remember that different yarns may change the motif size, texture, and yardage requirements.
How are the motifs joined?
Use a Flat SL ST Join. With MC and the larger hook, work slip stitches through the back loops only while keeping the working yarn on the WS to create a flat chain detail on the RS.
How are the appliqués attached?
With Contrast M, sew the appliqués to the blanket according to the Placement Diagram. Use Contrast O and Straight Stitch / Spoke Stitch to embroider the shine lines around the star.
How should the finished blanket be stored?
Store it clean and dry, folded loosely in a cool, dry place. Protect the velvet details, appliqué edges, lettering, and embroidery from snagging and excessive compression.
Conclusion
This Crochet Kooky Christmas Blanket Pattern brings together colorful motifs, soft velvet appliqués, and cheerful holiday imagery in one memorable handmade project. Keep the construction organized, count each round carefully, and use the placement diagram for the finishing details. For additional festive inspiration, explore this Bernat crochet Christmas blanket pattern and this Christmas hexagon blanket design.